Your Browsing History

Greg P.
Joined on 11/07/09
1
0
100%
100%


product reviews
- 105
ASRocks the M.2
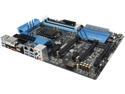
ASRock Z97 Extreme6 LGA 1150 Intel Z97 HDMI USB 3.0 ATX Intel Motherboard
Pros: ASRock has three color-coded tier’s of Z97 Chipset Intel motherboards. This one (Extreme6) is at the top end of the blue series. The tree tiers are: the OC board series (yellow) -- aimed at serious overclockers. The regular EXTREME series (blue) -- often with some sort of cutting-edge innovation. The FATALITY series (red) – designed for gaming. Intel’s Z97 chipset is a slight upgrade to the Z87 and H87 chipset series - primarily addressing storage interface technology. (the Z means it supports overclocking of unlocked processors, H does not). The biggest chipset upgrade is the support of M.2 (with two lanes). In addition, there is an upgraded version of Intel’s (SRT) which handles hybrid drives better; and there is SATAe support. The main innovative feature of this motherboard is the Ultra M.2 port. It offers PCIe 3.0 x4 bandwidth directly from the CPU. You should be able to get 4 GB per second storage bandwidth if you have a native PCIe 3.0 x4 SSD that can handle it. That should be more than 3 GB per second read/write (accounting for the overhead.) There is also a regular M.2 x2 slot provided by the Z97 chipset that is connected to the PCIe 2.0 lanes - just like on some other Z97 motherboards. See Other Thoughts if none of this makes sense. ASRock has a history of pushing motherboard innovations and pushing hardware limits. Overclock world records are frequently achieved with ASRock boards. The board looks nice, is well laid out, has some extra space for a bigger cooler if your ram sticks aren’t overly high. It uses all long-life 12K caps, and has a 3 year warranty. There are two LAN ports (Intel & Realtek). There are two removable BIOS chips, a BIOS selection switch, two digit debug, and on-board power & reset push-buttons. There is an interesting feature with an included cable called HDD Saver. This lets you hook up two SATA devices and control those devices’ power in the OS. The back panel has a ClearCMOS button. The Purity Sound 2 audio subsystem uses a separate PCB. The board came with 4 SATA cables. The BIOS has a Full HD UEFI mode. There is an easy, automatic overclock option using settings from ASRock based on their own testing. It is possible to disable onboard controllers to speed post times. The BIOS can be updated directly from the BIOS. You can choose which temp sensor is used to control fan power and adjust the various fan powers as needed. Customer support was responsive. The sturdy packaging protected the board even though the shipping box was rather crumpled.
Cons: Implementing the Ultra M.2 port runs up against the limits of the number of PCIe 3.0 lanes available direct to the CPU. So, if you use the Ultra M.2 port, your two PCIe graphics slots will be 8x and 4x instead of 8x and 8x. This may prevent you from using NVIDIA SLI since it requires two 8x slots. Crossfire will work fine. I couldn’t test this properly because I don’t have an M.2 x4 SSD. Don’t think anyone does yet. The only one I’ve ever seen on newegg (Samsung XP941) has been listed as out of stock every time I looked.
Overall Review: To fully understand the pluses, minuses, and innovation of this board, you need to know the basic features of the Haswell CPU/GPU plus Z97 Chipset. The CPU connects directly with 4 things: 16 PCIe 3.0 lanes, DDR3 RAM, up to triple display support, and the Z97 Chipset. The Z97 Chipset connects to 18 I/O lanes of which up to 8 can be PCI Express 2.0 lanes, up to 6 can be USB 3.0 ports, and up to 6 can be SATA 6G (this does not add up to 18 because two lanes can choose to be either USB3 or PCIe and two lanes can choose to be either SATA or PCIe). In addition, Z97 connects to: Intel Integrated MAC, the Firmware, Intel Rapid Storage Technology,and Intel High Definition Audio. Historically, the main bottleneck in PC performance has been moving data in and out of disk storage. With SSD’s we’ve progressed past parallel ports, IDE, 3GB SATA, and 6GB SATA -- to using what was traditionally the graphics pipeline: the PCI bus. The Z97 chipset supports the M.2 connector (formerly known as the Next Generation Form Factor) SSD’s by using two of the available 8 PCIe 2.0 lanes. Many of the new Z97 boards support this. ASRock blows this out of the water by adding something they call an Ultra M.2 port. The Ultra M.2 port uses 4 of the 16 PCI3 3.0 lanes that go directly to the CPU. That leaves an 8x slot and a 4x slot for PCIe 3.0 graphics. The downside is if you use that Ultra M.2 slot you won’t be able to SLI (but CrossFire is OK with no noticeable degradation). If this M.2 thing catches on, and it probably will, it would be nice for Intel to increase the direct-to-CPU lanes in upcoming processors. ASRock provides other additional ports not directly supported by the Z97 Chipset by using hubs and controllers. For instance, there are 10 USB 3.0 ports: four from the chipset, two from a ASM1042e controller, and four from an ASM1074 hub. There is a PCIe Gen 2.0 switch that splits one upstream port into: two PCIe 2.0 x1 slots and four SATA 6 ports. The only issue I have with this board is that its main defining characteristic is to take advantage of a technology for which hardware is not yet commonly available. Yet, you still get 10 USB 3.0 ports, 10 SATA ports, dual NICs, and enhanced audio for a really, really good price (on top of the two M.2 slots) from a quality company that is always on the cutting edge.
6/18/2014See more detail
9 months.
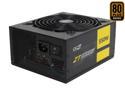
PC Power & Cooling ZT Series 550 Watt 80+ Bronze Fully-Modular Active PFC Performance Grade ATX PC Power Supply (OCZ-ZT550W)
Pros: Modular, looks nice, quiet.
Cons: Ran 9 months then failed. Only hooked to a low power Backup file server MB plus 6 drives. Took one 3TB drive down with it on failure. Was hooked to APC Smart-UPS rack so line power surge was not an issue.
Overall Review: Stuff happpens with all power supplies. Now we see what customer service is like. Prior experiences with this company have been good.
6/28/2013See more detail
Great non-subscription Adobe option

Adobe Photoshop Elements & Premiere Elements 2024 for Windows - Download
Pros: This is a great option for Adobe image/video software, especially if you can get seasonal discount pricing and don't want to pay a monthly subscription costs for Creative Cloud apps. Getting both Elements Photoshop and Elements Premiere together will save more money than buying separately. An extended free trial is available. REVIEW STARTS HERE AND CONTINUES IN "OVERALL REVIEW" BELOW --> WHAT IT IS: Software with a perpetual license having many features of the Pro versions of Photoshop, Lightroom, and Premiere. The Pro versions, for some years now, are only available by subscription - Adobe Creative Cloud - and are too expensive for most normal people (about $720/year) unless you use them for your business. WHO IS IT FOR: I think this software combination is a great option for a non-pro and maybe even a part-time pro who doesnt shoot every still photo in RAW. You can activate the programs on two computers and then only use one at a time. (Laptop at photo site, Desktop at home.) There is a beta phone (not tablet) app and a beta web app along with either 2 or 5Gb of free Adobe storage for sharing and transferring media into the program. (The manual says you get 2 Gb but I got 5 Gb.) It is perfect for family members who are responsible for collecting and sharing memories because of the automated curating, sharing, tagging, and face recognition features. Great for scanning old photos and slides. It also can directly upload to social media, printing services, and sharing on Adobes cloud storage. Most images today are taken by consumer-oriented imaging devices (phones, and non-pro cameras). Almost everything a non-pro needs is done faster and easier with ELEMENTS compared to the pro tools and for a lot less $$$. There are many short Adobe video tutorials as well as a lot of handholding in the programs themselves if you need it. The pro tools need hours and hours of learning time and well developed work flows to use them effectively. INSTALLATION: It took me a bit over half an hour to install, it requires online access, an Adobe ID login, and there is also a translation between a registration code to the required serial numbers that has to happen online. eLIVE: From an initial launch screen (called eLive), you can choose to launch Organizer, Photo Editor, Video Editor. There is a light and dark mode for each of these. ORGANIZER: The Organizer is shared between the image and video editing applications if you bought both applications. It stores your photos and videos in one or more catalogs and syncs with Adobe cloud storage. The Organizer imports images from folders, removable storage, scanners, or via the phone app. It organizes by date, people, places, and events. It does not appear to move,copy, or delete the original image files unless you specify. It will not alter a RAW image. You can include such AI features as Auto Curation (pick best photos from a group), facial recognition, and auto-tagging. The AI recognizes many things (like dogs, sunsets, colors and specific people). From within the organizer you can share, produce slideshows, and access Adobe cloud storage. In addition to manual or auto-tagging, you can also rate on a star scale. Photos can be organized into Albums without moving the original files. The Elements data/catalog can be imported into Lightroom if you decide to upgrade to that product in the future. During import, thumbnails can be generated, automatic rotation applied, and red-eye correction done. After import, several automatic image corrections and effects can be applied from within the organizer without opening the editors. This is called Instant Fix. Much of the automated organization also applies to video files including curation, facial recognition, and auto-tagging for a consistent experience no matter the media. ORGANIZER vs LIGHTROOM Consider the ORGANIZER to have features similar to LIGHTROOM minus the transparent RAW image Develop module. Instead, Organizer uses a Camera Raw plug-in module like Photoshop does. Lightroom was developed primarily for photographers after the digital SLR revolution happened. Photoshop was only really good at dealing with one image at a time. Professional photographers usually take hundreds of new images every day, most of which only require small, quick adjustments. The main work involved is proper organizing, tagging, and rating the photos. The Elements Organizer is very similar to Lightrooms organizing and labeling features. What ORGANIZER does not have is Lightrooms RAW image workflow. Many photographers (not me) shoot RAW images and use Lightroom (rather than their expensive cameras) to process the RAW files into something printable. Examples of raw file extensions are .NEF (Nikon), .CR2 & .CRW (Canon). Lightroom allows for efficient import and non-destructive editing of these huge RAW files (each underlying RAW file is never changed and treated like a film negative to be developed.
Cons: There are no cons at this price range. You get a huge Adobe feature set and a complete consumer level solution including phone app, free storage, and Adobe stock.
Overall Review: --> CONTINUED FROM REVIEW STARTED IN "PROS" Opening a Camera Raw file in Elements the first time will trigger a download of Adobe Photoshop Elements Add-on Utilities 2024 with the Camera Raw Editor plug in. You can also choose to do this download from the menu. The Camera Raw Editor is similar to the one in Creative Suite Photoshop except it has less tools and image adjustment tabs (like lens corrections). After applying settings to develop the raw image, Camera Raw Editor can then pass the developed picture into the Photo Editor for further editing. PHOTOSHOP ELEMENTS PHOTO EDITOR The ELEMENTS photo editor is aimed at the family or hobbyist photographer. Many common photography tasks can be automated for an easy and efficient work-flow. There are three edit modes: Quick, Guided, & Advanced (used to be called Expert). Advanced provides access to many photoshop specific editing features such as layers, effects, filters, masks, brushes, and scripted actions. There are interesting AI capabilities which are branded Adobe Sensei AI. These include adjustment of facial features, automatic colorization, one-click subject or background selection, color matching, and adding animation to still photos. Various creations are possible including Photo Reels with standard presets for Instagram, Facebook, YouTube, TikTok, Snapchat, Twitter, and Threads. There is free access to Adobe Stock media. (BTW most of the automatic features only work on 8 bit per color depth images - if you dont know what that means you dont need to worry about it.) ELEMENTS VS PHOTOSHOP The full version Photoshop is a monster of a tool that was not initially aimed at photographers but did everything you might need to alter any image composed of pixels. It first came out well before professional digital photography. Ive used every version of PS since the first one - on both Macs and Windows - and still use only a fraction of what it can do. Also, each version cost me up to a thousand bucks before it went to a subscription model. Elements in Advanced mode feels like photoshop with just the features normal people would use. Batch processing of files allows for only 4 possible quick fixes. Actions comes with many Adobe-created actions but does not allow for new automated Actions to be recorded. However, Action files created outside the program (like in Photoshop Pro) can be imported. ELEMENTS VS LIGHTROOM The Quick and Guided editing modes feel more like Lightroom than Photoshop. They are designed for photographers who dont shoot RAW as their main format, want fast results, and want to process many images quickly without having to research Photoshop features. PREMIERE ELEMENTS VIDEO EDITOR Video development changes faster than still images and requires a lot more computer processing power for rendering. There is so much to consider when using video as a medium including the various aspect ratios, multiple input/output formats, data bandwidths, social media requirements, and the computer time required to render output. Sometimes you need to do editing where the various source clips are all of different formats. Elements supports up to 4k @ 60 fps output. Three different editing modes are provided: Quick, Guided Edit, and Advanced - just like Photoshop Elements. Until recently, Premiere Elements had been stagnating as just a stripped down version of Pro but that has changed dramatically. The big trick has always been making video editing easier for the normal consumer. I think Adobe has succeeded. In addition to a lot of handholding wizards, Elements has many very interesting fully automatic and partially automatic tools which make working with video so much easier than just a few years ago. For instance, there is an audio module that adjusts the tracks to sync with the video. There is an auto-reframe option to keep the subject in frame while changing aspect ratios for different output requirements (think of YouTube vs Instagram vs Facebook). There are guided edits for automatic shadows and highlights. Smart Trimming. Animated overlays (like butterflies). Time lapse video. Video-in-video effects. Video collages. Adobe provides a large amount of stock audio. A complete novice can use this and come out with professional results. (One of the most common FAQs on the internet is whether the program can work as a screen recorder. It does not.) Ive used Premiere Pro since it came out and have used Elements v8, Elements 2018, and now 2024. This is the best version yet and is perfectly aimed at its target audience. PICS Pics: (Newegg allows 5 pics per review): eLive->OrganizerLightMode->OrganizerDarkMode_InstantFix, PSQuick, PSGuided, PhotoReel, PSAdvancedDarkMode.
11/17/2023See more detail
One of the smallest cases that will fit a 360 mm AIO and a full-size 3 slot graphics card
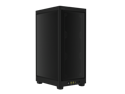
CORSAIR iCUE 2000D RGB AIRFLOW Mini-ITX PC Case - Black - Mini-ITX Form-Factor - Steel Mesh Panels iCUE Lighting Node CORE Controller
Pros: Fits a 3 slot GPU Fits a 360mm radiator Final appearance looks stylish but low key. Its really a fairly big case with a small footprint so its less frustrating to build than some of the other small cases out there. 3x iCUE low profile fans with hub and controller which makes the overall case price quite good. 3 unused slots in the controller and fan hub Nice location of front panel ports at the bottom of the case Some builds can be very quiet
Cons: Cable management can be difficult with the atypical locations and orientations of some of the components compared to a big case. This smaller form factor tends to be a bit more expensive and requires some specific components like Mini-ITX mb, SFX psu. A three slot GPU fits but it comes within a couple mm of the back of the case. The back of the case that faces the graphics card fans doesnt have the best airflow porosity. Power supply cord is routed outside of the case. Motherboard I/O faces down and can be annoying if you need to access that area frequently. As in the Pros, this is a biggish case for SFF which used to be defined as 20 L. This case is 24.8L including the feet. It depends on your perspective as to whether this is a pro or con. It is a pro for first-time builders of smaller case PCs. No spot for a 3.5 drive without modding. Space for three 2.5" drives but mounting hardware only included for two.
Overall Review: The name of this product describes it pretty well. Corsair - company known for high-end gaming and enthusiast components. Kept a mostly consistent logo and identity since the mid 90s. Seeing their logo on something generally gives me a good feeling about buying it. iCue - software providing some incentive to use other Corsair peripherals with single point control of RGB lighting, fan speeds,keyboard macros, headset audio settings... 2000D - the bigger the number, the bigger the case in the lineup - 4 versions avail. Airflow RGB - mesh everywhere (except back and bottom), 3 RGB fans and hub plus controller included. Mini-ITX - only for miniITX. The case at first glance may be a bit of a surprise because most components are either rotated 90 degrees from what you are used to or are switched top-bottom to be able to fit both a 360mm CPU AIO and a 3 slot GPU. This type of build seems to be the main use-case for the case. Front panel ports and buttons are on the bottom front - 2x USB 3.2 Type A, one Type-C USB and a 3.5mm combo audio jack. Accessories: screw pack, cable ties, black power supply extension cable. Big for a mini-ITX case tall but has a small desk footprint with tall feet which help with GPU exhaust. Front steel mesh panel comes off with ball snaps revealing three low profile RGB fans with cable-protecting grills. Top mesh panel is secured with magnets. Underneath is an opening for the psu plug/switch/exhaust and screw holes for a 2.5" drive. Left and right panels come off with hook tabs and thumb screws. Under the left panel you see the psu bay and the back-side of the motherboard with multiple zip tie points. Under the right side panel there is a removable radiator mounting rack. Deep to that rack is the back of the psu bracket and motherboard mounts. The motherboard I/O ports point downward and the vertically oriented memory slots clear the low profile front fan grills. Toward the back of the case is the vertically mounted GPU with the power plug edge pointing toward you. The GPU fans face the case back. The case back is composed of perforated case metal with a magnetically secured dust filter that can slide up for removal. If you use a three slot graphics card, the cards fans will almost touch the case back. There are mounting points for two low profile fans or a 240 mm radiator which will only work if you have a low profile GPU. The power supply must be SFX size installed with the plug/switch/exhaust facing up in the removable bracket. The psu extension-cable then plugs into the supply, is secured under the mesh top and the outside of the case back. There is one 2.5 SSD bracket on the back of the power supply bracket with two possible places to secure it The third possible spot for a 2.5 drive is under the roof of the case. The bottom of the case has a plastic L-shaped panel to access the downward-facing motherboard I/O ports and the downward facing graphics card ports. Cable exit is via a rectangular hole in the back of the case. Frequent access to any of the ports would be painful. Fan hub and Lighting Node Core controller cards are mounted to the case roof and use 2 SATA power and a USB cable. There are 3 extra slots available for controlling up to six RGB fans. The removable mount under the right mesh panel accommodates: up to a 360 mm AIO, 3x 120 mm fans, or 2x 240 mm fans. Without a radiator there is a lot of space for a CPU air cooler. Install tip for normal sized hands - pull the front fans while installing a 360mm AIO with the MB already in place. I can imagine there can be quite a difference in noise based on build decisions in these smaller cases. The 2000D easy-build seems to be designed for: a 360mm AIO like the Corsair iCUE H150i RGB ; a full size graphics card with some clearance between the card and the case. This can be very quiet. The advantage of the Corsair iCUE H150i RGB would be that it could use the remaining three open RGB controller slots that come with the case. I would suggest setting the radiator fans for exhaust flow. Using an air cooled CPU cooler would tend to push hot air from the front fans back toward the GPU. The design of the case back does not seem to be optimal for incoming air for GPU cooling - so some of the GPU cooling must come from case air coming in elsewhere. This single AIO build would then have airflow incoming from the front (included fans) and back (gpu fans) while going out the top (psu), bottom (graphics card exhaust), and the right (radiator). After a build, the inside can look like spaghetti, but no one will see.
9/2/2023See more detail
Excellent DDR5
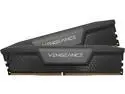
CORSAIR Vengeance 32GB (2 x 16GB) 288-Pin PC RAM DDR5 5200 (PC5 41600) Desktop Memory Model CMK32GX5M2B5200C40
Pros: Cost effective module from an excellent company for the new DDR5 bus if you can find it in stock anywhere. Also nice that it looks like a work of art, is low profile, no annoying RGB lights in this version. This module is available at various speeds and latencies. Lowest current available latency for Vengeance is 32. Highest available Vengeance rated speed is 6600 MHz. The speed is now marked via a label on the front of the packaging. The DDR4 vs DDR5 decision is easier now that prices have come down on DDR5. From March 2021 to October 2022 prices have dropped about 50%. I have 32GB at 5200MHz at CAS40 latency.
Cons: none for this product. As far as DDR5 modules over 4800MHz go, you will have to remember to enable XMP via the BIOS just to get to the best base performance of your RAM (method depends on the motherboard). Manual overclocking DDR5 (with XMP disabled) can be more difficult to do than DDR4.
Overall Review: Corsair is an excellent, gaming-oriented company and has a lifetime warranty on this memory. If you dont know about this DDR5 vs DDR4 thing heres what its about: Double Data Rate SDRAM fifth generation became mainstream with 12th gen Intel CPUs (Adler Lake) and 6000 series AMDs. The Double Data Rate naming means the bus is transferring on both the up and the down end of each clock cycle so the MHz labeling is twice the clock rate. Compared to DDR4, DDR5 has: the potential of higher clock rates (DDR4 is usually 800 - 1600, DDR5 runs about 1600 - 4200) - so higher data rates, quadruple the maximum die density for the DIMM modules on the board, and then each DIMM has two data channels instead of one. DDR4 and DDR5 motherboard slots are not compatible. DDR5 modules do their own power management. DDR4 modules have power managed by the motherboard. DDR5 runs on 1.1V and DDR4 runs at 1.2V. DDR5 also has a couple thermal sensors on each stick. Even though the new processors are compatible with both DDR4 and DDR5 RAM, the motherboard will determine which type of slots are available. There are currently no hybrid motherboards I know of with both DDR4 and DDR5 slots, so you have to pick $$ vs future proofing. It is probable that future intel 14+ series and AMD series will drop DDR4 support DDR5 has a higher latency. The number for that is CAS (Column Address Signal) and reported as CLxx in the module name. A lot of DDR5 modules have CL40 while many DDR4 modules are better at CL20. So a DDR5-4800-CL40 module might have similar performance to a DDR4-3200-CL20 for many workloads.
10/22/2022See more detail
Popular PSU in the Value Sweet Spot
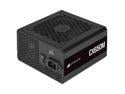
CORSAIR CX-M CX650M 650 W ATX12V / EPS12V 80 PLUS BRONZE Certified Semi-Modular Power Supply
Pros: This is a newer version of the affordable CX650M PSU which is one of the most popular mid-range, 650W semi-modular power supplies. The improvements seem to be primarily the improved appearance of the case and the upgrade from a sleeve bearing to a rifle bearing fan. Efficiency is better than 85% in a range from about 150 Watts to 500 Watts (at 120V). In this price range the efficiency looks a bit like a bell curve (it's not linear). It appears that the internals have changed a wee bit as well as the case in this update. Its a solid build with Corsair specific design. The components are pretty decent which means better life at higher temperatures. One of the chip changes is a Power Integrations TNY290PG Off-Line Switcher. 5 year warranty. The 120 mm fan is quiet. At room temp, using my laser tach, it clocks in the 600's till above around 300W. Then it ramps to around 2000 RPM at 600W. Good noise profile unless you run it hard. The older version would bottom out in the 800's. No change in cables or the 140mm case depth from the last model: two sleeved, blacked-out native cables, 5 flat ribbon-style modular cables of decent length with 115mm between the SATA connectors and 100mm between the molex. Nice warning on the case about using Corsair modular cables (modular cables tend not to have standardized plugs on the PSU side).
Cons: The fan has to always run at low RPM because reasonably priced power supplies are inefficient when running below around 10% capacity. Single EPS connector. Both this version and the older version are available without a name or model change which may make ordering confusing - especially when a google search for this model name preferentially links to the older version on the Corsair website. I asked Corsair pre-buy support as to what the changes were for this years model. It appeared to confuse them. There were no blog posts or announcements regarding how this model is different from last years model.
Overall Review: Hits the sweet spot for value and power when building a typical PC with one decent graphics card. It's worth getting the best PSU you can afford, especially if you have a top end graphics card and play games. The gaming-associated power fluctuations (as well as ripple on cheap PSUs) can eat up the capacitors on your mother board and elsewhere. See my pics for some internal shots of the new board and fan if you know what to look for regarding quality of capacitors and general design and layout.
4/22/2022See more detail