Installing a CPU is one of the most essential steps in building or upgrading a computer. While it may seem intimidating at first, understanding the basics can help you avoid damaging sensitive components, especially the delicate pins on the motherboard or processor. This guide will walk beginners through the process of installing a CPU, whether Intel or AMD, safely and accurately. With clear steps and tips on socket compatibility, proper alignment, and safe handling, you will be equipped with all the knowledge you need to set your system up for success.
Why Proper CPU Installation Matters
Installing a CPU incorrectly can lead to serious issues—from bent pins and system instability to complete boot failure or permanent hardware damage. A misaligned processor, too much pressure, or incompatible socket types can all cause problems that are costly to fix.
One of the most common challenges during installation is aligning the CPU correctly with the motherboard socket. Fortunately, most modern CPUs and sockets are designed with visual indicators to make this easier. Look for a gold triangle on one corner of the CPU and align it with the matching triangle or notch on the motherboard socket. These indicators ensure proper orientation and help prevent misalignment.
Tools and Materials You’ll Need
- Compatible CPU (Intel or AMD)
- Motherboard (the main circuit board your components connect to)
- Thermal Paste (a special compound that helps transfer heat from the CPU to the cooler; sometimes pre-applied)
- Anti-static wrist strap (optional to protect your PC parts from static electricity)
- Clean, static-free workspace (away from carpet and clutter)
- Phillips-head screwdriver (may be needed to secure motherboard later)
Before You Begin: Important Safety Tips
- Discharge Static Electricity: Before handling any components, always ground yourself to avoid damage. Use an anti-static wrist strap or touch a metal object to remove static electricity.
- Handle Components by the Edges: Avoid touching pins or metal contacts. Oil and static on yourself can damage parts.
- Work in a Clean Environment: A tidy surface minimizes the risk of losing screws or damaging components.
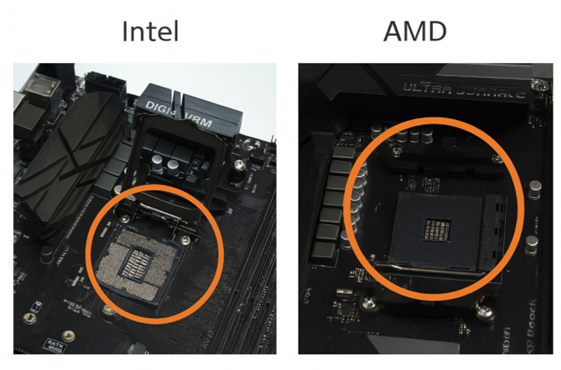
Understanding CPU Sockets: Intel vs AMD CPUs
When learning how to install a CPU, the first step is to identify whether you are working with an AMD or Intel processor. Each brand requires a slightly different installation method, so knowing which one you have helps you follow the correct steps, avoiding mistakes.
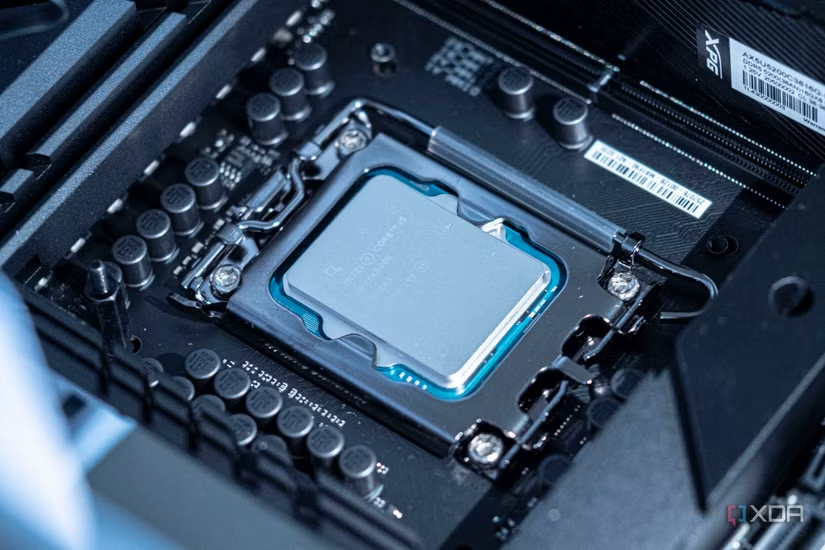
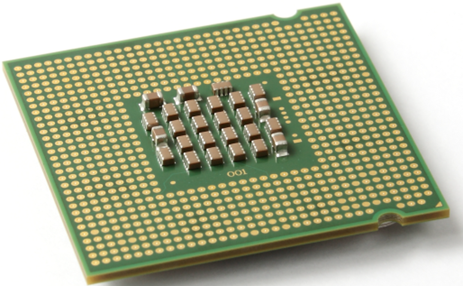
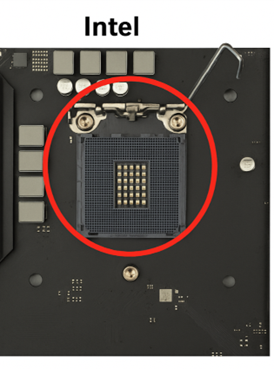
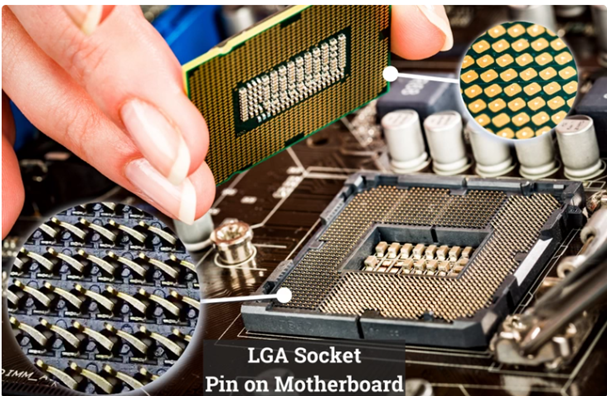
Intel CPUs (LGA Socket)
- LGA stands for Land Grid Array.
- The pins are built into the motherboard, not the CPU.
- The CPU has gold contacts on the bottom instead of pins.
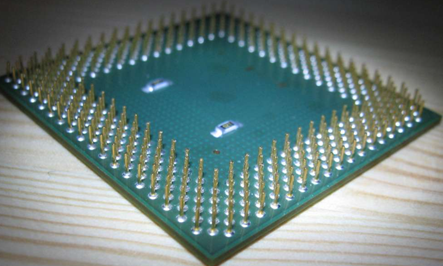
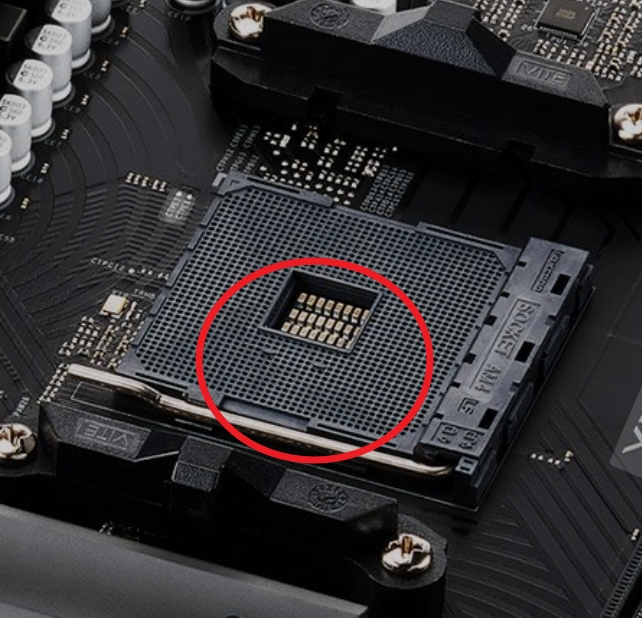
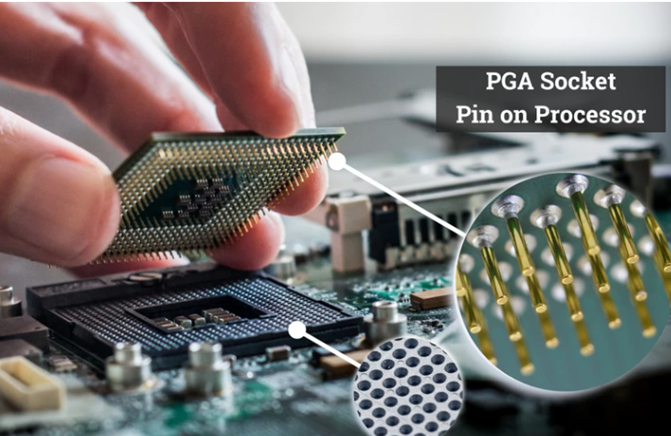
AMD CPUs (PGA or LGA Socket)
- PGA stands for Pin Grid Array. Here, the pins are on the bottom of the CPU.
- Some newer AMD chips (like AM5) also use LGA, like Intel, with pins on the motherboard.
- Be extra careful with PGA processors—bent pins are common with improper handling
Step-by-Step CPU Installation Instructions
Step 1: Prepare Your Workspace
- Set up on a flat, static-free table, away from the carpet.
- Lay the motherboard on its anti-static bag or clean, non-metallic surface.
- Wear your anti-static wrist strap if you have one.
Step 2: Locate the CPU Socket
- Find the large square socket on your motherboard.
- Intel: Find the hinged metal bracket.
- AMD PGA: Locate a plastic arm that lifts.
- AMD LGA: Same as Intel, find the hinged metal bracket.
Step 3: Open the Socket Mechanism
- Intel: Push the metal arm slightly out, then lift it all the way up. The top bracket will open.
- AMD AM4 Socket: Lift the lever to unlock the socket, allowing you to open the cover.
- AMD AM5 Socket: Use the same method as Intel. Push down on the lever and then pull it outwards, away from the socket, to release the tension on the retention bracket
Step 4: Align the CPU
- Carefully position the CPU over the motherboard socket, using the alignment markers as a guide. Once the parts are lined up, gently lower the CPU into place.
- The CPU should fit naturally into the socket with the right orientation and alignment. Double check your alignment to see if it is incorrect. Strongly avoid using excessive force.
- Once the CPU is properly aligned, let it settle evenly into the socket. Do not push or adjust anything once it’s in place. Then, carefully identify and engage the socket’s locking mechanism. This is usually a lever or latch that holds the CPU in place.
Step 5: Install the CPU
⚠️ Important: This is the most delicate step in the CPU installation process. A single bent pin—on the CPU (AMD PGA) or motherboard socket (Intel/AMD LGA)—can prevent your system from working and void warranties. Take your time, double-check alignment, and never force the CPU into place.
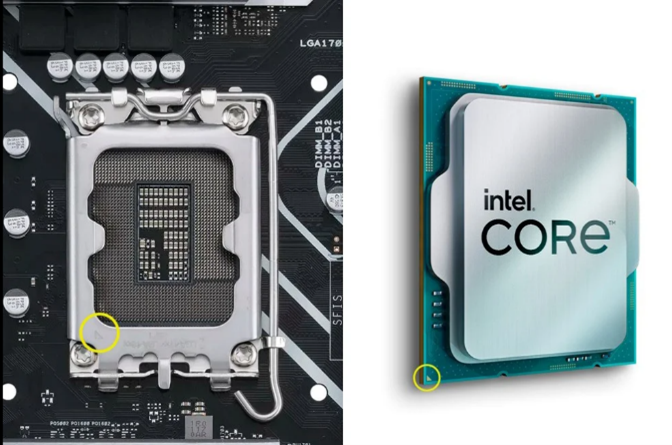
- Intel (LGA Socket – Pins on Motherboard):
The CPU will only fit in one way, so use the gold triangle and socket corners to guide alignment. Do not press the CPU down—it should sit flat on its own once properly aligned. Check all four edges to confirm it’s sitting evenly, then lower the metal retention arm and bracket until it clicks into place.
- AMD PGA (Pins on CPU – Socket Holes on Motherboard):
Hold the CPU gently by the edges and align the golden triangle on the corner of the CPU with the triangle on the socket. Do not angle or wiggle the CPU while lowering it—this is how pins get bent. The CPU should fit in effortlessly. If it doesn’t, lift it and check the alignment again. Once seated properly, lower the plastic arm to secure it.
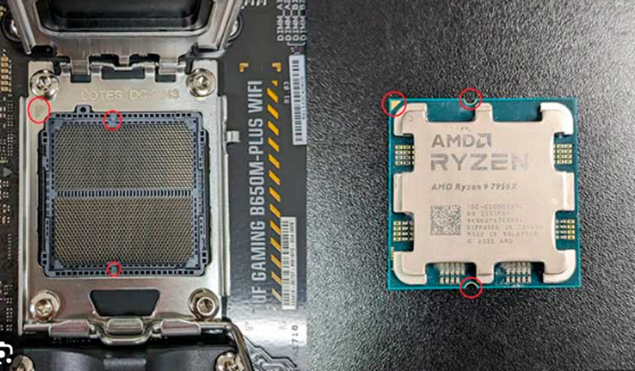
- AMD LGA (Pins on Motherboard:
Use the same careful approach as Intel. Align the processor with the socket notches. Lower the CPU gently, being careful not to press or force it. Then, close the socket bracket and locking arm to secure it in place.
Pro Tip:
If you’re unsure whether the CPU is aligned, don’t guess. Lift it straight up and try again. Forcing the CPU into the socket is the number one cause of bent pins, permanently damaging your processor and motherboard.
Step 6: Final Checks
After installing both the CPU take a moment to inspect all connections and ensure that everything is in place. Reconnect any components that were disconnected during the process, including power cables, memory modules (RAM), and any other hardware.
Before selling the computer case, it’s a good idea to power up the system and access the BIOS or UEFI settings. This allows you to confirm that the CPU is detected properly and operating as expected. The BIOS should display the processor model and relevant specifications, indicating a successful installation.
Once the CPU is correctly installed and verified, you can move forward with finishing the rest of your PC build or upgrade. Taking the time to follow each step carefully helps ensure that your CPU is properly seated and functioning optimally, contributing to overall system performance, stability, and long-term reliability.
Frequently Asked Questions (FAQs)
- How do I align the CPU correctly with the motherboard socket?
Most CPUs and sockets have alignment indicators—such as a gold triangle on one corner of the CPU and a matching mark on the socket. These should line up to ensure proper orientation before placement. - Should I apply force when inserting the CPU into the socket?
No. The CPU should sit gently into the socket without any force. If you feel resistance, remove it and recheck the alignment. Forcing it can bend the pins or damage the socket. - What is the locking mechanism on the CPU socket, and how do I use it?
The locking mechanism is typically a lever or latch that secures the CPU in place after installation. Once the CPU is seated, gently lower the lever until it clicks or locks into position. - What should I do if the CPU doesn’t fit into the socket?
Double-check the socket type (e.g., LGA1700, AM5) to ensure compatibility with your CPU. Then verify the orientation. If everything matches and it still doesn’t fit, do not force it—recheck the documentation or seek support. - Can I touch the bottom of the CPU or socket pins during installation?
No. Avoid touching the contact points or socket pins, as oils from your skin can interfere with connectivity, and pins can be easily bent. Handle the CPU at the edges only.
Conclusion
Installing a CPU onto a motherboard is a critical step in building or upgrading your PC. By following proper alignment techniques, handling components carefully, and securing the CPU correctly, you ensure optimal system performance and long-term stability. Always take your time, double-check each step, and refer to your motherboard’s manual when needed.
To simplify your building experience, consider purchasing a CPU and motherboard combo directly from Newegg. These bundles are curated for compatibility, helping you avoid guesswork and saving both time and money. Whether you’re a first-time builder or a seasoned enthusiast, Newegg offers a wide range of CPU and motherboard to match your performance needs and budget.