Your Browsing History

Aaron C.
Joined on 10/23/08
0
0
product reviews
- 4
Awesome for Ubuntu Server
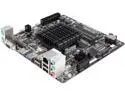
GIGABYTE GA-J1800N-D2H Intel Dual-Core Celeron J1800 SoC (2.41 GHz) Mini ITX Motherboard / CPU / VGA Combo
Pros: - Very fast, very cool server board. - 1x half-height mini PCI-E and 1x PCI-E (just enough for a dual band router build) - UEFI console provides the command "pci" which lets you double check that you're hardware is connected/functioning prior to OS installation
Cons: - Needs a BIOS update - Ridiculously weird USB keyboard support: UEFI console works with pretty much any keyboard but once you are in standard BIOS screen most suddenly don't - of the three keyboards I had handy only one worked. Having a PS/2 keyboard around is the only sure bet for setting up the BIOS.
Overall Review: If you can't get into the regular BIOS from the splash screen just type "exit" twice at the UEFI console prompt - it will take you there. I'm copying/editing/annotating instructions for BIOS update that I used, these were provided by Lance W. in his review of the GA-J1900N-D3V which also requires a BIOS update for Linux support. ----- Follow STEP 1 on this guide: http://www.gigabytenordic.com/wordpress/update-bios-gigabyte-brix/ Download the latest BIOS (as of 6/10/2014 it's F4): http://download.gigabyte.ru/bios/mb_bios_ga-j1800n-d2h_f4.zip Copy ALL the files to the newly created bootable USB drive (INCLUDING AUTOEXEC.BAT!) Go into BIOS and set CSM to UEFI and Legacy (in the Advanced tab) - Set network to DISABLED, Storage to Legacy First, Video to UEFI First and the last one to UEFI first. Reboot with no DVD in your system, hit F12 and boot off your USB drive (the drive name may appear twice, I selected the option that did *not* start with "UEFI: ") - the autoexec file will automatically flash the BIOS for you. Trying to run EFIFlash manually will result in an error code that it can't read the BIOS file - you HAVE to do it AUTOMATICALLY. Very odd. After that you can boot off your Win7 64-bit installer (DVD or USB, whatever you chose) and it should work just fine. ----- One other thing: when you boot off the USB key to flash the BIOS the process will begin *immediately* if you followed the directions above, and the first thing it will do is erase the BIOS - this is OK, everything will be fine. The process takes a minute or two and after a reboot you're good to go.
6/10/2014See more detail
Not serviceable as a wireless mouse
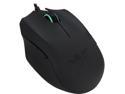
RAZER Orochi USB Gaming Mouse
Pros: - Great sensor - Great form factor - Feels amazing
Cons: - ~15 hours of battery life with rechargeable AAs - Poor range with even minor obstructions - Razer software is terrible
Overall Review: I used the original model Orochi for nearly 3 years as my desktop mouse with no issues, I finally decided it was a little too beat up and "upgraded" to this. For comparison the old Orochi gets about 5x better battery life, and tracks flawlessly in nearly any environment. I actually returned the first of these mice that I received assuming I had gotten a dud, but unfortunately the wireless range and battery issues appear to come from poor design. In order to get proper reception I had to run an extended antenna from my WiFi/Bluetooth card to the back of my monitor so that the transmission distance is no more than about 24 inches, and in order to use it as my daily driver I have to swap batteries every other day. These factors along with the constant annoyance from the Razer software combine to severely diminish the appeal and utility of the mouse when used wirelessly, which is the whole point of the device.
11/24/2014See more detail
Awesome for the price

Habey EMC-600BL Black Heavy duty 3mm aluminum Server Case 60W
Pros: - Cheap - Pretty - Aluminum - Black - Includes power supply - Easy to drill through
Cons: - The power port is on the side...which looks horrible - The power supply is kinda cheap, requires 5+ seconds after shut down before it's ready to boot again. This isn't a huge deal, just don't try to click the power button twice in quick succession or you may get a power light, but no boot.
Overall Review: There is actually enough room on the back of the case to drill a new mounting hole for the DC jack ,but it's a really, really tight fit (I had ~1mm of metal left between the I/O shield cut-out and the hole to give the jack enough room to make it work) and you'll have to bend the overhang from your I/O shield up next to the jack, although you won't see this from the outside. If you do drill a new hole for the DC jack the leftover hole can still be used for an RP-SMA (WiFi) jack, even though it's larger than it needs to be, and the washer will cover up the extra gap.
6/10/2014See more detail
Just works...fast
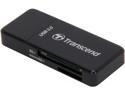
Transcend TS-RDF5K USB 3.0 Support SDHC (UHS-I), SDXC (UHS-I), microSD, microSDHC (UHS-I), and microSDXC (UHS-I) Flash Card Reader
Pros: Fast, cheap, black
Cons: Requires an sd to microsd adapter for microsd cards
Overall Review: I use this primarily with a 64gb sdxc microsd card that I normally leave installed in my Surface Pro 2. When I need to turn the card into a thumb drive I use this. So far I've observed no speed difference between this adapter and the built in reader.
5/11/2014See more detail