Your Browsing History

Jeffrey M.
Joined on 12/07/05
0
0
product reviews
- 9
Excellent portable gaming for the price.
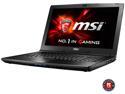
MSI 15.6" GL62 6QF-628 Intel Core i5 6300HQ (2.30 GHz) NVIDIA GeForce GTX 960M 8 GB Memory 1 TB HDD Windows 10 Home 64-Bit Gaming Laptop - "ONLY @ NEWEGG"
Pros: - Excellent build quality. Aluminum surrounds the touch pad and keyboard keys. The hinge is strong and both the keys and touch pad are very responsive, unlike my old Asus G73JH laptop which sometimes wouldn't register keystrokes or touch pad interaction from time to time, even when it was new. - 2x SODIMM slots, but only 1 is being used. To have a matched pair of memory, I removed the factory 8GB module and installed a 2x8GB Crucial DDR4-2133 pair for 16GB of RAM. - Empty M.2 slot. I added a 500GB Samsung M.2 drive to install the OS and applications on an SSD. This is fantastic as it allows for 1.5TB of SSD+HDD space. - Using a SanDisk 32GB USB drive, MSI's Recovery software is easily backed up to an external drive. The recovery partition is around 18-19GB, so a 32GB USB drive is necessary. I used this drive to do a factory recovery to install the OS/system apps to the Samsung M.2 drive, then used the (free) EaseUS Partition Master software to delete the *5* partitions from the factory 1TB drive and format as a single large 1TB HDD for data/files/etc. - The i5-6300, GTX 960M, and M.2 SSD work well to play The Division when portable gaming is necessary. It won't get 60fps on ultra settings, but that wasn't the point. It plays smoothly on a mix of low/medium settings.
Cons: - As others mentioned, you will void your warranty to do any upgrades, even RAM. For me, this wasn't intimidating at all, and was a similar experience when upgrading my Mac Mini a few years ago. There is one screw hidden behind the "Warranty Void If Removed" sticker that you must remove to get to the internals of the laptop. - Even if you're willing to void the warranty, getting to the internals has a couple tricks. - The factory HDD is formatted into 5 partitions. Windows partition manager can't combine the two drives into one due to a recovery partition being between the two logical drives. I used EaseUS Partition Master to make one large 1TB drive after adding the M.2 drive for OS/apps.
Overall Review: This is an excellent laptop for those looking for a sub-$1000 laptop for portable gaming. Sure, you won't run The Division on ultra settings at 60fps on a GTX 960m, but it can play the game quite well on a mix of low & medium graphics settings. Steps to disassemble the laptop for RAM/M.2/HDD upgrades: - Be willing to void your warranty. Know what you're doing. Fully test all features of the laptop BEFORE voiding your warranty. I used it for a week with stress testing benchmarking apps while checking all ports and wireless connectivity with various programs before deciding that it was ready for long-term use as a modified laptop with no warranty. - Close the laptop. - Pry off the flat, long, thin plate between the hinges. Start with the corners at the back of the laptop at the inside of the hinges. - Turn over the laptop and place it on a cloth - no sense in scratching up the back of the laptop as you work on the other side. - Remove all the visible screws, plus the one hidden by the Warranty Void If Removed sticker. - Now remove the optical drive. It will slide out (with a little force at the SATA connector) since you removed the one screw on the back plate that holds it in. - Remove the 3 flat black screws that were hidden behind the optical drive. These are the last screws holding the back plate to the laptop frame. - Lift the back plate up at the optical drive side, then slide it out and away from the opposite side of the laptop to take care of how the ports (headphones, mic, etc) are poking through that side of the back plate. You're done and can now do hardware upgrades to RAM, M.2, and HDD. Installation is the same steps in reverse order. I would make sure everything works, including all the steps below if you're reconfiguring the OS to M.2 and partitioning the HDD before screwing in the back plate again. Just place the backplate in the right spot and let the laptop "sit" in it while you're doing the OS recovery to M.2. You don't need the optical drive installed. To install the OS on the M.2 drive and make the HDD one large drive, do the following: - Get a clean 32+GB USB drive, preferably USB 3.0. (I used a SanDisk 32GB USB 2.0 and it took some time due to 18-19GB of data to transfer.) - Use the MSI Recovery software to create a USB recovery drive. You can't miss this software as it pops up the first time you boot the laptop. It's in the Start menu if you've dismissed that prompt and it never pops back up. - Install the M.2 drive. I temporarily removed the HDD at this time as I considered installing a SSD as well, but decided to stick with the factory HDD after I had the M.2 drive configured and running perfectly. - Boot from the USB recovery drive to begin the recovery process on to the M.2 drive. (If you removed the HDD, it will boot from USB by default. You may need to press DEL when booting to select the USB drive as boot drive in BIOS if you still have the factory drive installed.) - Reboot into BIOS and make sure your boot priority is M.2, then USB. You're not going back to booting from other devices. - After installing the OS to the M.2 drive, keep the 32GB USB Recovery drive in a safe place. You will need to use this for recovery if you follow through with the next steps to configure the HDD as one large data drive instead of an OS/recovery/data partitions. USB devices are much less prone to failure over time than a HDD anyway if they're stored securely. - Install EaseUS Partition Master (free), or other partitioning software. - Install the factory HDD, but be sure to boot from the M.2 drive since they'll both have the OS installed. If you set your boot order in BIOS correctly, this isn't an issue. - Use partitioning software to delete all *5* partitions on the factory drive. You will be prompted to reboot during this process to remove the boot and OS partitions, so do so when prompted. - Now partition and format the factory HDD as desired. I created a single partition of max size to fully use the 1TB of storage space as one large data drive. It has been running flawlessly for a couple weeks now, and I couldn't be happier with this purchase. $800 laptop + $160 500GB M.2 SSD + $73 16GB RAM is an excellent PC. You could cut some corners and go with 128/256GB M.2 and adding a single 8GB RAM module to the factory 8GB module that exists if you're more concerned about budgeting upgrades. Here are the newegg products I purchased that I can confirm work perfectly in this laptop (prices may vary): 1 x ($159.99) SAMSUNG 850 EVO M.2 500GB SATA III 3-D Vertical Internal SSD Single Unit Version MZ-N5E500BW 1 x ($72.99) Crucial 16GB (2 x 8G) 260-Pin DDR4 SO-DIMM DDR4 2133 (PC4 17000) Laptop Memory Model CT2K8G4SFD8213 If there is demand for it, I'll install some monitoring software and give more of a gaming performance review with specific graphics settings for smooth play in the future.
3/11/2016See more detail
Works with Rampage II Extreme
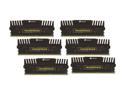
CORSAIR Vengeance 24GB (6 x 4GB) DDR3 1600 (PC3 12800) Desktop Memory Model CMZ24GX3M6A1600C9
Pros: I spent quite awhile looking for 24GB of memory proven to work with the Rampage II Extreme X58 motherboard, which only supported 12GB when I bought it ~4 years ago. I flashed my BIOS to the latest firmware (2101) to ensure the widest memory compatibility first. So far, the memory passed memtest86 at stock settings with no problems - 9-9-9-24 @ 1.50v 1600MHz, which were picked up on auto settings by the BIOS. No work is necessary in manually picking settings just to get running - these were plug-n-play.
Cons: None.. yet.
Overall Review: I have the i7-965 Extreme, so I'll work on RAM overclocking tests after revising my watercooling system. I'm upgrading from 6x2GB (12GB) of Corsair Dominator DDR3-1600C8. Keep in mind that more sticks and larger memory modules usually do not overclock as well as a few smaller memory sticks, so I'm not attempting to break any records. 24GB is for having a 12GB RAMDisk and 12GB of memory.. I'm waiting on an upgrade when 128GB RAM is supported on a future motherboard to really take advantage of a large RAMDisk.
3/10/2013See more detail
Fantastic performance in the right situations.
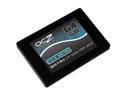
OCZ Core Series 2.5" 64GB SATA II Internal Solid State Drive (SSD) OCZSSD2-1C64G
Pros: I bought the drive to reduce lag in WoW due to hard drive thrashing - especially in cities like Shattrath and battlegrounds like AV. A single OCZ Core 64GB drive has been a MAJOR upgrade over a RAID0 Raptor array for hosting the WoW/Data directory to read game files during runtime. I have a standard WoW install on regular hard drives, but I have the WoW/Data directory stored on this SSD, which is symlinked to the correct location on the standard hard drive. I have eliminated the hard drive bottleneck in high random-read areas - all the player/world objects and textures that need to be read from the hard drive in these busy areas. The best upgrade I've done for this game.
Cons: None, if you use it for what it's made for - blazing fast random access times for reading non-sequential data.
Overall Review: You have to understand the benefits and disadvantages of using SSDs. They are fantastic performers for random reads of data, but fall behind on write speed. With a limited number of writes in the lifetime of SSDs, they're better used as data hosts for databases that don't change often - such as game data files.
8/30/2008See more detail
NOT good for OS/gaming.
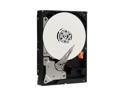
Western Digital Caviar GP WD5000AACS 500GB 5400 to 7200 RPM 16MB Cache SATA 3.0Gb/s 3.5" Internal Hard Drive Bare Drive
Pros: Quiet, cool, low power consumption. Excellent for media/data storage.
Cons: Do NOT attempt to use this drive for your OS, gaming, or real-time applications that may need to access the drive periodically. I was having an issue with 1-2 second freezes every few minutes while web browsing & gaming, and it was due to the IntelliPark feature of this drive. I now have two of them, and only use them for media storage. I use other drives (WD Caviar, Raptor, and Seagate Barracudas) for OS/gaming/application drives.
3/15/2008See more detail
Fantastic at 5-5-5-15 @ 1.9v
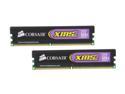
CORSAIR XMS2 4GB (2 x 2GB) DDR2 800 (PC2 6400) Dual Channel Kit Desktop Memory Model TWIN2X4096-6400C5
Pros: Passed 24 hour MemTest86 at 954MHz 5-5-5-15 @ 1.9v, and still has more overclocking headroom. I'm extremely pleased with the speed and voltage at these timings, especially for 2GB sticks. Great bang for the buck.
Cons: Although it passed MemTest86 Tests #1-7 over a span of a little more than an hour at 800MHz 4-4-4-12 timings @ 2.15v, a 24 hour MemTest86 run revealed 2 errors. Errors were reduced with each voltage increase from 1.9v to 2.15v, so it's possible that it could have passed the 24 hour test at 2.2v. I'm not satisfied with that voltage/stability risk being at the edge of reasonable limits, so I'm sticking to CAS5 timings for now. I don't have a need for trying to get CAS4 at 800MHz when my cpu/mobo are looking for around 900-1000MHz out of RAM:FSB 2:1.
Overall Review: Mild overclock at all stock voltages: E6750 @ 3.2GHz, Abit IP35 Pro - BIOS 14, 4GB (2x2GB) Corsair XMS2 DDR2-800C5, MSI 8800GT 512MB OC, SeaSonic 600W PSU, Antec 900, Tuniq Tower, WinXP. Still in the process of stress testing components for overclocking - expecting to get a minimum of 3.6GHz, 450MHz FSB, and DDR2-900C5 with safe temperatures & voltages.
3/6/2008See more detail
Excellent CPU for economy build..
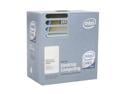
Intel Core 2 Duo E4300 - Core 2 Duo Allendale Dual-Core 1.8 GHz LGA 775 65W Processor - BX80557E4300
Pros: Since this CPU runs at an 800MHz bus (DDR2-400 RAM speed), it is easily overclockable with inexpensive RAM. The E6XXX series has a 1066MHz bus, requiring a minimum of DDR2-533 RAM, and up to DDR2-800+ for high-end overclocking. Since the E4300 has a 9x multiplier (compared to the E6300's 7x), it scales better for overclocking on less expensive memory and motherboards.
Cons: Price is high as the CPU is just released - the E6300 is a better buy at the moment. The price should drop at least thirty to fifty dollars within the next few weeks.
Overall Review: Some numbers to compare the E4300 and E6300: E4300 stock @ 200MHz bus (DDR2-400) = 1.8GHz E6300 stock @ 266MHz bus (DDR2-533) = 1.86GHz E4300 OC @ 266MHz bus (DDR2-533) = 2.4GHz E6300 OC @ 333MHz bus (DDR2-667) = 2.33GHz E4300 OC @ 333MHz bus (DDR2-667) = 3.0GHz E6300 OC @ 400MHz bus (DDR2-800) = 2.8GHz E4300 OC @ 400MHz bus (DDR2-800) = 3.6GHz Keep in mind that 3.6GHz may not be possible with your current CPU cooler or motherboard, but 3GHz is easily attainable at 333MHz bus with nearly all motherboards and memory.
1/21/2007See more detail