Newegg.com - A great place to buy computers, computer parts, electronics, software, accessories, and DVDs online. With great prices, fast shipping, and top-rated customer service - Newegg shopping upgraded ™
If you are reading this message, Please click this link to reload this page.(Do not use your browser's "Refresh" button). Please email us if you're running the latest version of your browser and you still see this message.
Keep the SSD in the protective anti-static container until you are ready to install.
Handle the SSD with care. Do not touch the gold connectors.
To minimize static electricity, touch the computer case before handling the SSD.
Do not remove the encasement or disassemble the SSD. These actions void the SSD warranty.
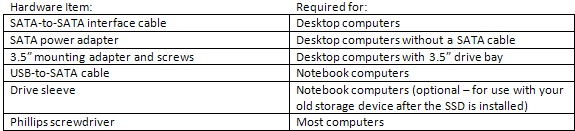
Follow these steps to install your SSD:
Desktop Computers:
If your computer has a 3.5” drive bay, attach the 2.5” SSD to the mounting adapter. If your computer has a 2.5” drive bay, no need to attach the mounting adapter.
Power off the computer, but keep the power cable connected.
Remove the computer case. (Check with your computer owner’s manual.) Disconnect and remove any existing drive in the drive bay.
Connect one end of the SATA interface cable to a SATA interface connector or SATA host adapter on your motherboard and connect the other end to the SSD.
Connect the SSD to the internal computer power supply using the SATA power cable. (If your computer does not have a SATA power cable and instead uses a 4-pin power connector, use a SATA power adapter. The SATA power adapter comes with certain packages or can be purchased separately.)
Slide the connected SSD with mounting adapter into the 3.5” drive bay, or secure the SSD to the computer by inserting one screw in each of the side-mounting or bottom-mounting holes.
Power on your computer and wait for the OS to recognize the new SSD.
Notebook Computers:
Power off the computer. You may leave the power cable connected.
Remove the notebook battery.
Unscrew and remove the hard drive panel. (Refer to your computer owner’s manual.) It there is a tab on the existing hard drive, gently pull it up and then remove the hard drive from the bay.
Align the SATA connector pins on the SSD with the SATA connector in the drive bay.
Slide the SSD firmly against the SATA connectors in the drive bay.
Reattach the drive panel and screws.
Reinstall the battery.
Turn on the power and wait for the OS to recognize the new SSD.
To clone your existing drive onto a new SSD, you may need to use cloning software provided with your SSD package or downloaded from a third-party source. The instructions on how to use your cloning software should be provided to you from the manufacturer. However, the following instructions are a general guideline for how to complete this process.
Defragment and backup your data. Save the backup file to a separate storage drive that is different from your existing drive and the new SSD, in case you need to access it later.
With your original drive still connected, connect the SSD to your computer through the USB port using a USB-to-SATA adapter.
With your old drive and new SSD now both connected, open the cloning software and follow the on-screen instructions to successfully transfer your data.
After the process is complete, shut down the computer.
Remove the original drive and place in a secure location. Connect the new SSD using your computer’s primary SATA connection.
Start your computer and ensure the cloning process was performed successfully. If you experience any problems, you may use your OS system repair disk to correct any boot record files that may have become corrupted during the migration.
Your manufacturer may have specific requirements for updating the firmware on your SSD and you will need to refer to the SSD user manual for any specific requirements. The following are common steps for upgrading your SSD firmware.
Go to the manufacturer’s website and download the latest update for your SSD firmware.
After successful download, you may need to extract compressed file contents. Files with the extensions “.zip,” “.rar” or “.7z” will need to be extracted before you can install the update.
You may need to burn the file to a CD/DVD before installing. You will notice a file extension of “.iso” at the end of your downloaded file if this is necessary. If the downloaded file is executable (noted by the file extension “.exe”), open it and follow the on-screen instructions.
If your computer needs to install from an “.iso” image, restart your computer with the burned CD/DVD inserted to the CD-ROM and follow the on-screen instructions.
Ensure you are using the latest version of firmware by locating your SSD’s properties and checking the version number.
How to Migrate Windows OS to an SSD without Reinstalling Windows
If you want to move your Windows Operating System to an SSD without moving your data files from your existing drive, follow these steps:
Defragment and back up your data on a drive that is not your current drive or the SSD.
Remove files from your current drive until it becomes small enough to fit on your new SSD. If you have already backed up your data files, you can make them available again after your OS is moved to the new SSD.
With both old and new drives connected to your computer, migrate the data from your old drive to your SSD. There are many third party tools available to help you do this. After this step, you may need to realign your SSD partition in order to keep its performance strong. There are articles available online to help you do this correctly.
Now that your SSD is working, format the contents on your original drive by right-clicking the drive and choosing “Format.”
Create a new folder on your recently formatted drive. Now, go into your SSD, open the Users folder and open your Username folder. Right-click on each of the folders listed in the Username folder and choose Properties. Click on the “Move” button and select the new folder on your recently formatted drive.
Finally, open your backup file and move your files into this new folder. Your computer will now recognize how to access the files you moved even though they are located on a different drive.
Open Control Panel and select Administrative Tools.
Open Computer Management.
Click Disk Management. A list of different drives will appear.
Right-click inside the section with unallocated disk space and select “New Partition.”
The New Partition Wizard appears. Click Next.
Select Primary partition and click Next.
Leave the Partition size in MB at the default setting and click Next.
Select “Assign the following drive letter” and click Next.
Select “Format this partition with the following settings:”. In the “File system” field, select FAT32 or NTFS and click Next.
When the formatting completes, close the New Partition Wizard.
The SSD should appear in the Computer Management screen as another storage drive.
For Mac Users:
Open the Go menu and select Utilities.
Double-click Disk Utility
In the list of drives on the left side, select your SSD.
On the right side, near the top of the page, click the Partition tab. Under Volume Information, enter a Name and then select the correct Format. Select Install Mac OS X (or other version) Disk Drivers. Click the Partition button in the lower-right corner.
Click the Erase tab near the top of the page, and then click the Erase button in the lower-right corner.
When the formatting completes, the SSD should appear on the desktop as another storage drive.
To maximize the life expectancy of your SSD, you may want to modify features on your computer that are automatically formatted for HDDs. The following are some steps you can take on your Windows OS to improve the performance of your SSD, which contributes to the overall life expectancy.
Ensure that TRIM is enabled – The TRIM feature automatically deletes blocks of data that are no longer in use on your SSD. When enabled, TRIM helps keep your SSD organized and prevents unnecessary space from being eaten up. Here’s how to enable TRIM on your Windows system.
Check if your system supports TRIM (WIN+R, type “cmd” and press enter). In the command prompt, type “fsutil behavior query disabledeletenotify”. You will get one of the following: DisableDeleteNotify = 1 (Means that Windows TRIM commands are disabled); DisableDeleteNotify = 0 (Means that Windows TRIM commands are enabled).
If TRIM is disabled on your system, you may need to go to your Device Manager and enable it for your SSD to run correctly.
If you run an older system (OS before Windows 7 or Mac OS X Snow Leopard v10.6.6), you may need to install software updates or third party tools before you can allow the TRIM feature to work with your SSD.
Eliminate Windows OS Features – Windows automatically enables features for hard drives that will not be necessary for your solid state drive. Here are some of the more common OS features you can turn off to have your SSD performing optimally.
Paging – With paging, memory is swapped to the hard disk drive to ensure your computer’s internal memory does not overfill. If you have sufficient memory that can handle multiple programs, you may not need this feature. There are two options for removing this feature.
Disable paging file:
a) Open Start Menu and right click on “Computer”.
b) Choose Properties.
c) Choose “Advanced system settings” on the left.
d) Click the “Settings” button under “Performance”.
e) Choose “Advanced” option on top.
f) Click “Change” under “Virtual memory”.
g) Choose your SSD drive and select “No paging file” and click the “Set” button.
h) Click OK to save the change.
You can also move the file from your SSD to your HDD. Here’s how.
a) Disable paging file as described above.
b) Choose your preferred hard drive. Select “System managed size” and click the “Set” button.
c) Click OK to save the option.
Hibernation – Since Windows’ hibernation feature writes memory to your SSD, it is recommended that you consider using the sleep or shutdown functions instead. You can turn off hibernation by doing the following.
a) Open Start Menu and type “cmd” in the search box.
b) Right click “cmd.exe” (Command Prompt) and click “Run as administrator”.
c) Type “powercfg.exe /hibernate off” and press Enter.
d) Type “exit” and press “Enter” to close the Command Prompt window.
SuperFetch and Defragment – SSD manufacturers recommend to turn off these Windows features since SSDs do not need defragmentation and SuperFetch is rendered useless by an SSD’s amazing speed. Here is how to disable these features.
Disable SuperFetch:
a) Type “services.msc” in the Start Menu’s search box and hit enter.
b) Locate SuperFetch in the list and open Properties.
c) Click “Stop” to turn off the feature.
d) Change the selection on “Startup type” drop-down menu from Automatic to Disabled.
e) Click OK to save the change.
Disable defragmentation:
a) Type “defrag” in the Start Menu’s search box and hit enter.
b) Open Disk Defragmenter and click “Modify Schedule”.
c) Uncheck the selection box next to “Run on a schedule (recommended)” to disable automatic defragmentation.
d) Click OK to save the change.
Search Indexing – Windows’ search indexer speeds up searching for files on a hard drive. With an SSD, this may not be necessary. Here are some steps you can take to remove this feature.
Disable search indexing:
a) Type “services.msc” in the Start Menu’s search box and hit enter.
b) Locate “Windows Search” in the list and right click to open Properties.
c) Click “Stop” to turn off the feature.
d) Change the selection on “Startup type” drop-down menu from Automatic to Disabled.
e) Click OK to save the change.
Move search indexing to another drive:
a) Type “index” in the Start Menu’s search box and hit enter.
b) Click “Advanced” button.
c) Click “Select New” and choose a different drive to house the search indexing feature.
d) Click OK to save the change.
Trim down indexed locations:
a) Type “index” in the Start Menu’s search box and hit enter.
b) Click “Modify” button.
c) Uncheck all boxes you do not want to have search indexing.
d) Click OK to save the change.