

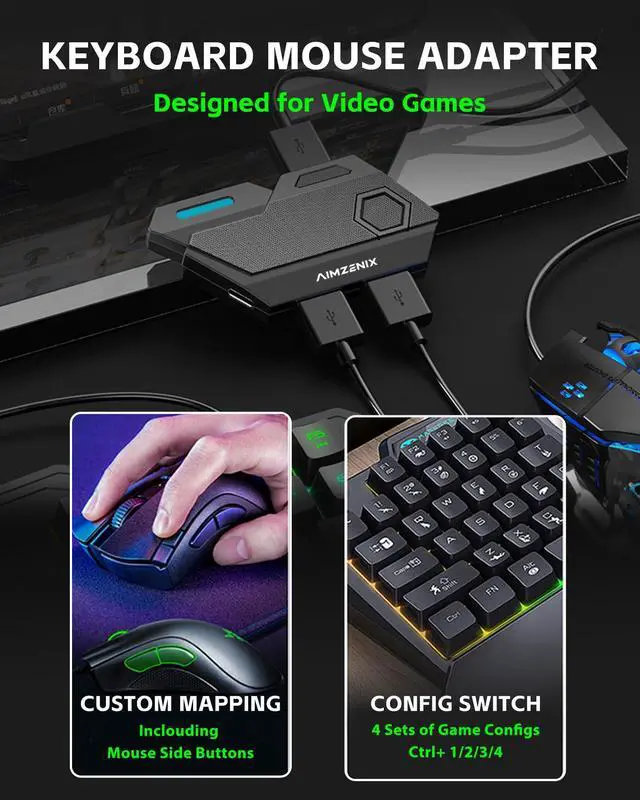


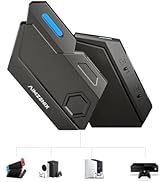
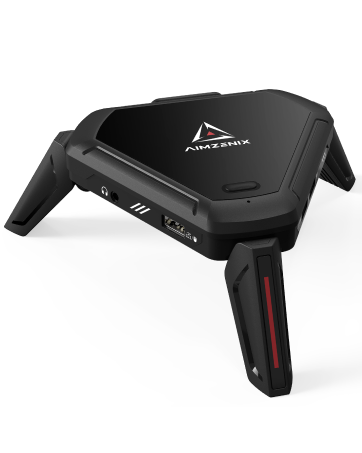
Entry-level Keyboard and Mouse Adapter
AIMZENIX-BLADER
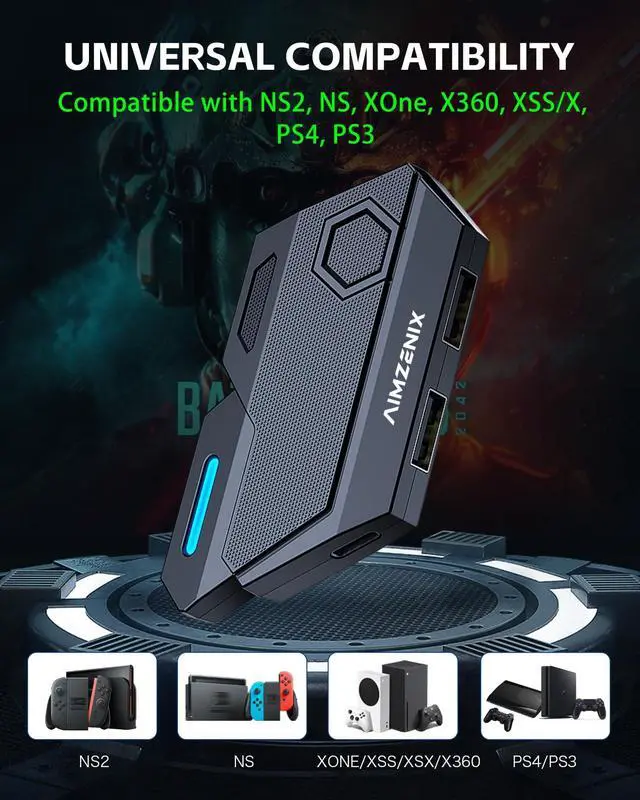
- Compatible Platforms: NS2, NS, X-ONE, XSS, XSX, X360, PS4, PS3
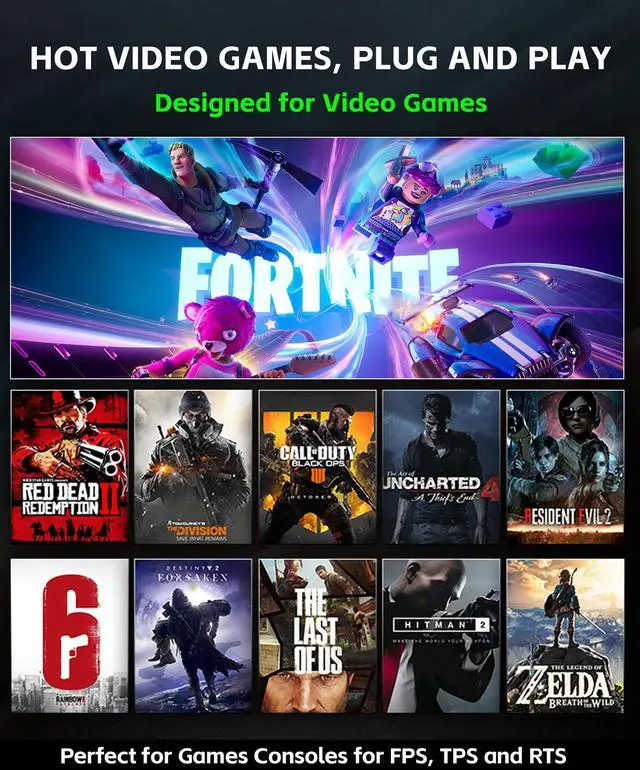
- Plug and Play. Suitable for FPS, TPS, such as Fortinte, ...

PLUG AND PLAY on Multiple Platforms
- NOTE: 1. The connection requires the original controller; 2. It is recommended that the game sensitivity be set to the maximum; 3. The mouse is equivalent to the right joystick, and the mouse pointer icon will not be displayed in the game.
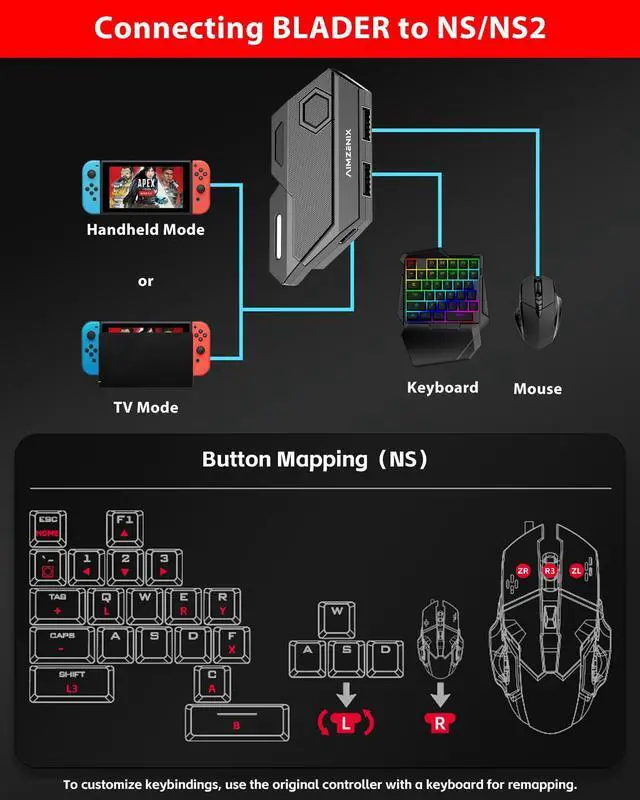
Instructions for Connecting BLADER to N-Switch/Xbox one/Xbox Series S/X /PS4/PS3
The Steps to Connect BLADER to N-Switch/NS2
Step1: Go to Switch “System Settings> controller and sensors> Pro controller wired connection”, and adjust it to the “ON” state.
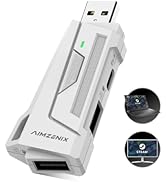
Step2: Plug BLADER into your Switch console using the data cable and OTG adapter. (If you're in TV mode, plug BLADER into the N-Switch TV Dock with the data cable) The LED on BLADER flashes in blue. After 3-5 seconds, the LED on BLADER lights up in blue to indicate a successful connection.
Step3: Connect the keyboard/mouse to the keyboard/mouse interface
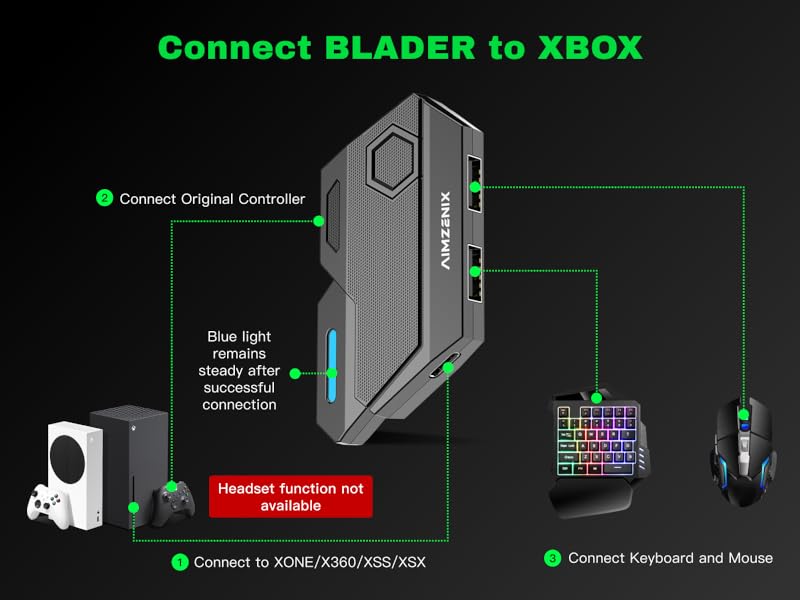
The steps to connect BLADER to Xbox-one/Xbox Series S/X
Step 1: Before starting the connection, please turn off the original controller.
Step 2: Plug the BLADER into your Xbox-one/Xbox Series S/X console using the data cable. The LED on the BLADER flashes in blue.
Step 3: Connect your original controller to the BLADER using the data cable. The LED on controller lights up. After the connection is established, the LED on BLADER lights up in blue to indicate a successful connection.
Step 4: Connect the keyboard/mouse to the keyboard/mouse interface
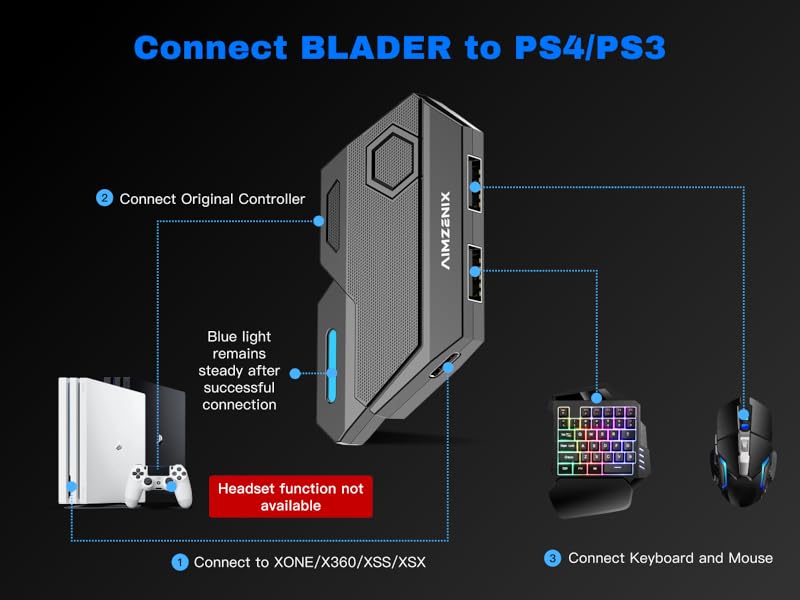
The steps to connect BLADER to PS4/PS3
1: Go to “Settings>Devices>Controllers>Communication Method>Use USB cable”(PS3 skip this setting)
2: Before starting the connection, please turn off the original controller.
3: Plug BLADER into your PS4/PS3 console using the data cable. The LED on BLADER flashes in blue.
4: Connect your original controller to BLADER using the data cable. After the connection is established, the LED on BLADER lights up in blue to indicate a successful connection. 5: Connect the keyboard/mouse to the interface


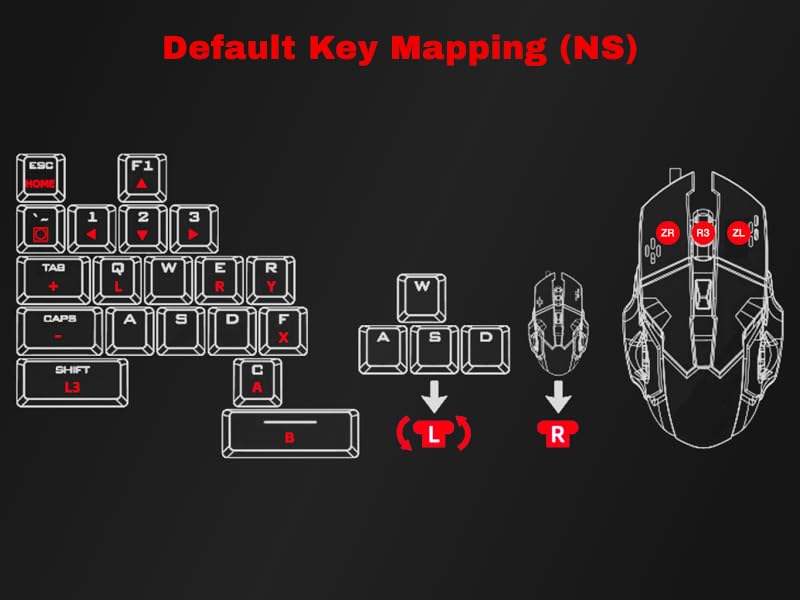
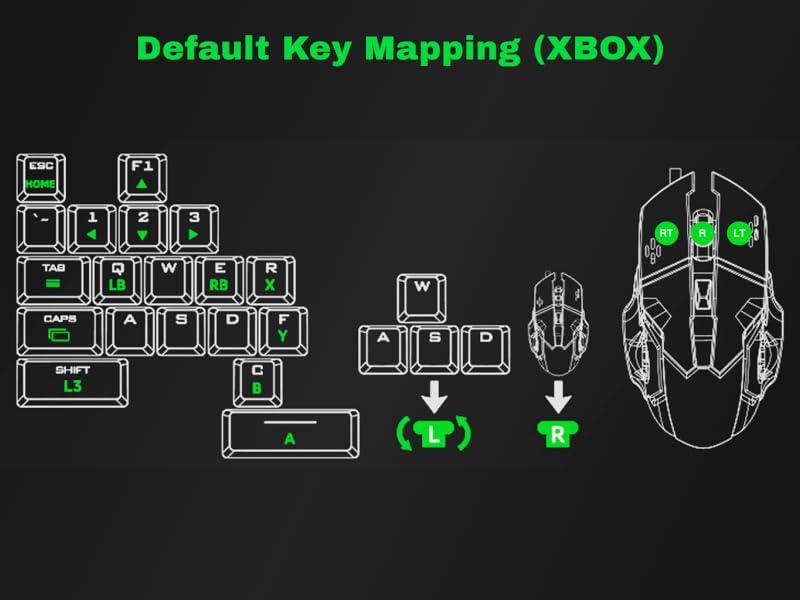
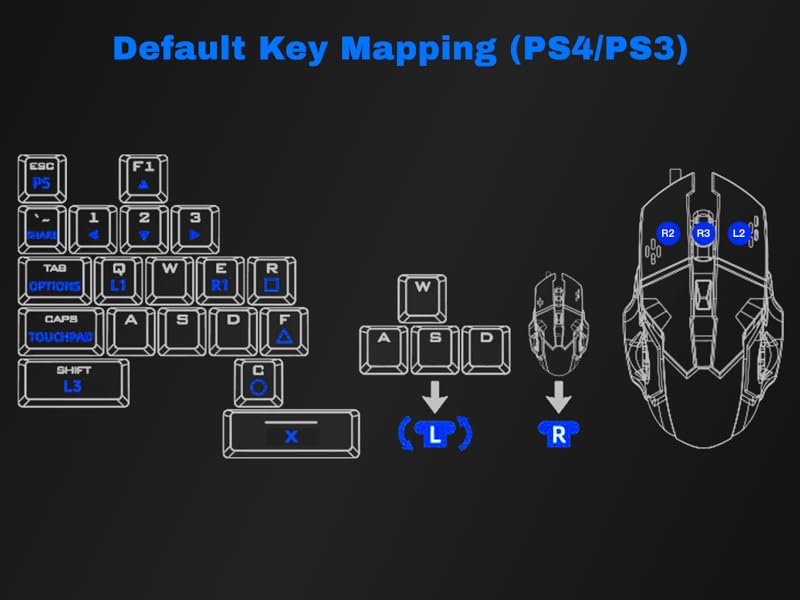
Default Key Mapping for N-Switch/Xbox one/Xbox Series S/X /PS4/PS3
Steps to Remap Keys for NS/NS2
NOTE: For remapping, you need to connect the Official Switch Pro Controller
1. Enter the key settings: press "Ctrl+Esc" (LED light rapid flashing)
2. Hold down the button on the controller that you want to modify. (supports single keys or combination keys); 3. Press the keyboard/mouse button you want to remap. (keep holding down the controller button)
4. Release the controller button and the keyboard/mouse button simultaneously. 5. Exit and save the key settings: press "Ctrl+Esc".
Steps to Remap Keys for Xbox one/Xbox Series S/X /X360
1. Enter the key settings: press "Ctrl+Esc" (LED light rapid flashing)
2. Hold down the button on the controller that you want to modify. (supports single keys or combination keys); 3. Press the keyboard/mouse button you want to remap. (keep holding down the controller button)
4. Release the controller button and the keyboard/mouse button simultaneously. 5. Exit and save the key settings: press "Ctrl+Esc".
Steps to Remap Keys for PS4/PS3
1. Enter the key settings: press "Ctrl+Esc" (LED light rapid flashing)
2. Hold down the button on the controller that you want to modify. (supports single keys or combination keys); 3. Press the keyboard/mouse button you want to remap. (keep holding down the controller button)
4. Release the controller button and the keyboard/mouse button simultaneously.
5. Exit and save the key settings: press "Ctrl+Esc".


Function Description of Shortcut Key Editing
Why is there no sound from my controller's headphone jack after connecting BLADER?
Since the controller connects to the game console via BLADER, which does not have audio processing capabilities. It is recommended that you connect your headset device directly to your console or the display screen
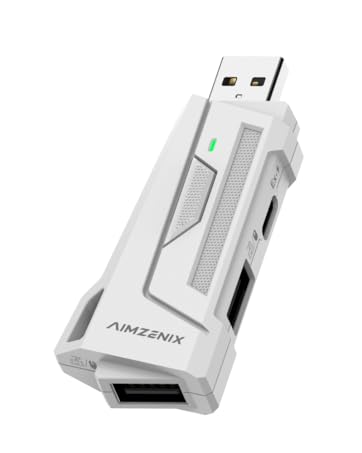
Why does BLADER keep flashing after connecting?
If BLADER is flashing, it means the connection is abnormal. The settings of each game console are different. We recommend that you refer to the manual or video tutorial for step-by-step troubleshooting.
Does the BLADER support custom game key mapping on N-Switch?
Yes, but you need to connect the Switch Pro controller, and then use the shortcut keys CTRL+ESC to enter editing. Please refer to the manual or video tutorial for details.
How do I know if the keyboard and mouse are compatible?
Due to the large number of keyboard and mouse models, please go to the AIMZENIX official website to check the keyboard and mouse compatibility. In addition, BLSDER does not recommend connecting a high-power keyboard and mouse.
Why is there no response when moving the mouse after connecting? And why is there no mouse pointer icon on the screen?
The keyboard and mouse adapter simulates controller input by emulating keyboard and mouse actions. The mouse acts as the right joystick, hence no mouse pointer is shown on screen. Once in-game, move the mouse to observe its effects.
AIMZENIX Products Function Comparison
 AX130-BLADER |  AX200 |  AX300-STRIKER PRO |  AX600-MONSTER | |
|---|---|---|---|---|
Customer Reviews | — | — | — | — |
Price | — | — | — | — |
Product Level | Entry-level | PC-specific | Universal | Full-featured |
Playstation5 | ? | ? | ? | ? |
PS4/PS3/XONE/XSS/XSX | ? | ? | ? | ? |
NS/PC | ? | ? | ? | ? |
3.5mm Headphone Audio | ? | ? | ? | ? |
Reporting Rate | 125Hz | 1000Hz | 1000Hz | 1000Hz |
APP Real-time Adjustment | Shortcut key adjustment | ? | ? | ? |
Smart Joystick Recoil Macro | ? | ? | ? | ? |
Flex Mapping | ? | ? | ? | ? |
Configure Sharing Function | ? | ? | ? | ? |
Firmware Update Function | ? | ? | ? | ? |


AlMZENIX is a self-developed brand committed to providing the best gaming experience for users. Our team of passionate gaming enthusiasts and technical experts infuses endless creativity into every AlMZENIX product. We specialize in console game controllers and connectors, designed and tested to deliver exceptional performance and reliability.


AIMZENIX Gaming Adapters

AX200 PRO
- PC dedicated converter upgrade version
- More powerful game features
- One-click switch between game and office mode

BLADER: Entry-level Converter
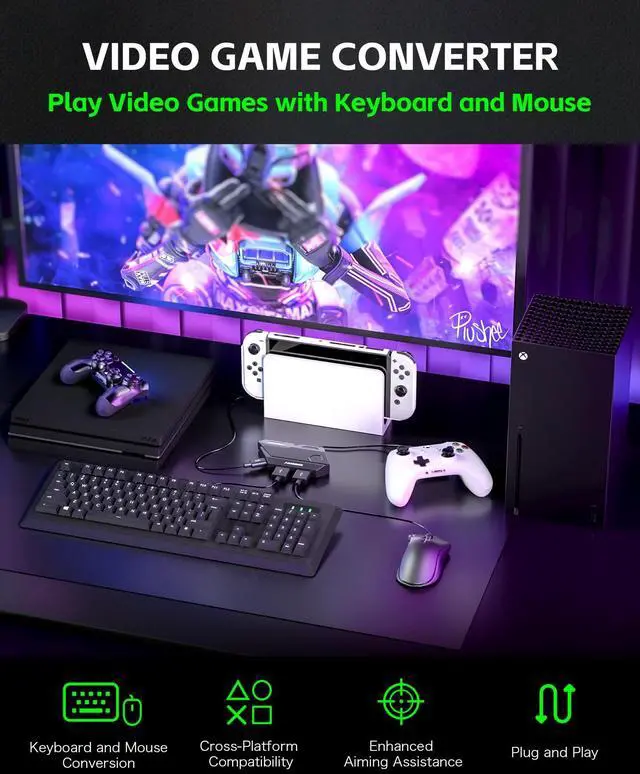
BLADER, an entry-level converter, ensures a simple, plug-and-play experience. It's reliable for basic gaming needs.
AX200: PC-exclusive Adapter
The AX200 is a keyboard and mouse adapter tailored specifically for PC, providing powerful features to enhance your gaming control.
STRIKER PRO: Universal Adapter
Universal gaming adapter, lacks PS5 support but retains core functionalities. Perfect for versatile gaming across platforms.
MONSTER: Ultimate Converter
The ultimate gaming adapter, supports PS5 console and provides a dedicated app for seamless customization. Ideal for avid gamers.


AIMZENIX-BLADER
- Compatible Platforms: NS2, NS, X-ONE, XSS, XSX, X360, PS4, PS3
- Plug and Play. Suitable for FPS, TPS, such as Fortinte, ...

PLUG AND PLAY on Multiple Platforms
- NOTE: 1. The connection requires the original controller; 2. It is recommended that the game sensitivity be set to the maximum; 3. The mouse is equivalent to the right joystick, and the mouse pointer icon will not be displayed in the game.
Instructions for Connecting BLADER to N-Switch/Xbox one/Xbox Series S/X /PS4/PS3


The Steps to Connect BLADER to N-Switch/NS2
Step1: Go to Switch “System Settings> controller and sensors> Pro controller wired connection”, and adjust it to the “ON” state.
Step2: Plug BLADER into your Switch console using the data cable and OTG adapter. (If you're in TV mode, plug BLADER into the N-Switch TV Dock with the data cable) The LED on BLADER flashes in blue. After 3-5 seconds, the LED on BLADER lights up in blue to indicate a successful connection.
Step3: Connect the keyboard/mouse to the keyboard/mouse interface
The steps to connect BLADER to Xbox-one/Xbox Series S/X
Step 1: Before starting the connection, please turn off the original controller.
Step 2: Plug the BLADER into your Xbox-one/Xbox Series S/X console using the data cable. The LED on the BLADER flashes in blue.
Step 3: Connect your original controller to the BLADER using the data cable. The LED on controller lights up. After the connection is established, the LED on BLADER lights up in blue to indicate a successful connection.
Step 4: Connect the keyboard/mouse to the keyboard/mouse interface
The steps to connect BLADER to PS4/PS3
1: Go to “Settings>Devices>Controllers>Communication Method>Use USB cable”(PS3 skip this setting)
2: Before starting the connection, please turn off the original controller.
3: Plug BLADER into your PS4/PS3 console using the data cable. The LED on BLADER flashes in blue.
4: Connect your original controller to BLADER using the data cable. After the connection is established, the LED on BLADER lights up in blue to indicate a successful connection. 5: Connect the keyboard/mouse to the interface
Default Key Mapping for N-Switch/Xbox one/Xbox Series S/X /PS4/PS3


Steps to Remap Keys for NS/NS2
NOTE: For remapping, you need to connect the Official Switch Pro Controller
1. Enter the key settings: press "Ctrl+Esc" (LED light rapid flashing)
2. Hold down the button on the controller that you want to modify. (supports single keys or combination keys); 3. Press the keyboard/mouse button you want to remap. (keep holding down the controller button)
4. Release the controller button and the keyboard/mouse button simultaneously. 5. Exit and save the key settings: press "Ctrl+Esc".
Steps to Remap Keys for Xbox one/Xbox Series S/X /X360
1. Enter the key settings: press "Ctrl+Esc" (LED light rapid flashing)
2. Hold down the button on the controller that you want to modify. (supports single keys or combination keys); 3. Press the keyboard/mouse button you want to remap. (keep holding down the controller button)
4. Release the controller button and the keyboard/mouse button simultaneously. 5. Exit and save the key settings: press "Ctrl+Esc".
Steps to Remap Keys for PS4/PS3
1. Enter the key settings: press "Ctrl+Esc" (LED light rapid flashing)
2. Hold down the button on the controller that you want to modify. (supports single keys or combination keys); 3. Press the keyboard/mouse button you want to remap. (keep holding down the controller button)
4. Release the controller button and the keyboard/mouse button simultaneously.
5. Exit and save the key settings: press "Ctrl+Esc".
Function Description of Shortcut Key Editing
| Adjust Mouse Sensitivity | Ctrl + Mouse Wheel Up/Down: 1. In the game, hold down Ctrl and use the Mouse Wheel to adjust the mouse sensitivity. (include the mouse field of view sensitivity and the mouse sensitivity for aiming)(for non-ADS sensitivity) 2. Release Ctrl to close the adjustment. Please note : "Aim Down Sights" sensitivity is adjusted separately and should be done while aiming down sights. |
|---|---|
| Adjust Curve Sensitivity | Shift+ Mouse Wheel Up/Down: 1. In the game, hold down Shift and Mouse Wheel to adjust the sensitivity of curve. 2. Release Shift to close the adjustment. |
| Switch Configs | Ctrl+1/2/3/4: BLADER supports saving 4 sets of configs. Please switch configs via Ctrl+1/2/3/4 before modifying the configuration. (The default config is Ctrl+1) |
| Invert Y-axis Setting | Ctrl+R: In some games, the Y-axis control may have the opposite direction to the default setting. You can press Ctrl+R in the game to toggle the direction. |
| Lock Key | Ctrl+F5: The lock key prevents accidental triggering of other combination keys Pressing it again will unlock and exit. (When locked, the LED light is green) |
| Switch Fire Modes | Press F4: Switch between Rapid Fire and Single Shot Modes (Note: Long press the left mouse button after switching to Rapid Fire mode) |
| Restore Factory Settings | Ctrl+Alt+Z: Restore current configuration to default configuration |
Why is there no sound from my controller's headphone jack after connecting BLADER?
Since the controller connects to the game console via BLADER, which does not have audio processing capabilities. It is recommended that you connect your headset device directly to your console or the display screen
Why does BLADER keep flashing after connecting?
If BLADER is flashing, it means the connection is abnormal. The settings of each game console are different. We recommend that you refer to the manual or video tutorial for step-by-step troubleshooting.
Does the BLADER support custom game key mapping on N-Switch?
Yes, but you need to connect the Switch Pro controller, and then use the shortcut keys CTRL+ESC to enter editing. Please refer to the manual or video tutorial for details.
How do I know if the keyboard and mouse are compatible?
Due to the large number of keyboard and mouse models, please go to the AIMZENIX official website to check the keyboard and mouse compatibility. In addition, BLSDER does not recommend connecting a high-power keyboard and mouse.
Why is there no response when moving the mouse after connecting? And why is there no mouse pointer icon on the screen?
The keyboard and mouse adapter simulates controller input by emulating keyboard and mouse actions. The mouse acts as the right joystick, hence no mouse pointer is shown on screen. Once in-game, move the mouse to observe its effects.
AIMZENIX Products Function Comparison
AX130-BLADER | AX200 | AX300-STRIKER PRO |  AX600-MONSTER |
|---|---|---|---|
| Customer Reviews | |||
| — | — | — | — |
| Price | |||
| — | — | — | — |
| Product Level | |||
| Entry-level | PC-specific | Universal | Full-featured |
| Playstation5 | |||
| ? | ? | ? | ? |
| PS4/PS3/XONE/XSS/XSX | |||
| ? | ? | ? | ? |
| NS/PC | |||
| ? | ? | ? | ? |
| 3.5mm Headphone Audio | |||
| ? | ? | ? | ? |
| Reporting Rate | |||
| 125Hz | 1000Hz | 1000Hz | 1000Hz |
| APP Real-time Adjustment | |||
| Shortcut key adjustment | ? | ? | ? |
| Smart Joystick Recoil Macro | |||
| ? | ? | ? | ? |
| Flex Mapping | |||
| ? | ? | ? | ? |
| Configure Sharing Function | |||
| ? | ? | ? | ? |
| Firmware Update Function | |||
| ? | ? | ? | ? |

AlMZENIX is a self-developed brand committed to providing the best gaming experience for users. Our team of passionate gaming enthusiasts and technical experts infuses endless creativity into every AlMZENIX product. We specialize in console game controllers and connectors, designed and tested to deliver exceptional performance and reliability.
AIMZENIX Gaming Adapters
AX200 PRO
- PC dedicated converter upgrade version
- More powerful game features
- One-click switch between game and office mode
BLADER: Entry-level Converter
BLADER, an entry-level converter, ensures a simple, plug-and-play experience. It's reliable for basic gaming needs.
AX200: PC-exclusive Adapter
The AX200 is a keyboard and mouse adapter tailored specifically for PC, providing powerful features to enhance your gaming control.
STRIKER PRO: Universal Adapter
Universal gaming adapter, lacks PS5 support but retains core functionalities. Perfect for versatile gaming across platforms.
MONSTER: Ultimate Converter
The ultimate gaming adapter, supports PS5 console and provides a dedicated app for seamless customization. Ideal for avid gamers.
