Your Browsing History

Jeff C.
Joined on 11/06/02
0
0
product reviews
- 49
I have purchased FOUR of these
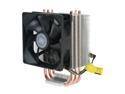
Cooler Master Hyper TX3 - CPU Cooler with 3 Direct Contact Heatpipes
Pros: Best bang for the buck. Excellent heat transfer. Compatibility to multiple socket types. Comes with additional fan mount (although I have never used it). Directs heat directly to exhausting case fan in most tower cases. Quiet. Cord length is great.
Cons: Thermal paste - the stuff that comes with it, I used it one time but ended up cleaning it off and used Arctic Silver. I just didn't like the thickness of the stuff that came with it.
Overall Review: Some tips: Clean surface of chip and heat plate / pipes with high purity alcohol first. Wear latex gloves to prevent body oil contact. Finalize cleaning with a lint free cloth (similar to a lens cloth for your glasses or LCD / Plasma TV). Apply the bracket HW according to your chip / socket type. AMD - you're pretty much good to go and there's not much work involved. With Intel you will need to screw the arms on to the underside of the base. The screw holes are slightly different in there spacing to accommodate the socket type, so make sure before you put all of that work into screwing the arms down you check to make sure you are aligning the right holes. I, personally, use a drop of red (permanent) thread lock on the tiny screws. I am weary of thermal expansion and contraction over time loosening the tightness of the screws. Draw the thermal paste into the pipe grooves on the heat plate and then smear the plate "clean" with a CC, four drops of paste on the proc and mount!
8/12/2010See more detail
Me Again - Back with a 2nd Review
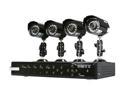
KGuard CA108-H02 4 Camera+8 Channel DVR with Remote Web / Mobile Phone Access (HD Sold Separately)
Pros: Very affordable entry level system with all around decent cameras.
Cons: DVR recording quality is this system's single major drawback. If having high quality recorded video is your goal, THIS IS NOT THE SYSTEM FOR YOU. I have lived and learned. You will want to find yourself a system that supports FULL D1 on all cameras at 30 FPS. This system attempts D1 on 8 cams at 7FPS, but fails horribly. Not only is the frame rate terrible, but the resolution is not D1. It looks worse than CIF once more than 1 camera is recording.
Overall Review: Remote view quality is very pixilated (even on a LAN). GUI on the DVR is hokey. All in al the system works, but you are getting what you pay for. It is, like I said, a GREAT entry level, starter, basic, system. Live video is great!
8/22/2011See more detail
Acronis DOES activate
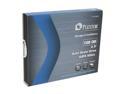
Plextor PX-M2 Series 2.5" 128GB SATA III MLC Internal Solid State Drive (SSD) PX-128M2S
Pros: Always remember when reading reviews, take them with a grain of salt! Acronis DOES activate if you follow the instructions.
Cons: Activating Acronis is indeed a hassle. Yes, when you first attempt to use the key, if in the wrong time / place, you will have a message returned stating the key is already used. This is because it is an OEM key. But just follow the instructions in front of you on your screen. I don't remember exactly the step by step for this review (since I didn't think to write them down while I did it). I do know that at first I thought it would not work, but then after following the instructions, I was fine.
Overall Review: From what I remember - Install Acronis. Once installed, you will be promoted for the activation. Click "GET KEY". This takes you to the Acronis web site. Register and make an account. Acronis will then email you a confirmation (with a link to complete activation). You have two numbers on your label. One is the OEM serial number (that comes back as already registered if put in at the wrong time / place) and the other is an activation key. Trust me, I had problems like others with the ridiculous registration process, but it does work.
9/19/2011See more detail
Best of the Best SSDs
Plextor PX-M2 Series 2.5" 128GB SATA III MLC Internal Solid State Drive (SSD) PX-128M2S
Pros: The read and write rate on these Plextors are about twice as fast as SSDs on the market today. Let me tell you - this drive screams! Also, these are MADE IN JAPAN. I'll take that over China any day. This drive is worth the extra money. Newegg had it to my door in 2 days (faster than their own estimated shipping time)!
Cons: None at all. Worth the money all day long.
Overall Review: I have owned and purchased Intel SSDs, Kingston SSDs, and now this Plextor SSD. This is by FAR the fastest one and is now my new benchmark. Forget about the fastest processor on your next build or upgrade. Get an SSD - preferably one of these. And if you really want to surprise yourself, replace your laptop's 5400 RPM drive with one of these. You will be sure to smile.
9/19/2011See more detail
Problem with multiplier

MSI 760GM-P35 AM3 AMD 760G HDMI Micro ATX AMD Motherboard
Pros: Great price, 4 memory slots, great BIOS features.
Cons: My board had an issue with the multiplier for a Phenom II X4 2.8Ghz. The default multiplier was set to 11 (only giing me 2.2Ghz). I had to "over-clock" the multiplier to 14 to give me the actual 2.8Ghz that the chip was rated. I confirmed the chip model / type and the system even reported back the chip as being correct.
Overall Review: Maybe a future BIOS update may correct the issue.
8/22/2011See more detail
Good - Almost Great
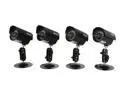
KGuard Camera Kit-H02 420 TV Lines MAX Resolution 1.0Vp-p. 75ohm (BNC) Set of 4 Night Vision & Waterproof CCD Camera Kit
Pros: You're getting maximum bang for your buck, that is for sure. I bought this set of cameras to compliment my recent purchase of the KGuard CA108-H02 4 Camera+8 Channel DVR (Newegg Item N82E16881377018). These are the same exact cameras that come with that 4 Cam system. Now I have a full 8 cam system and I LOVE IT. I have 100% perimeter coverage now. The color and clarity of these cams are amazing for the price. Unless you're planning on spending $1000 on a single cam, you can expect the same performance on these little guys as you can on cams costing four to five times more. My friend has $200 Samsung Cams and these look just as good (except he has MANY more IR LEDs so his night vision is better). But with 8 cams, I have plenty of night vision to go around. I so not need to the cam to see more than the 30 feet it is capable of in complete dark. My other cams will take over when that distance is exceeded.
Cons: The mounting bracket nut that tightens against the cam is too large for use on the rear hole of the cam. It will make contact with the wire coming out of the cam. I had to replace it with a smaller standard nut. Also, the mount for this cam pack is NOT the same for the mounts included with N82E16881377018. I preferred the combo mount. The combo mount had a port to route the wiring through. I accommodated with this configuration (a solid base) by covering up my hole and only leaving enough room for the wire. Also these mounts only have three screw holes while the others had four. The wing nuts on these have plastic grips while the wing nuts on the others were true metal wing nuts. The four way power splitter was BAD. I thought nothing worked until I realized that splitter had a bad center pin. I had to make a work around until I get a better power supply for the entire system. The power supplies included with the KGuard stuff are kind of weak.
Overall Review: I really put a lot of time into finishing touches and strive for a professional look. These cams have the appearance of being pro when installed right. Some tips I will share: Build your mounts to the cams all at once while sitting down and relaxing. Apply thread lock to all of the screws and nuts. Use pliers to help grab the shafts to get a nice snug fit. Back out the mounting plate screw and thread lock that as well. Once mounted, finish the wire off with some loom and zip tie it to the mount. Use your mobile phone app to position the cams so you can make real time adjustments. Bring some pliers with you and use them to lock down the wing nuts once you get the positions just right. But remember, NOT TOO TIGHT or you might break the wing nuts or screws. Certainly a 5 Egg product when you consider the price to performance ratio - even with the minor issues.
5/16/2011See more detail