

Your Browsing History


SYLVIA F.
Joined on 11/12/11
0
0
product reviews
- 15
A Premium, Beautiful case with great thermals & intelligent features that is fun & easy to build in!
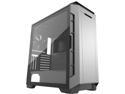
Phanteks Eclipse P600S PH-EC600PSTG_AG01 Anthracite Gray Steel / Tempered Glass ATX Mid Tower Computer Case
Pros: The layout inside of the case is meticulously thought out, as though Monk were in charge of making the cleanest build possible in a case. This is both good & slightly bad, but not enough to deduct an egg. So beautiful that when I freed it from the box I just stared at it for about 8 minutes before I snapped out of it & grabbed my camera to take some pictures of it. Packaging is top notch! The case is nestled into molded-foam surrounds that fully cover the ends of the case with the case itself wrapped neatly inside of a black nylon bag to prevent damage during shipping. The full sheet of tempered glass has 1mm thick plastic protective film on both sides of the glass panel. Foam & absorbent rubber lines the border of the panel on the inside, preventing rattle & helping to keep the case sealed for an excellent thermal environment. The black border visible from outside of the case, conceals that material as well as the latching mechanism, which once again employs the use of magnets at the top & bottom corners of the glass panel, instead of the more common & frankly noise-prone method of securing the panel with thumbscrews, which require drilling holes in the glass & compromising strength at those corners. The accessories box is in a cutout on the top so upon opening the main box it is the first thing you see after pulling aside the little "sheet" of material laid between the flaps & the protective garb. I was excited, but restrained, after all my knife is kept wickedly sharp, & easily parted the three layers of heavy duty packing tape like it wasn't even there. The box holds all the accessories, brilliantly located inside the four HDD bays, making for a very impressive & efficient use of space. These are the guys you want to help when you move! It's that good. The manual. It isn't often I get to suggest Reading The F8ing Manual WITHOUT it having a frustrated undertone! Read the manual, because the people at Phanteks Write The Manual, then F7 (spelling & grammar check) it before printing it out. They may even have someone edit or proof-read it, it's that well written. Not a single spelling error, or grammatical misstep. Everything is written in a way that makes sense and makes building with the case that much more enjoyable. It might seem silly to some, but it goes to show the attention to detail the folks at Phanteks have & the level of pride they take in their products when something as simple as the manual is just that nice. *The effort is recognized & appreciated.* The case is easy to build in, very sturdy & the Sound absorbing panels are steel rather than plastic & held firmly in place with strategically placed magnets seated in the case & corresponding ferrous metal built out from the panel, ensuring a snug fit. The overall fit & finish is excellent & the only "rough" spot I could find anywhere was on the removable top radiator bracket & those I had to search for as they're in a spot that is tough to get to without running a hand along bracket & following up with a fine file, something that isn't feasible unless the case were built-to-order. Considering the level of quality throughout the case, it would be nit picky to complain about something so trivial & the only reason I mention it is because it was unexpected. It's not rough enough to cause injury, nothing that extreme, but it might catch on a mouse pad or a filter, so be mindful of where you place it if it's removed. Other than that, the removable bracket is neat. It allows you to easily mount a Radiator (of fan/fans) outside of the case, then you just slip the mounted cooling device into the case, slip the bracket onto the little hooked guides at the top, tighten the two thumbscrews & all that's left is to make your connections! It's pretty neat & saves a lot of time & potential frustration, especially if you don't have an extra set of hands (i.e. some assistance) while assembling your system.
Cons: I only have two complaints about the case: first, the lack of any place to secure cable runs, such as the CPU to ATX connection in the top corner of the Mobo, with thin little zip ties. They wouldn't really be noticed as long as the zippies weren't thick &/or brightly colored. Second, the PSU shroud being completely fixed is a pain. Yes, there is a generous cutout at the back/side of it, but it makes it hard to finish up the build, especially when it comes to installing HDD there. If you could drop them in from the top via a hatch or door or something in the top of the PSU Shroud, it wouldn't look like Wolverine got drunk & played Tic Tac Toe under there! That python of a 24-pin cable is in the way under there, so I found a way to zip tie it to the little door for the reservoir or pump so it would be out of the way, but doing so made getting the drives to lock into place an frustrating ordeal. The lack of any case lighting COULD be seen as a con, but considering that the Eclipse case comes with 3 2.5" SSD mounts & 4 3.5" HDD Bays, I feel it's worth the lack of RGB light strips. Especially when you factor in the cost of the mounts & drive bays vs a couple light strips.
Overall Review: Regarding the Monkish interior: there aren't enough places to zip tie cables to. Yes, it has those neat double Velcro straps that do a pretty good job, but some cables (like that python of a 24-Pin Motherboard cable) would benefit from being zipped tight against the case at a couple of places. The 3 included 140mm fans are also nice, but once again, there are no rubber dampening on the corners of the fans, despite them being standard when you buy the fans. It's actually something omitted in my last Phanteks case (Enthoo Pro) & it bears repeating: all 8 corners don't have to be rubber dampened if it's a materials/cost thing. Just put the dampeners on the side which touches the case, or toss them into the accessories box for the customer to put on themselves. Hell, now I have to acquire 12 rubber grommets or something to put on the 140mm fans, cause their performance to noise ratio is outstanding! The only fan I hear is the goofy 120mm Corsair fan I threw in under the 140mm fans temporarily to cool the HDD drives. It's only there till I can replace it with a proper 140mm fan. I'll likely swap out the fan that was installed at the rear of the case & move it to the intake & install the 140mm Phanteks fan from the Enthoo Pro case as the top exhaust fan. It has white blades instead of black, so doing that would give the front a consistent look. I'm the only one who will see the top fan & it won't bother me that the blades are white.
5/17/2019See more detail
Vampire! But NOT a "Time Vampire" (Picture It In Ruins song), rather a Joules Nosferatu!
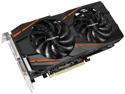
GIGABYTE Radeon RX 570 4GB GDDR5 PCI Express 3.0 x16 CrossFireX Support ATX Graphics Card GV-RX570GAMING-4GD
Pros: It actually runs pretty darn cool thanks to the "Windforce" cooling system, which consists of 3 direct contact copper pipes & a miniaturized heat-sink mated directly to the GPU & the twin fans by default (at least on Linux, without any AMD software installed) spin at under 800 rpm, effectively making them silent while keeping the card below 36 C. "Stylish metal back plate" looks undeniably cool & according to GIGABYTE, assists in the cooling of the card. RGB Lighting, if you’re into that. It defaults to just cycling through about 7-10 preset colors which isn’t too annoying. Good thing, cause I couldn’t install jack to shut it off or set it to match my color scheme.
Cons: THIRSTY, this thing GULPS power like a man dying from thirst in the desert! Despite 3 separate PSU calculators indicating this card wouldn't have a wattage requirement exceeding the NVIDIA GeForce GTX 1050 card it was slated to replace, it pushed my power draw to over 105 Watts when before it was 55 Watts! NOT GAMING! Idling! Put a light load of a single instance of Firefox (with never more than 5 tabs open at a time) & it jumped to 120 Watts, compared to 77 Watts before & that was with 5.1 speakers On, jamming tunes. Power draw is confirmed by the omnipresent Kill-A-Watt meter my system is plugged into. Wasn't able to undervolt the GPU or install WattMan to reduce the power draw, despite following all guides to the letter & rebooting the system. Couldn't even get ANY program, proprietary OR Open Source, to reduce power draw to a more reasonable, less insane amount. Terminal commands didn't work to calm down the power craze either. Pulling the RX570 & reinstalling the GTX 1050 did, though. 8x1 Pin Power cable requirement. Gotta have it, won't run without it. Expensive lesson learned. Now I gotta try to sell this thing or something... Or keep it in the box till November/December when it finally cools down...
Overall Review: Unfortunately, I didn't read the Return Policy which is Exchange Only for the exact same product. So I can't return it & pay the difference for an NVIDIA card. Decked the dog on that one. 8x1 Pin Power cable requirement. I realize this is redundant, but I should have taken that as my first clue, with the second being what PCPart Picker reported under "System Wattage" instead of the 3 separate Power Supply Calculators (OuterVision, Seasonic & EVGAs) which indicated there wouldn't be much of an increase in power use. I really shouldn't have purchased this GPU, as my build is geared toward a low-wattage, efficient system with sufficient headroom to last the next 5-7 years with the only upgrade needed being the GPU, eventually. System Specs: Case/Chassis: Phanteks Eclipse P600S Anthracite Gray & Tempered Glass Edition CPU: Intel Core i5-8500 3.0Ghz (4.1Ghz Turbo) Hexacore Proc CPU Cooler: Noctua NH-U12S Heatsink w/ NF-12 Redux 1700rpm PWM fan (instead of the fugly fecund brown stock fan) Mobo: Gigabyte Z390 Aorus Pro PSU: Seasonic Focus+ Platinum 550 Watt Fully Modular Power Supply RAM: G.Skill Ripjaws V 3200Mhz 16GB (2x8gb) DDR4 Storage: WD Blue 3D Nand 550GB SSD (Main/OS); OCZ ARC 100 256GB SSD (Old Win 7 Install); WD Black 1TB HDD (Media/Data/Storage); Seagate Barracuda 2TB HDD (Documents, Data, Backup) UPS: CyberPower CP850PFCLCD Pure Sine Wave OS: Kubuntu 19.04 with the BEAUTIFUL KDE Plasma Desktop. Oh, yeah. The GPU: NVIDIA GeForce GTX 1050 2GB Overclocked Gigabyte flavor. Since I don't do any really intensive gaming 1080o is fine for now, but I know the card is a mismatch for the system & will be the bottleneck for some of the upcoming games I'm interested in (such as The Sinking City).
6/4/2019See more detail
Looks Nice, Excellent Performance & Nearly Silent
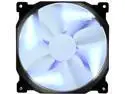
Phanteks PH-F140SP_BK_BLED 140mm Blue LED Case Fan
Pros: *The fan is pretty much inaudible. I have 3 of these installed as intake fans on my Phanteks Eclipse P600S case, plugged into the fan hub in the case for speed regulation, & I hear my 2 Noctua Redux 120mm fans on the Noctua CPU cooler over these three. *Moves a LOT of air. The 3 LED fans replaced the (pretty good) stock Phanteks 140mm fans that came pre-installed on the Eclipse P600S case & I watched my storage drive temps drop 10 degrees! Other temps like VRM Chipset & Mobo dropped a good bit, like 3-4 degrees or thereabouts. Overall everything saw a reduction in temps & there are 2 dust filters at the intake (a nylon one built into the front panel & a fine mesh magnetic filter directly in front of the fans). *My goal was to bring down my HDD temps, particularly the 2TB Seagate which runs a bit warm. Ta-pock: Achievement Unlocked! *Rubber dampeners do a good job eliminating vibration transferred to the case.
Cons: *Not PWM & there isn't a PWM version available. I knew that going in & since these are plugged into a fan hub with the speed set/controlled by a PWM fan, it's not a big deal. *It would be nice, though to add the same fan w/ PWM control to regulate the fan speed, instead of having to find a 140mm PWM fan that won't look out of place.
Overall Review: *The LEDs can be turned on/off with a button wired into the fan, which of course means more cables to manage. The short lead with the button can be disconnected, which is nice, I guess. I just did some creative mounting & routing & hid the buttons, so they wouldn't end up getting lost or something. *Beware of another seller on Newegg that lists one of these fans for double the price. There aren't any reviews for that listing at the time I wrote this review & the item showed that it was coming from Hong Kong before mysteriously changing to United States. Just a heads up to be wary & make sure you get the fan sold & shipped by Newegg. *The cable which plugs into the Motherboard is nicely sleeved, but the LED switch cable is not. Not really a con, just an inconsistency which I thought people should be aware of.
1/10/2021See more detail
Great protection, some annoyances, but worth it overall
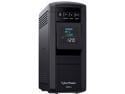
CyberPower CP850PFCLCD PFC Sinewave UPS Systems - 850VA/510W, 120 VAC, NEMA 5-15P, Mini-Tower, Sine Wave, 10 Outlets, LCD, PowerPanel
Pros: *First, this puppy does its job & does it well! Works for PSU's which have Active PFC or Power Factor Correction. If you have an 80+ rated Power Supply, that's what you need, broadly speaking. *You can see the number of "Events" on the LCD, which is important in certain situations. There have been a total of 6 events since it's been in service protecting my current build & the previous one. 2 of the events were intentional "tests" where you hold your breath & unplug the unit from the wall while your system is running. *You can silence (most) of the beeps... Except that one. *It is pretty efficient, more so than I anticipated. The unit itself only draws 9-12 watts during use/while protecting whatever's connected. Caveat: It's a vampire. Not a "Time Vampire" like the Picture It In Ruins song, which is beyond sick. *It stays surprisingly cool, especially if you let it breathe. So give it some space, that 8-ft right angle plug is there for a reason. I cut a section off of a pine 1x8 that was left over from a finished project to get it off the carpet & There is 6" of space between the unit & the walls at the back & right side. *Good run-time for my system. The more efficient your PSU, the better for the unit. I finished a new build that went from a 80+ Gold rated 550 Watt PSU to an 80+ Platinum rated 550 Watt PSU & while the difference isn't enormous, it is noticeable but only if you paid attention. The real noticeable difference occurs before the UPS is really a factor in the equation. *When the unit is muted & there is a Power Event it will emit a single soft tone, if it is a non-critical Event (i.e. Voltage Drop or Spike, something of that nature). If it's a critical Event (i.e. total loss of power, or pulling the plug with bated breath) the tone emitted is louder, but I haven't heard it repeat.
Cons: *That one long, loud beep, followed by two short also loud beeps, that happens whenever you power the unit on &/or off by pressing & holding the Power button. While all other beeps/alarms can be muted, that particular one can't be muted. This is something to consider if you don't leave the UPS & everything connected to it plugged in 24/7, but unplug the UPS from the wall like I do when the system isn't in use. *All information regarding Events (i.e. voltage drop, power loss, etc.) are recorded in the PowerPanel software. No data is available on the unit itself aside from the number of Events. This is a problem because: *The software can be wonky to say the least. There were numerous times that the software would thing that either the UPS wasn't connected or the PowerPanel Service was not started/was not able to start. PowerPanel service was set to Automatic, when Win 7 loads & the USB cable was always plugged into both the UPS & a USB port in the rear of the case. I had to unplug the USB data cable from the UPS to the back of my tower, end the PowerPanel Software from Task Manager, plug the USB cable back in & restart PowerPanel by opening it from the Programs menu. All so Windows 7 Home Premium 64-bit would say, "Your UPS is correctly connected" & actually start to register data & be usable. *Otherwise, nothing gets monitored/logged, there is no cumulative data on operating cost, a neat feature. When I had to reinstall the OS, PowerPanel didn't work at all. I had to get an WAY old version (like 1.18 or something, the current at the time was 2.15 or 2.16) which worked. Updating the software while keeping the old version's service enabled was the only way to get it to work. *I'm now running Kubuntu 19.04 in my new Z390 build & it's not supported (or at least it's such an out of date version, I can't get it to install) so...
Overall Review: *Yes I would recommend this UPS, especially if you happen to get it on sale, which I was lucky enough to do & managed to score this unit for $99.50 shipped in September of 2018. It arrived a day early, too & was sitting there waiting when I came home from work. Good thing the Brown Truck UPS guy set it where it was mostly out of sight. *Full Disclosure here: I purchased a different CyberPower UPS from a brick & mortar retailer, who shall remain nameless because Newegg doesn't like name dropping of other stores (even if they share a name with a grocery store), however that particular UPS was not Pure Sine Wave, it was the Simulated Sine Wave. Just for giggles I attempted to test it out, but the UPS wouldn't play nice. My PSU at the time was a Corsair CS550M 80+ Gold rated with Active PFC. If it had let me fire up the PC, chances were good it would not provide protection & would have failed the "Hold your breath & pull the plug" test.
5/29/2019See more detail
Great Mobo, Decent UEFI BIOS, One minor PITA. 4.5 Stars overall.
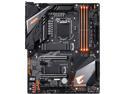
GIGABYTE Z390 AORUS PRO LGA 1151 (300 Series) Intel Z390 HDMI USB 3.1 ATX Intel Motherboard
Pros: Running the Fate (v. F8) BIOS. There's an F9, but I'm not sure if I'm gonna change it. If it ain't broke & all that... It's so pretty! It's also pretty Bad@$$! Realtek ALC1220-VB Audio Codec sounds great (not audiophile level, but what audiophile uses onboard sound?). Plenty of fan hubs (8 total) ALL of them 4-pin & true PWM. 8 built-in Temperature Sensors + 2 headers for the included thermistor cables, potentially totaling 10 sensors. *See below. Highly efficient 12-phase power design. VRMs that keep cool, despite a Liquid Cooler which doesn't provide any sort of residual cooling effect. The VRMs were reportedly designed with that in mind & thus engineered to be cooler than industry standard. Serious thermal pads on the heat sinks. I'm not kidding, you can see them easily sandwiched between the board. Looks like Oreo cream filling. Don't try to eat it. :-) Generous spacing around the standoff screw-holes, holes which according to the manufacturer are said to be more resistant to the effects of ESD events. That may be marketing malarkey, but it's still nice to have some space around critical points such as those & the area surrounding the CPU socket & capacitors as well as the back plate on the back of the motherboard. The integrated I/O Shield is neat, making case drop in easy & worry free. It's doubly awesome considering this is the only mobo at this price point to feature one. The next closest is $20-30 more. Reinforced PCI Express Slots (the main 2 anyway) & RAM Slots (All four, duh) are functional & look sick. BOTH M.2 Ports have heat sinks, most boards will only 'sink one M.2 port if at all. Recognized my RAM & had the correct speed out of the gate. The lettering for all connections on the board itself are large enough & just the right shade of not-quite-white but brighter-than-gray to be easily read, with the exception of the front panel. The front panel lettering is tiny & beneath the headers at the bottom of the board. This little annoyance is mitigated by the fact that the connections are color coded & there is a big "+" sign printed where the pin is. It's also all enclosed like other headers, instead of just being open & looking dorky like other boards that I've seen. The included "G Connector" thing is neat, but wouldn't work cleanly with my front panels' wiring. YMMV depending on case manufacturer.
Cons: The cons are few, but I'll start with the biggest one: Pay close attention if you have a Liquid CPU Cooler: First, plug the pump into CPU_OPT on the motherboard, NOT one of the Sys/Pump hubs. Second, immediately upon boot you NEED to hit the "Delete" key to enter the BIOS & go into Smart Fan Monitor. You have to make sure the BIOS will regulate your cooler properly! It DOES NOT do it automatically, in fact, the pump doesn't even run on some models until you make the change. Mine didn't. It was terrifying. If you have a pump with a fixed speed, you have to adjust the settings to reflect that: set the Fan Speed Control to Full Speed, switch the Fan/Pump Control Mode to Voltage & Switch ON the Fan/Pump Fail Warning. Also, in order for it to remember the settings, it's smart to click on the Fan Speed on the right side so it switches to displaying Flow Rate. When those changes have been made, hit F3 to Save the Profile so that the changes do get saved correctly. Changing the Fan Speed to Flow Rate seems like it tells the mobo you actually DO have a Liquid Cooler, not an air cooler, cause when I made all the above changes EXCEPT that final one, my pump kicked on once (I could hear it start to circulate) then stopped upon reboot, & it wasn't until I made that last change & saved the profile (overwriting the prior one) that the mobo finally understood the cooling unit. When I switched it from Fan Speed to Flow Rate & saved it, the pump turned on again & stayed on. I also noticed that the BIOS now always shows Flow Rate instead of Fan Speed under CPU_OPT & there have been no issues. But it was dicey there for a second & I'm glad my room temp was around 70 degrees F & my fans were all spinning. CPU Temp as reported in the BIOS thankfully never went above 34 C & when I locked in those changes, dropped back down to 29-30C. There are no issues with the pump not turning on either. *Where to place the thermistor cables? I can't decide & the manual gives no guidelines or suggestions whatsoever. The RGB Lighting is not adjustable or configurable through the BIOS, you have to use RGB Fusion (in Windows) to change from the GHASTLY default yellow/orange color that sometimes makes the inside of your case look like parts might be smoldering... I'm using Kubuntu, not Winblows. For some crazy reason, my 3 front intake fans take an extra few seconds to start to spin up after hitting the Power button. They are plugged into a fan hub in the Phanteks case & the hub is plugged into SYS_FAN_1 on the mobo with power provided via a SATA connection from the PSU. The BIOS setting for SYS_FAN_1 is set to PWM and Auto speed, and each fan is plugged into one connection, so they aren't stacked or anything. The signal is received from a single top case exhaust fan. All but one fan are identical 140mm Phanteks fans. The odd one out is a 120mm Corsair LED fan as the bottom intake until I can get a 140mm to replace it with for consistency. I wonder if that may be the reason, but I'm actually not too concerned, cause they spin up after a few seconds. I haven't overclocked & my case (Phanteks Eclipse P600S) has excellent thermals as it is.
Overall Review: I like how the audio ports are all the same black color ::eye roll:: & the printing is teeny. Nothing like hearing "Front, Center" come from the Left Surround & Subwoofer static come from the Right Surround. The Aorus logo on the I/O shield lights up (again that ghastly orange/yellowish color) which is pretty nifty & will be downright sweet when I finally get it changed. One last thing, to the dude whose RGB strip caught fire & melted: the RGB headers labeled D_LED 1 &2 have adjustable voltage set by a jumper on the board. By default it is set to 12V which can be reduced with said jumper down to 5V. Perhaps that's why it melted? It's easy to overlook & the other RGB headers are 12V only. I haven't added any additional lighting yet, but plan to do so shortly.
5/17/2019See more detail
These are MUCH better than regular Push Pins, If you can get them for a reasonable price.
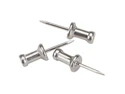
Gem Aluminum Head Push Pins, Aluminum, Silver, 1/2", 100/Box CPAL4
Pros: *The heads are made of aluminum, making them significantly stronger vs standard plastic head push pins. *The box actually had 110 push pins, which is good because of the first con below. *No more busted heads from hammer blows sending plastic fragments flying. *A 1/2" long shank means they will positively secure whatever you need to wherever you need to, within reason of course.
Cons: *Out of the box, 8-10 push pins had shanks that were poorly set into the head. By that I mean they were at enough of an angle relative to the head as to make them almost unusable; that is, unless you actually need a push pin to be inserted with the head angled. Then, since the head is aluminum, you might be alright. *The silver paint on the heads are an unnecessary afterthought. It only makes you question if the heads are actual aluminum, and most of the paint ran or beaded at some point or another, be it on the head or the shank. Not really a Con... *If the heads of normal push pins exploding occasionally makes you giggle... No more busted heads from hammer blows sending plastic fragments flying?
Overall Review: *At first glance, you may think the heads of these push pins are plastic painted to look like aluminum, but testing reveals they are actually aluminum painted silver. How do I know that? When you use a hammer to tap in a regular push pin (& I really mean lightly TAP) the heads of regular plastic push pins tend to crack or explode. These push pins don't do that at all, even when the tap isn't so light. I'm sure that given a hard enough smack with a hammer they'll break, but that's simple physics & metallic properties. Steel is a harder metal & inherently has more strength than aluminum. *I haven't been able to find these in ANY brick & mortar store, and every other online store in shipping charges, the cost is the same price product itself or more!
10/21/2018See more detail