Your Browsing History

Christopher W.
Joined on 11/04/14
0
0
product reviews
- 1
Great Desk and Awesome Space
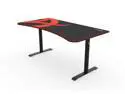
Arozzi Arena Heavy Duty Rectangular Gaming Desk and Mouse Pad Black
Pros: Easy to put together and awesome space for a desk. If you follow the instructions in the book you will have some problems so I will add the steps I completed and it will save you a lot of time and effort.
Cons: I wish it was customizable for the desk mat as I don't prefer the design on top. However this by any means is not really a con. You can purchase additional mats from the company separately, so if these ever run down I will purchase replacements from them.
Overall Review: This was actually my 3rd and 4th desk purchase of this product. I had actually purchased 2 back at Christmas for my kids and it worked perfectly, so I bought two more for me and my wife. I recommend this desk to everyone. Only one hint on putting this together. Put the brackets on the desk first before attaching the legs. This will make it more of a 1 man job than 2. Once you have the brackets on the desk part then you can slide the legs into place and attach. Also don't tighten the bolts all the way in on the desk, before screwing the desk into place. This will give you some maneuverability when sliding the legs and attaching them to the brackets. I really wish I would have done a video for this but the instructions that came with the desk make it a little difficult to put together. Do these steps in order to save you a hassle. Step 1 and 2 in the instruction book: Complete and set the legs to the side. Step 3. Assemble and set to the side. Step 4 in the book is what you do not want to do. Skip this part and do Step 5. Once you do step 5. The brackets you put together in step 3 you want to go ahead and attach them desk like you see in step 6 but it will be without the legs. Make sure you keep the brackets some what loose you will see why when you do the next step. The next step is you will attach the legs once the brackets are attached to the desk. The legs will slide right in and you won't have to hold them up while attaching the brackets to the legs like you see in step 4. Secure the legs first to the brackets then tighten down the rest of the bolts to the desk. Once this is done you can attach the netting. Make sure everything is nice and tight and then have someone help you flip the desk. Once the desk is flipped and put into place then put the mat down. If you do it this way then it will save you a lot of time I promise.
5/28/2017See more detail