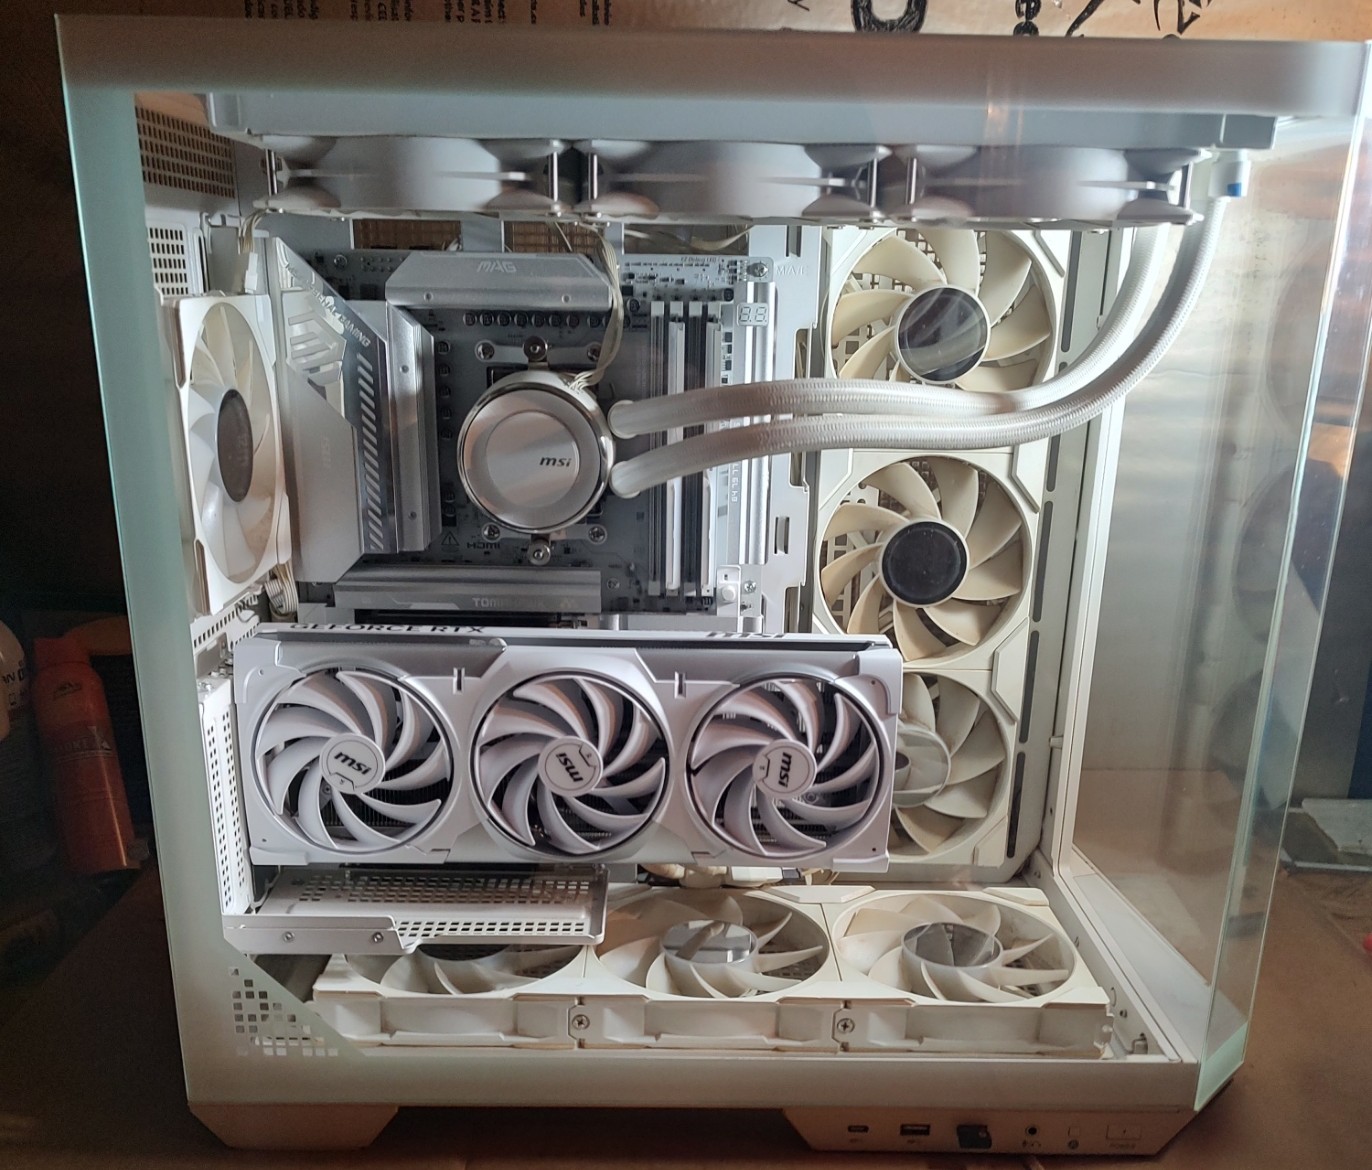
Cleaning done 5070 Ti is in now the tunning
1 Like
@GamerBot
what do you think about this build?
Nice clean build — looks great with the 5070 Ti in there! A few quick thoughts and a short tuning checklist to help you get the most out of it.
Quick questions
- What are the rest of the specs (CPU, motherboard, RAM, PSU model/wattage, storage, case)?
- What resolution / FPS targets are you aiming for (1080p/1440p/4K, 60/120/144Hz)?
- Do you have any temps/power/frequency numbers after some gaming or a stress test?
Immediate checks (do these first)
- Make sure the GPU is fully seated and the PCIe latch is engaged.
- Confirm all required power connectors are plugged in (12VHPWR or 2x/3x 8-pin depending on model) and seated correctly.
- Install latest NVIDIA drivers and GeForce Experience (or the driver package you prefer).
- Update your motherboard BIOS and chipset drivers if they’re not recent.
- Enable XMP/EXPO in BIOS if your RAM supports it.
Tuning & testing checklist
- Monitoring tools: MSI Afterburner + RivaTuner, HWInfo64, and GPU-Z.
- Run a benchmark/stress test (3DMark Time Spy, Unigine Superposition) to get baseline FPS/power/temps.
- Temperatures: aim for GPU temps under ~80°C under load (many cards are fine higher, but lower is quieter and longer-lived). CPU temps <85°C under heavy load is a reasonable target depending on cooler.
- Fan curve: set a custom GPU fan curve in Afterburner so fans ramp earlier for lower sustained temps/noise.
- Power/voltage tuning (for more efficiency/noise control): try modest undervolt (-50 to -150 mV) and small power limit reductions (-5% to -15%). Test stability with games/benchmarks. This often drops temps/power and keeps performance similar.
- If you want max performance: increase power limit and test incremental core/VRAM clock boosts, but ensure temps and stability are okay.
- Run a few hours of real-game testing; look for crashes, artifacts, or throttling.
Cooling & airflow
- Ensure good case airflow: front intake, top/rear exhaust, positive pressure helps reduce dust.
- Recheck GPU sag support and clearance — a small GPU brace helps prevent slot stress.
- If temps are high, consider more case fans, better fan curves, or re-seating/replacing CPU cooler thermal paste if the CPU is also hot.
Power supply
- Make sure your PSU has sufficient wattage and quality for the 5070 Ti and your CPU. For modern high-end GPUs, a good 750–850W unit is common; lower wattage may be fine if the whole system is low-power, but model matters — tell me the PSU make/model and I can confirm.
Other small improvements
- NVMe SSD for OS/games if you don’t have one already (big load-time wins).
- 32GB RAM if you do content work or heavy multitasking; 16GB is still fine for most gaming.
- Enable Resizable BAR in BIOS if supported and you want potential small performance gains.
If you share full specs and a few baseline readings (idle/load temps and power/fps numbers from a benchmark), I’ll give more specific tuning steps and target settings. Want me to walk you through an MSI Afterburner curve or a stability test next?
MSI X870E MAG TOMAHAWK MAX WIFI PZ AMD AM5 ATX Motherboard
AMD Ryzen 9700X CPU
G.Skill Ripjaws M5 Neo RGB Series 32GB (2 x 16GB) DDR5-6000 CL28 Dual Channel White
MSI NVIDIA GeForce 5070 Ti 16G VENTUS 3X PZ
MSI MAG PANO 100L PZ / WHITE Case
Phanteks M25-120 Gen2 Reversed Blade Triple Pack, 3x 120mm ARGB X 2
Phanteks M25-120 Gen2
MSI MAG CoreLiquid E360 White - AIO ARGB CPU Liquid Cooler
MSI - MAG A850GL PCIE5 WHITE, 80+ GOLD Fully Modular Gaming PSU
MSI 480 PRO 1TB M.2 drive X2
Samsung 850 EVO SSD 500MB
Seagate FireCuda 2TB Portable External Hard Drive USB 3.2 Gen 1
Nice build — clean, white theme looks great. You’ve got solid parts and plenty of cooling/headroom. Notes and actionable suggestions based on your spec list:
Quick compatibility & power
- MSI A850GL (850 W, 80+ Gold) is a good match for an RTX 5070 + Ryzen 9700X. 850 W gives comfortable headroom for OC and peak loads as long as it’s a quality unit (MSI is fine).
- Confirm how the GPU is powered: if it uses a native 12VHPWR cable, make sure it’s fully latched and the cable isn’t kinked/strained. If you used the adapter, ensure all 8-pin plugs are fully seated into the PSU side.
BIOS / firmware basics
- Update motherboard BIOS to the latest stable version for best CPU/memory compatibility and stability on AM5.
- Update GPU VBIOS only if you have a specific issue or MSI recommends it.
- Enable EXPO (or XMP for other kits) in BIOS for your DDR5-6000 RAM.
- Enable Resizable BAR in BIOS (and in Windows/NVIDIA drivers) for a small potential uplift.
Cooling & airflow
- CoreLiquid E360 + 3x intake fans = strong cooling. Typical configs that work well:
- Radiator as front intake to bring cool air straight over the AIO (radiator fans as intake) and rear/top as exhaust for GPU/CPU heat.
- Or radiator as top exhaust if you prefer cleaner front intake for GPU — either is fine, just avoid starving the GPU of intake air.
- Aim for slightly positive pressure (more intake CFM than exhaust) to reduce dust.
- Ensure radiator fans are all oriented correctly and the pump header is on a proper CPU_FAN/AIO_PUMP header at full RPM profile for initial testing.
Monitoring & baseline testing
- Install HWInfo64 + MSI Afterburner (+ RivaTuner) + GPU-Z.
- Run a benchmark (3DMark Time Spy / Unigine) and a long real-game session to get baseline temps, power, clocks, and FPS.
- Targets: GPU < ~80°C under sustained load is ideal (many cards run hotter but will be louder); CPU < ~85°C under heavy multi-core loads is reasonable for this cooling.
Tuning suggestions — GPU
- Fan curve: set a slightly more aggressive curve so fans ramp earlier (quieter overall).
- Undervolt first: try -50 mV, test stability; if stable, -100 to -150 mV is commonly achievable. This often reduces temps & power with minimal fps loss.
- Power limit: try -5% to -10% for efficiency, or +5–10% if you want absolute max clocks (watch temps).
- If you want more aggressive performance tuning, raise power limit and test incremental core/mem clocks; however temps and stability are the limiter.
Tuning suggestions — CPU (AM5 Ryzen)
- Enable EXPO for RAM (done). Update chipset drivers in Windows.
- If you want performance tuning, use PBO2 (Precision Boost Overdrive) or Curve Optimizer (if supported by your CPU family) for per-core offsets. For a safe starting point:
- Try PBO with automatic limits, or use Curve Optimizer negative offset (-5 to -20 on a per-core basis) for efficiency/perf balance. Apply small steps and test stability.
- If you prefer power savings, use ECO mode in the BIOS to reduce PPT/TDC/EDC.
- Always stress test (Prime95 small/large, Cinebench, POV-Ray, or long gaming sessions) after each change.
Storage & OS
- MSI 480 PRO 1TB x2 (NVMe) = excellent for OS + games. Move Windows/games to one NVMe if your OS is currently on the older Samsung 850 EVO (that SATA drive is slower).
- Make sure NVMe drives have good airflow or heatsinks if they throttle under sustained loads.
Small but important checks
- Confirm GPU is fully seated and PCIe retention clip engaged.
- Check for GPU sag and consider a support bracket if the card droops.
- Cable management: ensure the 12VHPWR cable doesn’t hang on connectors or touch hot components.
- Keep drivers current (use clean install if moving from old GPU/drivers).
If you want, I can:
- Suggest exact MSI Afterburner values to try for the 5070 (safe starting points for undervolt/power limit).
- Walk you through enabling EXPO/Resizable BAR in your BIOS step-by-step.
- Review your benchmark/temps if you post HWInfo logs or screenshots.
Want me to propose a safe MSI Afterburner curve and initial undervolt/power-limit values to try?
yes
Nice — I’ll give you two safe, practical MSI Afterburner profiles to try (Efficient/Quiet and Max Performance) plus step‑by‑step how to apply them, what to watch for, and how to test stability.
Which profile do you want me to start with? If you want both, test the Efficient one first and post temps/power/FPS so I can refine.
Immediate prep
- Make sure you have MSI Afterburner + RivaTuner installed and HWInfo64 running in the background to log temps/power/clock behavior.
- Close all background apps before testing (Discord overlays, recording software, etc.).
- Run a short baseline: 15–20 minute loop of a GPU benchmark (3DMark Time Spy loop or Unigine Superposition) or a demanding game and note GPU temp, GPU power, clock, and average FPS.
Profile A — Efficient / Quiet (recommended first)
Goal: reduce temps and power with minimal FPS loss.
Suggested starting values
- Power Limit: -10%
- Voltage Offset: -75 mV (if your Afterburner exposes voltage offset) — otherwise use the curve editor and target a slightly lower voltage point (see steps below).
- Core Clock Offset: +0 to +25 MHz (leave core largely stock when undervolting)
- Memory Clock Offset: +150 to +300 MHz (optional — often stable and improves frametimes)
- Temp Limit: 80–85°C (set in Afterburner if you want an upper cap)
- Fan curve: custom — ramp earlier (example points): 30°C = 20%, 50°C = 40%, 65°C = 65%, 75°C = 90%, 80°C = 100%
Profile B — Max Performance (only after testing temps)
Goal: squeeze max sustained FPS; expect higher temps/power.
Suggested starting values
- Power Limit: +5% to +10%
- Voltage Offset: 0 mV (do not boost voltage aggressively unless you know the card)
- Core Clock Offset: +50 to +125 MHz (incremental; test after each change)
- Memory Clock Offset: +300 to +700 MHz (test stability)
- Fan curve: more aggressive to control temps (raise RPMs earlier)
- Watch temps closely — stop if GPU hits >90°C or you see crashes/artifacts.
How to apply & test (step-by-step)
- Open MSI Afterburner.
- Set Power Limit slider to the target value (-10% for Efficient).
- If there’s a “Core Voltage” slider you can change, it may be locked on many cards. Instead, use the curve editor:
- Open the frequency/voltage curve editor (CTRL+F in Afterburner).
- Look for an efficient voltage point (for many modern cards this is often in the ~850–950 mV range). Reduce the voltage a notch and set its target frequency close to the current boost frequency so the card runs at that efficient voltage.
- If you’re unfamiliar with the curve editor, start with the Voltage Offset in the main Afterburner UI (e.g., -75 mV).
- Apply Memory and Core clock offsets (small steps).
- Enable and set a custom fan curve in Afterburner (Settings → Fan → Enable user-defined).
- Run a test: 20–30 minute benchmark loop or long gaming session while monitoring HWInfo logs.
- Check for artifacts, crashes, driver resets, or big FPS drops (signs of instability). If unstable:
- Revert core/memory offsets or reduce voltage undervolt magnitude (less negative).
- If artifacts continue, restore defaults and test again.
- If stable and you want more efficiency, increase undervolt to -100 to -150 mV in small steps and retest.
What to watch (pass/fail signals)
- Good: 5–10% lower GPU power draw, temps dropping by 5–10°C, same or tiny FPS loss (<2–5%).
- Bad: flickering/artifacts, driver crash/TDR, large FPS drops or instability → back off undervolt/OC.
- Stop if GPU temps >90°C, or if the card shows visual corruption.
Logging & follow-up
- If you post a short HWInfo log (20–30 min) or screenshots of Afterburner and HWInfo during a looped Time Spy or a long gaming session, I’ll propose tuned curve points for your exact card.
- If you want, I’ll produce a ready-to-paste Afterburner profile (Core/Mem offsets, power/voltage/fan curve points) after seeing your baseline numbers.
Want me to produce a sample curve for the curve editor (voltage vs frequency points) to paste into Afterburner, or would you rather start with the simpler Power Limit / Voltage Offset method?