


All Types of Dashcam Hardwire
How we start?
We start with a dashcam accessories supplier, and we decided to develop the dashcam hardwire kit with more functions to meet customers' new requirements, and we started to do so.
Why the hardwire kit cannot cut off power when engine is off?
Because nowadays many vehicles have the start/stop function, the hardwire kit has the time delay function to keep the power supply when engine is for a temporary stop
Why the hardwire kit is not compatible with all brand dashcams?
Because the Type-C uses a different ACC signal port than others (A5-B5 or A8-B8) it may cause not compatible issue.


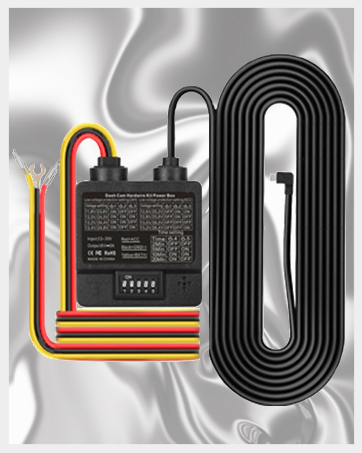
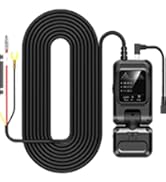
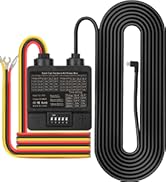
DASH CAMERA HARDWIRE KIT

VOLTAGE SELECTION HARDWIRE KIT FEATURES:
- Voltage Selection: Allows you to select different minimum voltage levels for vehicle.
- Timer function: Allows you to select the times to keep dash camera recording.
- 2 Power Modes: ACC or 24 Hour Parking Mode.
- Compatibility: Compatible with most of the dash cameras for 12-24V vehicles.
- Low Voltage Protection: Automatically power off voltage at the preset level.
IMPORTANT NOTE:s
If the hardwire kit does not provide power, please try to insert the fuse tap in the OPPOSITE direction.
(Due to the car fuse slot having positive and negative poles)

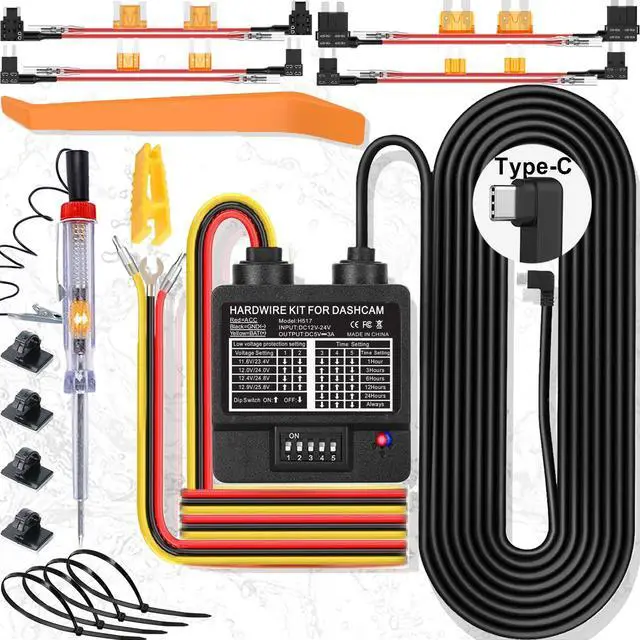
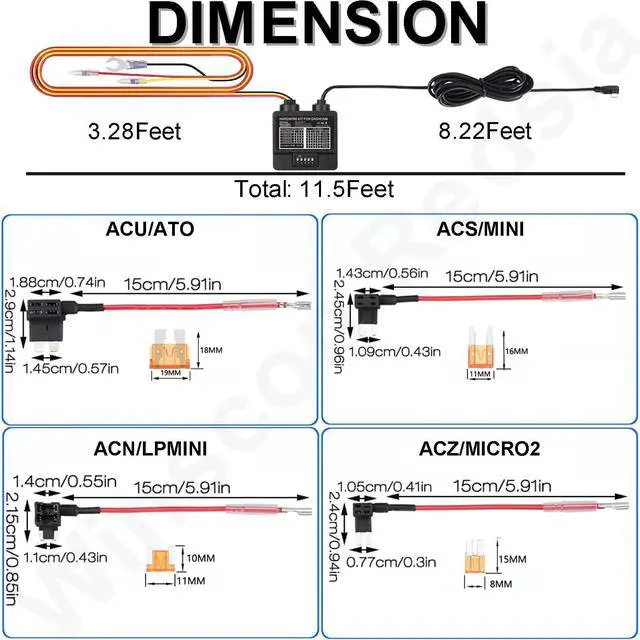
24H DASH CAM HARDWIRE KIT SPECIFICATIONS:
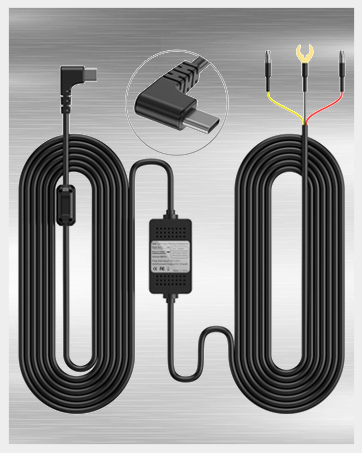
- Connector Type: USB Type-C
- Input Voltage: DC 12V-24V
- Output Voltage: 5V
- Output Current: 3A
- Working Temperature:-40~ 160 Degrees F
- Cable Length: 11.5ft/3.5m
- Adjustable Low Voltage Protection: 11.6V for 12V vehicle; 23.5V for 24V vehicle. (Adjustable based on your need)
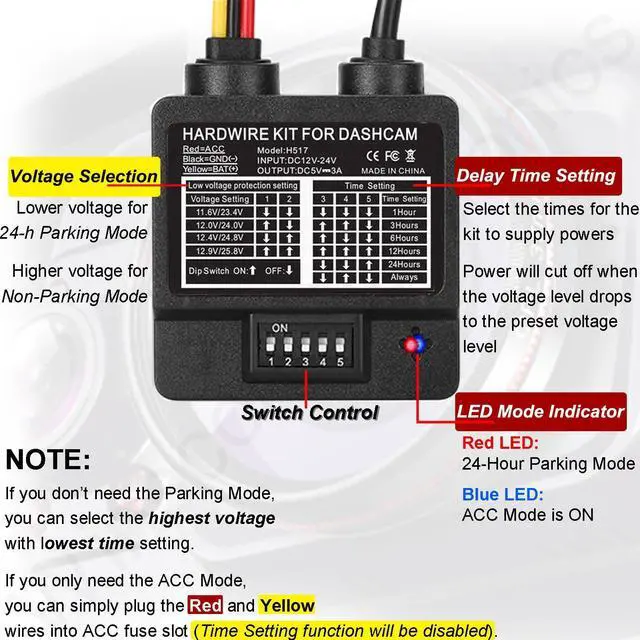
- LED Indicator: Red-Parking Mode; Blue-ACC Mode
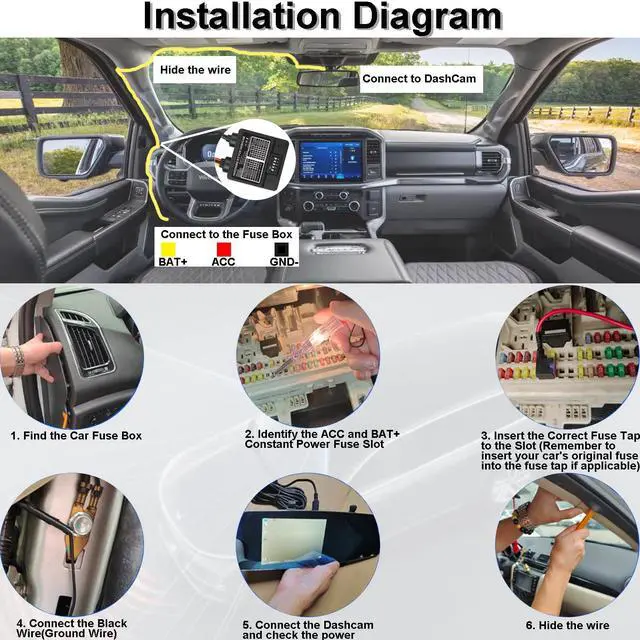
HARDWIRE KIT INSTALLATION STEPS:

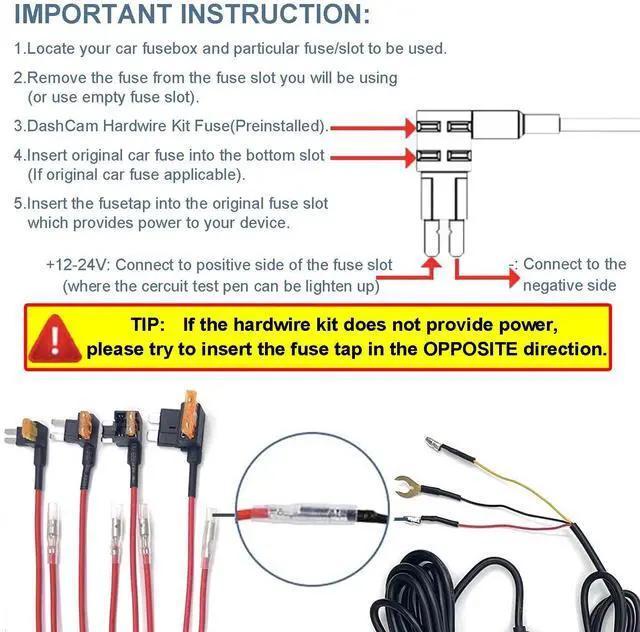
1. Use your owner’s manual to identify the location of the internal fuse box. This is normally found by the foot well on the driver’s side of your vehicle or under the engine hood.

2. Open the fuse box cover plate to find the fuse map. Locate the Fuse Box and find a Constant Fuse Slot, or ACC Fuse Slot(for NOT USE 24/7 Surveillance Mode).
3. Remove the fuse from the constant fuse slot and insert it into the bottom slot of the fuse we provide the same size.
Use the circuit test pen to identify the positive pole of the fuse slot.

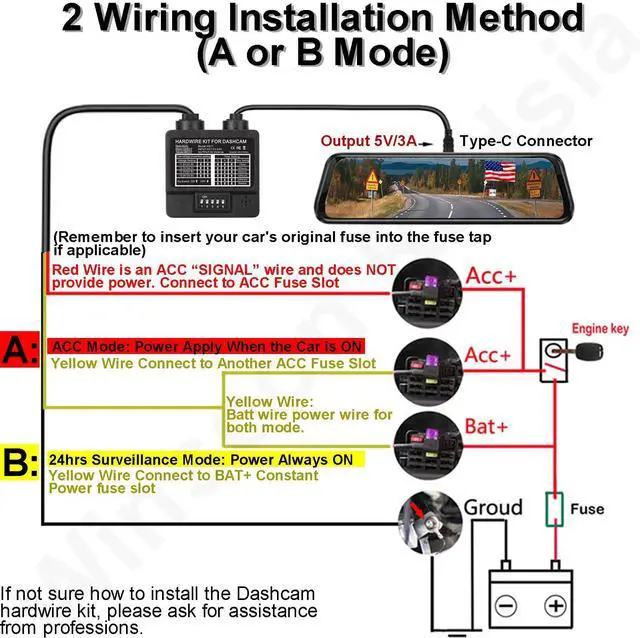
4. Connect the Yellow LINE to the positive pole of the constant fuse slot, or ACC Fuse Slot(for NOT USE 24/7 Surveillance Mode).
5. Connect the RED LINE of the hardwire kit to the positive pole of the ACC fuse slot in the fuse box. ACC fuse slot energizes only when the ignition switch is on.
(IMPORTANT:Remember to insert your car's original fuse into the fuse tap if applicable.)
6. IMPORTANT: If the hardwire kit does not provide power, please try to insert the fuse tap in the OPPOSITE direction.

7. Connect the Black Wire(Ground Wire) and screw connect it to any non-coated metal bolt.

8. Before hiding the charger cable, connect the power cable to Dash Cam to make sure the device can be powered on and work normally.
IMPORTANT: If the hardwire kit does not provide power, please try to insert the fuse tap in the OPPOSITE direction. (Due to the car fuse slot having positive and negative poles)

9. Install the switch box on your car dashboard where you can easily operate. Wire and hide the extra dash cam power charging cable, and connect it to the onboard dash cam or other devices, then the installation is completed.

MODE SETTING SWITCH:
- 24/7 Non-Stop Surveillance Mode : (Choose the minimum voltage you want to cut off the power)
11.8V/23.6V: 1(ON);2(OFF);3(OFF) | 12.0V/24.0V: 1(ON);2(ON);3(ON)
12.2V/24.4V: 1(ON);2(ON);3(OFF) | 12.4V/24.8V: 1(ON);2(OFF);3(ON)
- ACC Only Mode: (Choose the minimum voltage you want to cut off the power)
12.6V/25.2V: 1(OFF);2(ON);3(ON) | 12.8V/25.6V: 1(OFF);2(ON);3(OFF)
13.0V/26.0V: 1(OFF);2(OFF);3(OFF) | 13.2V/26.4V: 1(OF);2(OFF);3(ON)
- Delay Power Off Time Setting: (Delay power off if battery reaches the preset voltage level)
2Min: 4(OFF);5(OFF) | 5Min: 4(OFF);5(ON) | 10Min: 4(ON);5(ON) | 20Min: 4(ON);5(OFF)

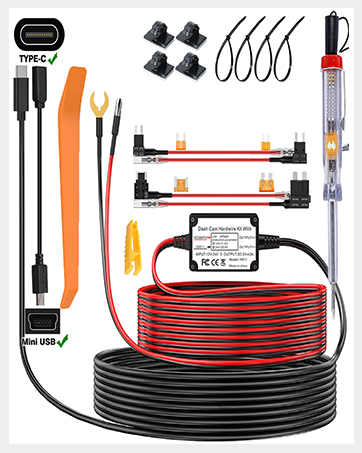
PACKAGE INCLUDE:
- Voltage Selection Dash Camera Hardwire Kit*1
- Mini/LP ACN; Mini ACS; ATO ACU; Micro2 Fuse Add-A-Circuit Fuse Holder*2
- Circuit Test Pencil; Fuse Clip; Opening Tool Bar*1
- Cable Ties; Cable Organizers*4
- User Guide*1
 Voltage Selection Dashcam Hardwire kit |  3-Wire Dashcam Hardwire Kit |  3-Wire Dashcam Hardwire Kit |  2-Wire Dashcam Hardwire Kit |  OBD Dashcam Hardwire Kit | OBD Dashcam Hardwire Kit | |
|---|---|---|---|---|---|---|
| Customer Reviews | — | — | — | — | — | — |
| Price | — | — no data | — | — | — | — |
| Parking Mode | ? | ? | ? | N/A | ? | ? |
| Fuse Box Connection | ? | ? | ? | ? | N/A | N/A |
| Voltage Selection | ? | ? | N/A | N/A | N/A | N/A |
DASH CAMERA HARDWIRE KIT
VOLTAGE SELECTION HARDWIRE KIT FEATURES:
- Voltage Selection: Allows you to select different minimum voltage levels for vehicle.
- Timer function: Allows you to select the times to keep dash camera recording.
- 2 Power Modes: ACC or 24 Hour Parking Mode.
- Compatibility: Compatible with most of the dash cameras for 12-24V vehicles.
- Low Voltage Protection: Automatically power off voltage at the preset level.
IMPORTANT NOTE:s
If the hardwire kit does not provide power, please try to insert the fuse tap in the OPPOSITE direction.
(Due to the car fuse slot having positive and negative poles)
24H DASH CAM HARDWIRE KIT SPECIFICATIONS:
- Connector Type: USB Type-C
- Input Voltage: DC 12V-24V
- Output Voltage: 5V
- Output Current: 3A
- Working Temperature:-40~ 160 Degrees F
- Cable Length: 11.5ft/3.5m
- Adjustable Low Voltage Protection: 11.6V for 12V vehicle; 23.5V for 24V vehicle. (Adjustable based on your need)
- LED Indicator: Red-Parking Mode; Blue-ACC Mode
HARDWIRE KIT INSTALLATION STEPS:
1. Use your owner’s manual to identify the location of the internal fuse box. This is normally found by the foot well on the driver’s side of your vehicle or under the engine hood.
2. Open the fuse box cover plate to find the fuse map. Locate the Fuse Box and find a Constant Fuse Slot, or ACC Fuse Slot(for NOT USE 24/7 Surveillance Mode).
3. Remove the fuse from the constant fuse slot and insert it into the bottom slot of the fuse we provide the same size.
Use the circuit test pen to identify the positive pole of the fuse slot.
4. Connect the Yellow LINE to the positive pole of the constant fuse slot, or ACC Fuse Slot(for NOT USE 24/7 Surveillance Mode).
5. Connect the RED LINE of the hardwire kit to the positive pole of the ACC fuse slot in the fuse box. ACC fuse slot energizes only when the ignition switch is on.
(IMPORTANT:Remember to insert your car's original fuse into the fuse tap if applicable.)
6. IMPORTANT: If the hardwire kit does not provide power, please try to insert the fuse tap in the OPPOSITE direction.
7. Connect the Black Wire(Ground Wire) and screw connect it to any non-coated metal bolt.
8. Before hiding the charger cable, connect the power cable to Dash Cam to make sure the device can be powered on and work normally.
IMPORTANT: If the hardwire kit does not provide power, please try to insert the fuse tap in the OPPOSITE direction. (Due to the car fuse slot having positive and negative poles)
9. Install the switch box on your car dashboard where you can easily operate. Wire and hide the extra dash cam power charging cable, and connect it to the onboard dash cam or other devices, then the installation is completed.
MODE SETTING SWITCH:
- 24/7 Non-Stop Surveillance Mode : (Choose the minimum voltage you want to cut off the power)
11.8V/23.6V: 1(ON);2(OFF);3(OFF) | 12.0V/24.0V: 1(ON);2(ON);3(ON)
12.2V/24.4V: 1(ON);2(ON);3(OFF) | 12.4V/24.8V: 1(ON);2(OFF);3(ON)
- ACC Only Mode: (Choose the minimum voltage you want to cut off the power)
12.6V/25.2V: 1(OFF);2(ON);3(ON) | 12.8V/25.6V: 1(OFF);2(ON);3(OFF)
13.0V/26.0V: 1(OFF);2(OFF);3(OFF) | 13.2V/26.4V: 1(OF);2(OFF);3(ON)
- Delay Power Off Time Setting: (Delay power off if battery reaches the preset voltage level)
2Min: 4(OFF);5(OFF) | 5Min: 4(OFF);5(ON) | 10Min: 4(ON);5(ON) | 20Min: 4(ON);5(OFF)
PACKAGE INCLUDE:
- Voltage Selection Dash Camera Hardwire Kit*1
- Mini/LP ACN; Mini ACS; ATO ACU; Micro2 Fuse Add-A-Circuit Fuse Holder*2
- Circuit Test Pencil; Fuse Clip; Opening Tool Bar*1
- Cable Ties; Cable Organizers*4
- User Guide*1
Voltage Selection Dashcam Hardwire kit | 3-Wire Dashcam Hardwire Kit | 3-Wire Dashcam Hardwire Kit | 2-Wire Dashcam Hardwire Kit | OBD Dashcam Hardwire Kit | OBD Dashcam Hardwire Kit | |
|---|---|---|---|---|---|---|
| Customer Reviews | — | — | — | — | — | — |
| Price | — | — no data | — | — | — | — |
| Parking Mode | ? | ? | ? | N/A | ? | ? |
| Fuse Box Connection | ? | ? | ? | ? | N/A | N/A |
| Voltage Selection | ? | ? | N/A | N/A | N/A | N/A |
All Types of Dashcam Hardwire
How we start?
We start with a dashcam accessories supplier, and we decided to develop the dashcam hardwire kit with more functions to meet customers' new requirements, and we started to do so.
Why the hardwire kit cannot cut off power when engine is off?
Because nowadays many vehicles have the start/stop function, the hardwire kit has the time delay function to keep the power supply when engine is for a temporary stop
Why the hardwire kit is not compatible with all brand dashcams?
Because the Type-C uses a different ACC signal port than others (A5-B5 or A8-B8) it may cause not compatible issue.