

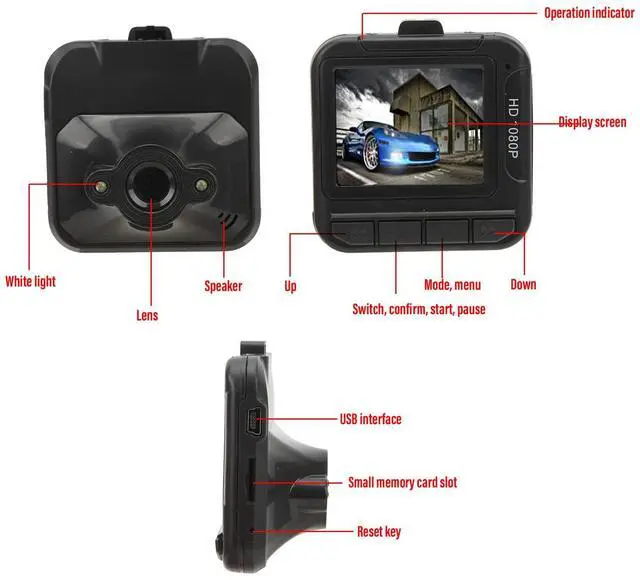


Overview of functions
- Digital recorder with video/photo/playback function. You can automatically set the mode you want:
- A) Recording modeAfter pressing the power or plugging in the car charger, the recorder automatically enters recording mode and starts to record. (Note: Please insert the TF card before using.) The blue indicator light flashes at this time. The video file is stored in the TF card, press the OK confirmation to stop recording, the indicator light blue will then stop flashing.
- B) Photo modeTurn on the device and press the mode to enter photo mode. Press photo 6 to take photos.
- C) Playback mode Turn on the power and press mode key twice to enter playback mode, press up and down keys to select the file to browse, press the video key to enter the directory, then press the video key “play/pause”.
- D) Delete functionIn playback mode, press the menu key to enter to the delete interface, then press OK key to enter the delete interface, use up/down keys to select the listed parameters, press OK key to delete, you can also select "display" functions thumbnails” and “playback volume level preview”, then press the OK key to confirm.

How to use the car recorder:
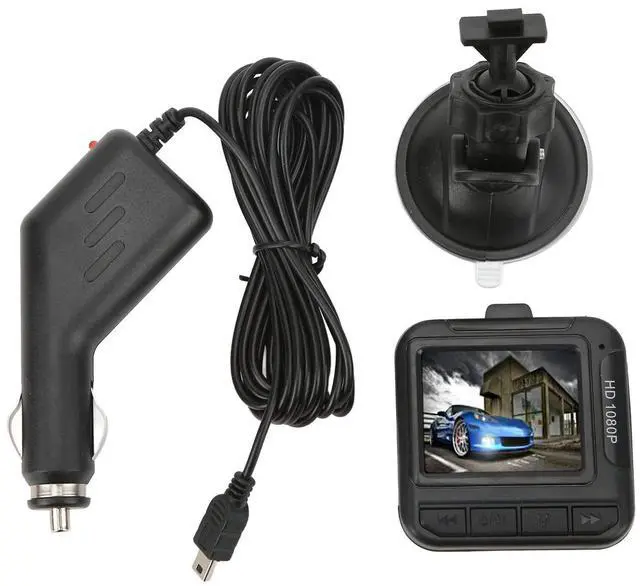
- Power supply (two possibilities):
- A) using the built-in rechargeable lithium battery
- Charging method:
- 1) Plug in the car charger.
- 2) Connect the computer by USBDuring charging, the red light is on. When the battery is full, the red light will turn off.
- Note: When using a lithium battery, you need to press the switch to start or stop recording the DVR.
- B) Connect 12V/24W car chargerAfter the car starts, the DVR will start recording automatically. It shuts down after a power outage and automatically saves the file before. Note: Only use the car charger with 5V output.

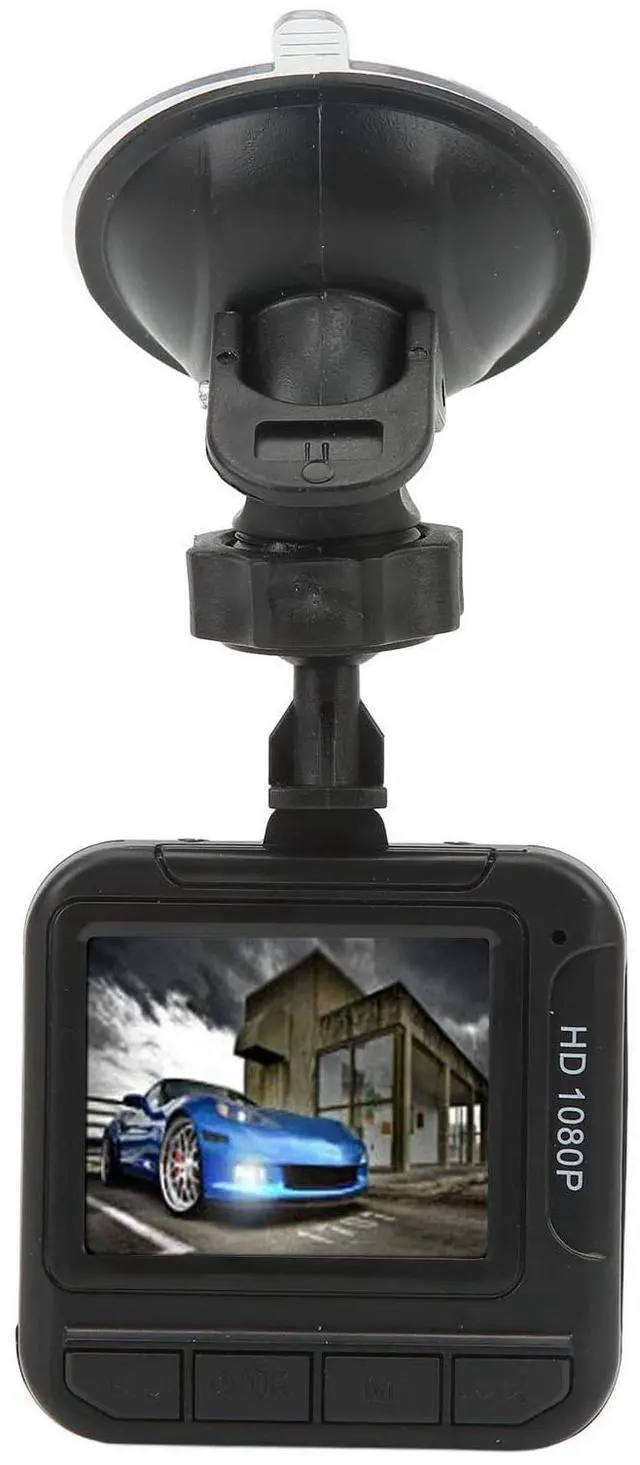
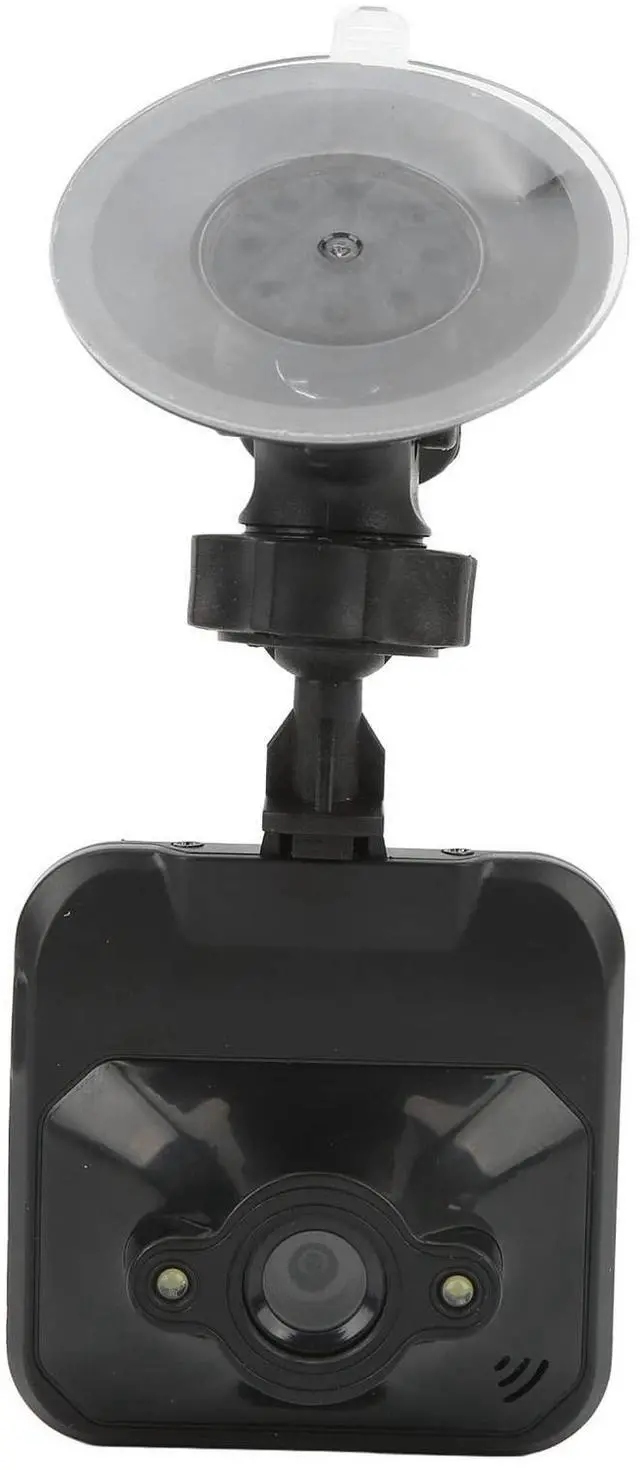
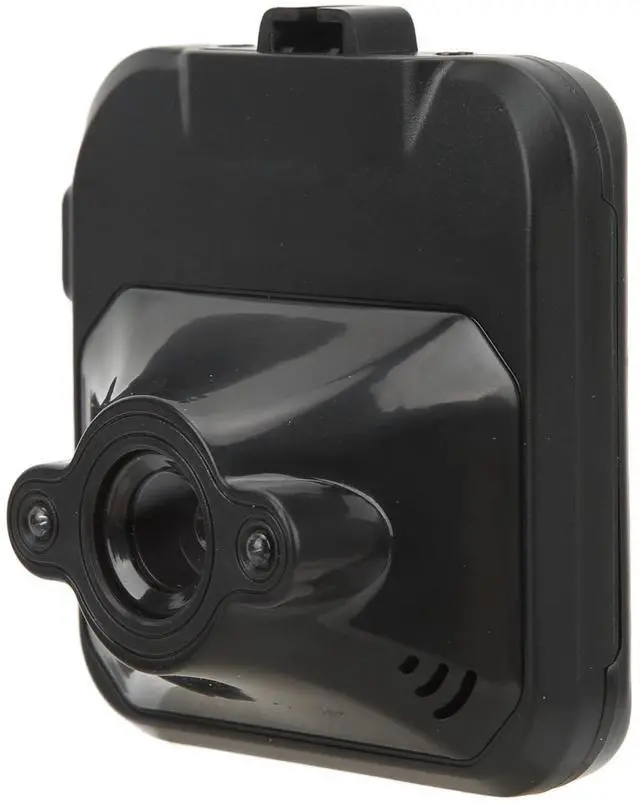
HD lens
1.6-inch color screen, easy to adjust and display the current shooting status, 1080P HD screen recording, providing excellent image quality.

Parking monitoring
Collision parking monitoring, when collision vibration occurs, the recorder urgently starts recording.

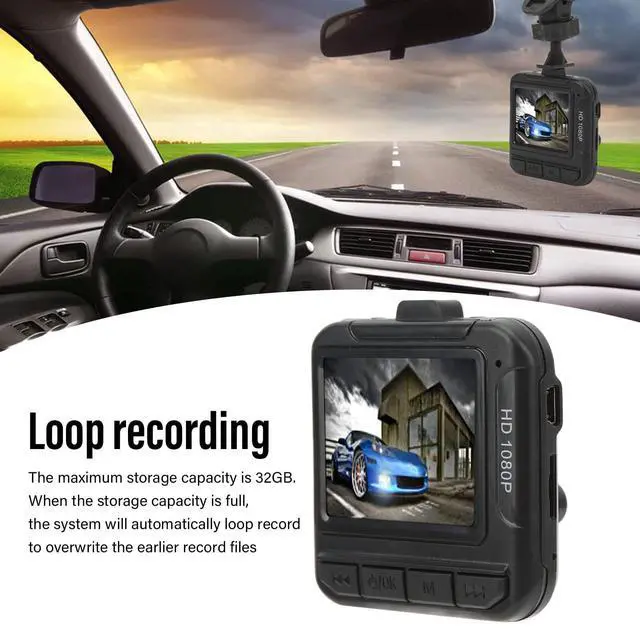
Loop recording, automatic deletion
Fully automatic loop overlay technology automatically produces consistent video clips, automatically clears unnecessary previous videos when memory is full, while not accidentally deleting useful locked videos.

Instructions for use
1. Insert the memory card into the card slot of the driving recorder.
2. Please use a high-speed memory card (class 10 or higher) with a capacity of at least 512 MB.
3. Attach the driving recorder to the vehicle
4. Insert the car charger into the cigarette lighter
5. Connect the USB interface of the driving recorder to the vehicle charger using the charging extension cable.
6. During wiring, the charging extension can be laid along the edge of the windshield.
7. Adjust the position of the lens to ensure it is level with the ground.

Product List
1 x Host
1 x Bracket
1 x Power cord
Device specifications
Item Type: Driving Recorder
Material: Plastic, Metal
Weight: Approx. 166g/5.9oz
Video Resolution: 1080P 720P VGA interpolation
Recording format: AVI
Battery information: 100mAh lithium-ion battery (comes with a built-in battery)
Other functions: Voice recording function
Display screen: 1.6 inch color screen
Support small memory card: Up to 'to 32 GB (not included)
Adapter input: DC 12-24V
Adapter output: DC 5V±5% 1A
Noticed :
1) Please insert the TF memory card before recording.
2) This DVR recording mode can be selected for loop recording, when the memory card is full, the DVR automatically starts recording again from the original memory card and overwrites the old file. (Note: In order to avoid deleting all old files, when saving, the saved files are about 2 minutes/5 minutes/15 minutes as a subsection, when the SD/MMC memory card is full and re-recording, the old files will be overwritten one by one).
3) When the lithium battery is low, the recorder screen displays "insufficient power" and automatically turns off after 20 seconds.
Overview of functions
- Digital recorder with video/photo/playback function. You can automatically set the mode you want:
- A) Recording modeAfter pressing the power or plugging in the car charger, the recorder automatically enters recording mode and starts to record. (Note: Please insert the TF card before using.) The blue indicator light flashes at this time. The video file is stored in the TF card, press the OK confirmation to stop recording, the indicator light blue will then stop flashing.
- B) Photo modeTurn on the device and press the mode to enter photo mode. Press photo 6 to take photos.
- C) Playback mode Turn on the power and press mode key twice to enter playback mode, press up and down keys to select the file to browse, press the video key to enter the directory, then press the video key “play/pause”.
- D) Delete functionIn playback mode, press the menu key to enter to the delete interface, then press OK key to enter the delete interface, use up/down keys to select the listed parameters, press OK key to delete, you can also select "display" functions thumbnails” and “playback volume level preview”, then press the OK key to confirm.
How to use the car recorder:
- Power supply (two possibilities):
- A) using the built-in rechargeable lithium battery
- Charging method:
- 1) Plug in the car charger.
- 2) Connect the computer by USBDuring charging, the red light is on. When the battery is full, the red light will turn off.
- Note: When using a lithium battery, you need to press the switch to start or stop recording the DVR.
- B) Connect 12V/24W car chargerAfter the car starts, the DVR will start recording automatically. It shuts down after a power outage and automatically saves the file before. Note: Only use the car charger with 5V output.
HD lens
1.6-inch color screen, easy to adjust and display the current shooting status, 1080P HD screen recording, providing excellent image quality.
Parking monitoring
Collision parking monitoring, when collision vibration occurs, the recorder urgently starts recording.
Loop recording, automatic deletion
Fully automatic loop overlay technology automatically produces consistent video clips, automatically clears unnecessary previous videos when memory is full, while not accidentally deleting useful locked videos.
Instructions for use
1. Insert the memory card into the card slot of the driving recorder.
2. Please use a high-speed memory card (class 10 or higher) with a capacity of at least 512 MB.
3. Attach the driving recorder to the vehicle
4. Insert the car charger into the cigarette lighter
5. Connect the USB interface of the driving recorder to the vehicle charger using the charging extension cable.
6. During wiring, the charging extension can be laid along the edge of the windshield.
7. Adjust the position of the lens to ensure it is level with the ground.
Product List
1 x Host
1 x Bracket
1 x Power cord
Device specifications
Item Type: Driving Recorder
Material: Plastic, Metal
Weight: Approx. 166g/5.9oz
Video Resolution: 1080P 720P VGA interpolation
Recording format: AVI
Battery information: 100mAh lithium-ion battery (comes with a built-in battery)
Other functions: Voice recording function
Display screen: 1.6 inch color screen
Support small memory card: Up to 'to 32 GB (not included)
Adapter input: DC 12-24V
Adapter output: DC 5V±5% 1A
Noticed :
1) Please insert the TF memory card before recording.
2) This DVR recording mode can be selected for loop recording, when the memory card is full, the DVR automatically starts recording again from the original memory card and overwrites the old file. (Note: In order to avoid deleting all old files, when saving, the saved files are about 2 minutes/5 minutes/15 minutes as a subsection, when the SD/MMC memory card is full and re-recording, the old files will be overwritten one by one).
3) When the lithium battery is low, the recorder screen displays "insufficient power" and automatically turns off after 20 seconds.