


OFIRAY-HOME COST-EFFECTIVE ONE-HANDED TEAR KITCHEN TOWEL RACK SOLUTION!
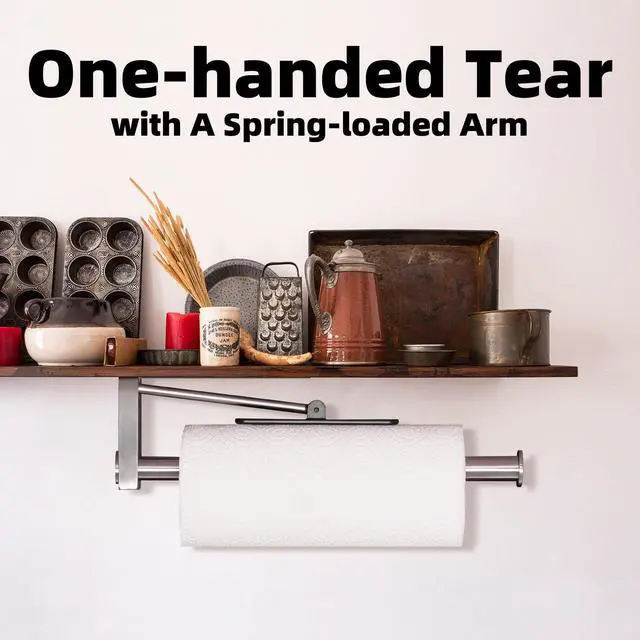
A QUICK ONE-HANDED TEARING effortlessly detaches a single sheet of the kitchen paper towel, bidding farewell to kitchen pandemonium!
**IMPORTANT NOTE:
3M adhesive for smooth marble/tile/metal/glass; nails for paint/plaster/cement/wallpaper. Please avoid using 3M adhesive on rough surfaces to ensure optimal adhesion.

ENJOY YOUR TIME IN THE KITCHEN
HOW ONE-HANDED TEAR BENEFIT YOU?
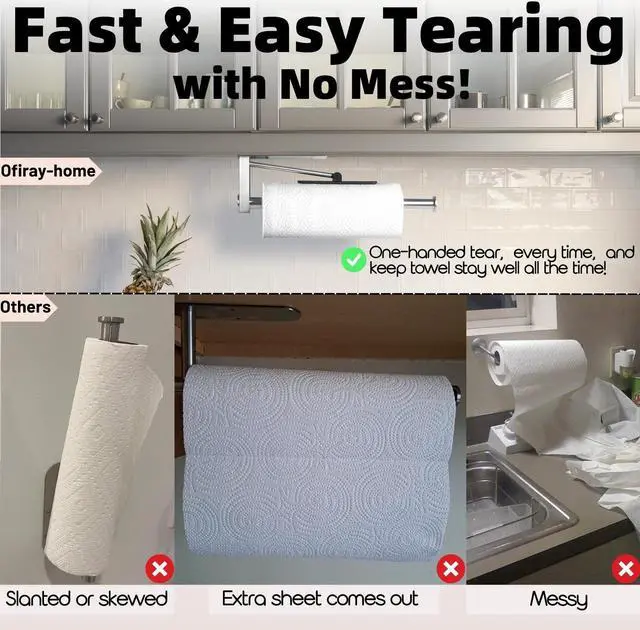
A one-hand tearing kitchen paper towel holder offers the convenience of single-handed operation and efficient tearing, reducing waste and providing stability. Its versatility allows for different paper towel sizes and types, ensuring durability and ease of use.
WHY CHOOSE THIS OFIRAY-HOME EASY TEARING KITCHEN PAPER TOWEL HOLDER?

Rv Paper Towel Holder
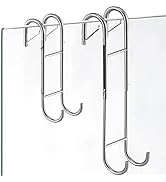
The wall-mounted paper towel holder offers versatile installation options, allowing you to mount it either vertically or horizontally on the wall. It's an excellent solution for organizing paper towel rolls, effectively maximizing space in the kitchen, bathroom, pantry, garage, RV, camper, and more.

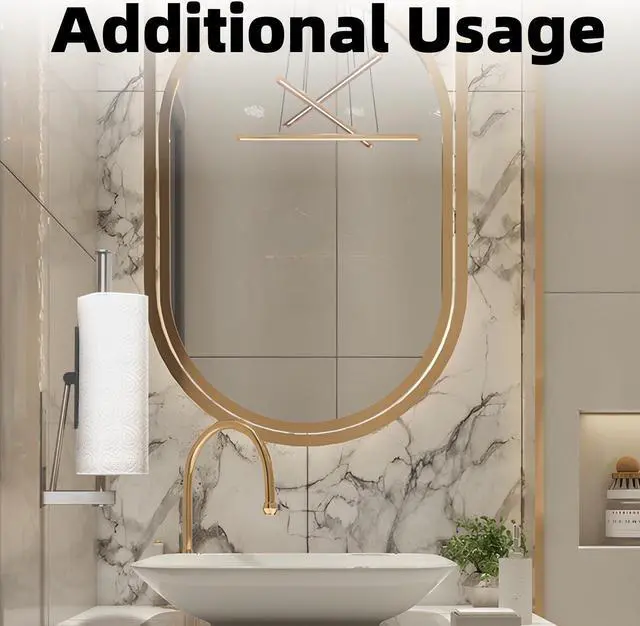
Bathroom Paper Towel Holder
Keep the countertop clear with this convenient accessory, which serves as an ideal replacement for the countertop bracket. By opting for wall mounting, you ensure a tidy and organized space while saving valuable countertop real estate.
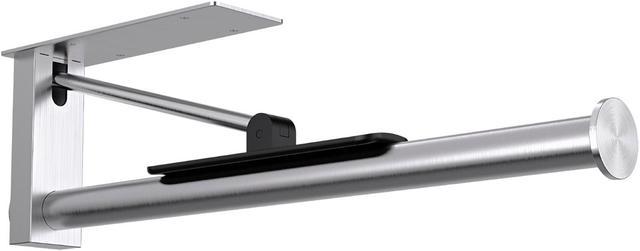
PRODUCT DETAILS

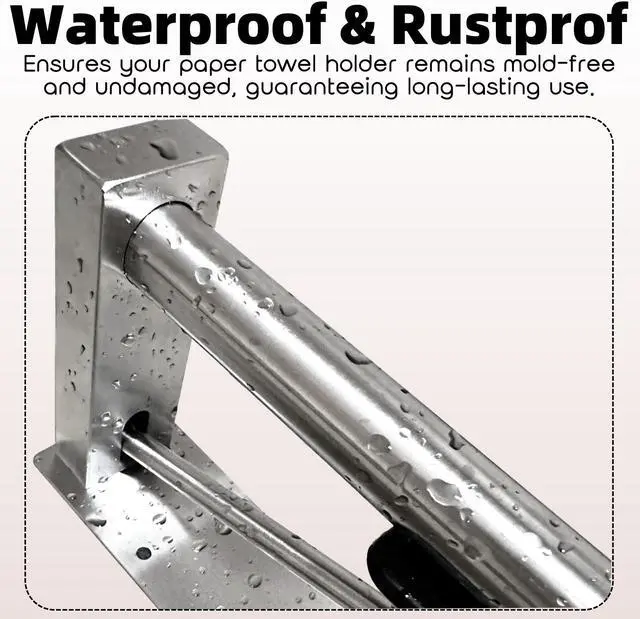
HIGH-QUALITY STAINLESS STELL
Rust-resistant and durable stainless steel made offers hygiene, sleekness, and long-lasting functionality.

PAPER TOWEL STOPPER
It ensuring stable placement and preventing towel unravelling for convenient and neat usage.

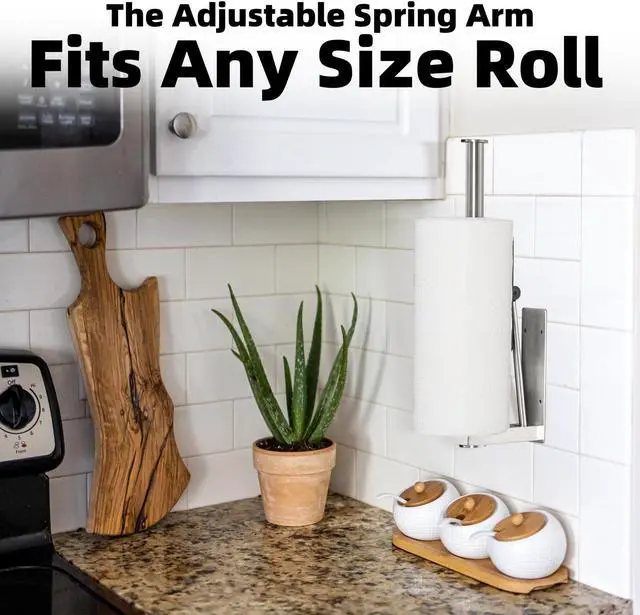
ADJUSTABLE SPRING ARM
Ensure controlled tearing and prevent paper unrolling, keeping it in place without slant for convenient usage, minimal wastage, and neatness.

2 INSTALLATION WAYS AVAILABLE
2 installation methods available: adhesive for smooth surfaces, screw for rough surfaces. Optimize performance and usability based on your preference.
INSTALLATION METHODS-1: SELF-ADHESIVE (Extreme Stickiness)

Step 1:
Prepare the wall by cleaning dust/moisture. (NOTE: 3M adhesive for smooth marble/tile/metal/glass; nails for paint/plaster/cement/wallpaper.)

Step 2:
Peel off one side of the double-coated 3M tape. (Please avoid using 3M adhesive on rough surfaces to ensure optimal adhesion.)

Step 3:
Attach the tape to the adhesive back of the towel rack.

Step 4:
Peel off the tape, firmly press the product onto the wall for secure adhesion, and wait 24 hrs for the adhesive to set before hanging the paper towel.
INSTALLATION METHODS-2: NAILING

Step 1:
Find the appropriate position and mark it with a pen.

Step 2:
Drill four holes using an impact drill and insert plastic expansion plugs into the holes.

Step 3:
Align the installation holes of the product with the wall holes and screw in the screws.

Step 4:
Installation is complete, and the product is ready for use.

-

Ofiray-home is a brand that was born out of a desire to help people organize their homes and lives. The founder, a young woman named Ofiray, was frustrated with the lack of stylish and functional storage options available on the market. She believed that everyone deserved to live in a space that was clutter-free and beautiful, and set out to create a solution.
-
Organize Your Homes and Lives


-
Ofiray-home is a brand that was born out of a desire to help people organize their homes and lives. The founder, a young woman named Ofiray, was frustrated with the lack of stylish and functional storage options available on the market. She believed that everyone deserved to live in a space that was clutter-free and beautiful, and set out to create a solution.
-
Organize Your Homes and Lives
OFIRAY-HOME COST-EFFECTIVE ONE-HANDED TEAR KITCHEN TOWEL RACK SOLUTION!
A QUICK ONE-HANDED TEARING effortlessly detaches a single sheet of the kitchen paper towel, bidding farewell to kitchen pandemonium!
**IMPORTANT NOTE:
3M adhesive for smooth marble/tile/metal/glass; nails for paint/plaster/cement/wallpaper. Please avoid using 3M adhesive on rough surfaces to ensure optimal adhesion.

ENJOY YOUR TIME IN THE KITCHEN
HOW ONE-HANDED TEAR BENEFIT YOU?
A one-hand tearing kitchen paper towel holder offers the convenience of single-handed operation and efficient tearing, reducing waste and providing stability. Its versatility allows for different paper towel sizes and types, ensuring durability and ease of use.
WHY CHOOSE THIS OFIRAY-HOME EASY TEARING KITCHEN PAPER TOWEL HOLDER?
| 1. | One-handed tearing for efficient cooking. |
|---|---|
| 2. | Super easy installation with screws or adhesive included. (Unrivaled adhesive strength, effortless installation!) |
| 3. | Securely holds the towel, avoiding kitchen mess. |
| 4. | Durable stainless steel withstands moisture and grease. |
| 5. | Great value compared to similar products. |
| 6. | We back our product with a 1-year period and take full responsibility for any quality issues! |
Rv Paper Towel Holder
The wall-mounted paper towel holder offers versatile installation options, allowing you to mount it either vertically or horizontally on the wall. It's an excellent solution for organizing paper towel rolls, effectively maximizing space in the kitchen, bathroom, pantry, garage, RV, camper, and more.
Bathroom Paper Towel Holder
Keep the countertop clear with this convenient accessory, which serves as an ideal replacement for the countertop bracket. By opting for wall mounting, you ensure a tidy and organized space while saving valuable countertop real estate.
PRODUCT DETAILS
HIGH-QUALITY STAINLESS STELL
Rust-resistant and durable stainless steel made offers hygiene, sleekness, and long-lasting functionality.
PAPER TOWEL STOPPER
It ensuring stable placement and preventing towel unravelling for convenient and neat usage.
ADJUSTABLE SPRING ARM
Ensure controlled tearing and prevent paper unrolling, keeping it in place without slant for convenient usage, minimal wastage, and neatness.
2 INSTALLATION WAYS AVAILABLE
2 installation methods available: adhesive for smooth surfaces, screw for rough surfaces. Optimize performance and usability based on your preference.
INSTALLATION METHODS-1: SELF-ADHESIVE (Extreme Stickiness)
Step 1:
Prepare the wall by cleaning dust/moisture. (NOTE: 3M adhesive for smooth marble/tile/metal/glass; nails for paint/plaster/cement/wallpaper.)
Step 2:
Peel off one side of the double-coated 3M tape. (Please avoid using 3M adhesive on rough surfaces to ensure optimal adhesion.)
Step 3:
Attach the tape to the adhesive back of the towel rack.
Step 4:
Peel off the tape, firmly press the product onto the wall for secure adhesion, and wait 24 hrs for the adhesive to set before hanging the paper towel.
INSTALLATION METHODS-2: NAILING
Step 1:
Find the appropriate position and mark it with a pen.
Step 2:
Drill four holes using an impact drill and insert plastic expansion plugs into the holes.
Step 3:
Align the installation holes of the product with the wall holes and screw in the screws.
Step 4:
Installation is complete, and the product is ready for use.