


Discover Elegance: Sussex
Explore convenience with our chargers.

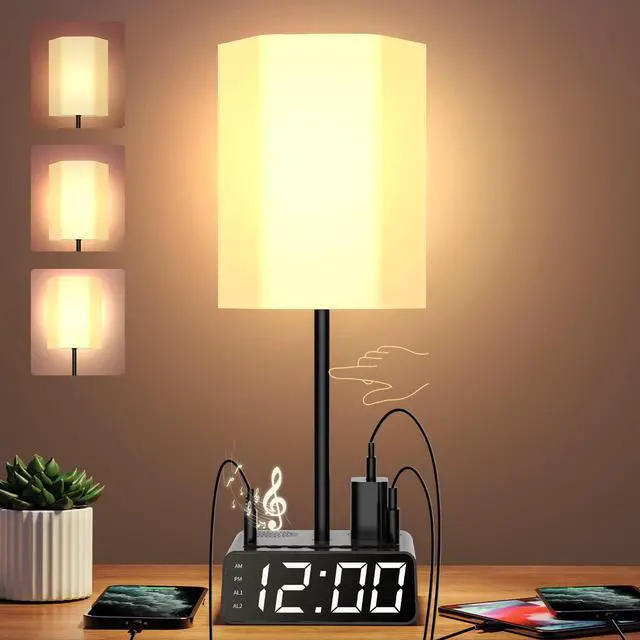
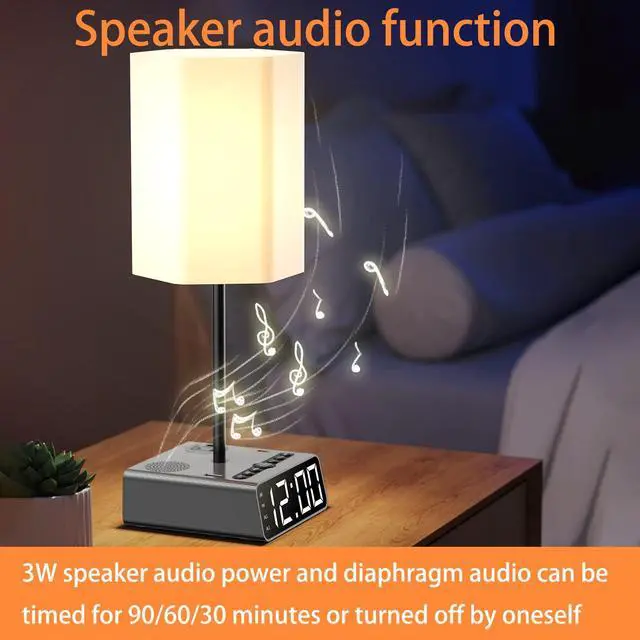
Illuminate, Charge, and Play with Style!
Discover the ultimate blend of functionality and style with Sussex.
Our table lamp isn't just about lighting up your space; it's a versatile companion that offers much more. Equipped with USB ports, power outlets, and built-in speakers, it simplifies your daily routine. Charge your devices conveniently, play your favorite music, and wake up to a customizable, dimmable alarm clock.
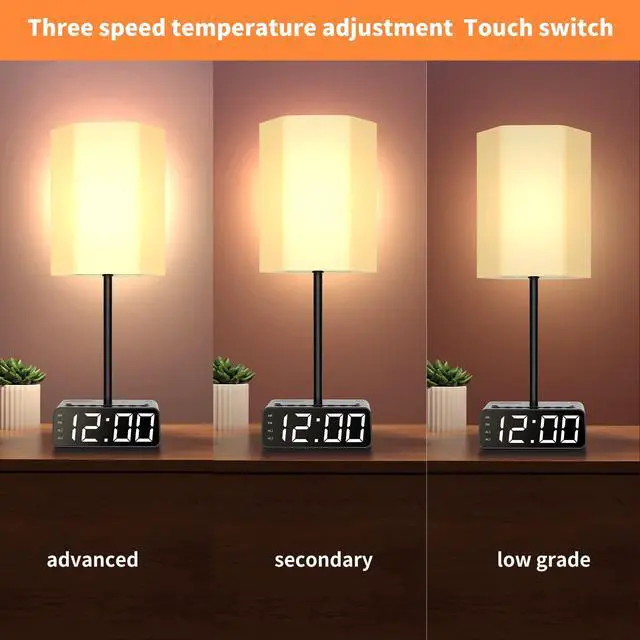
The intuitive touch controls make operation effortless, making it ideal for bedrooms, kids' rooms, or study spaces. Sussex enhances your environment, providing exceptional lighting and enhancing your multimedia experience.

Choose Sussex for modern, multifunctional living. Illuminate, charge, and play with style all in one. Elevate your space with Sussex, where innovation meets illumination.
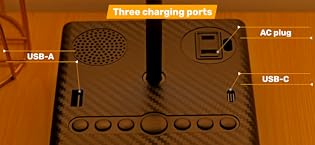
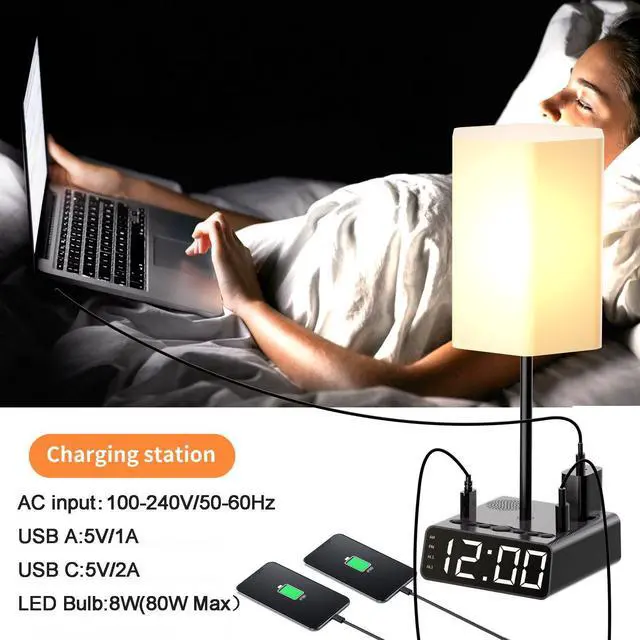
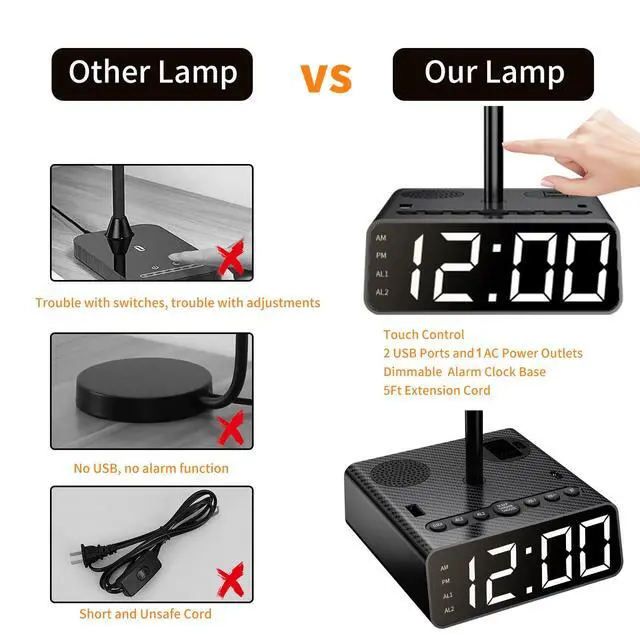
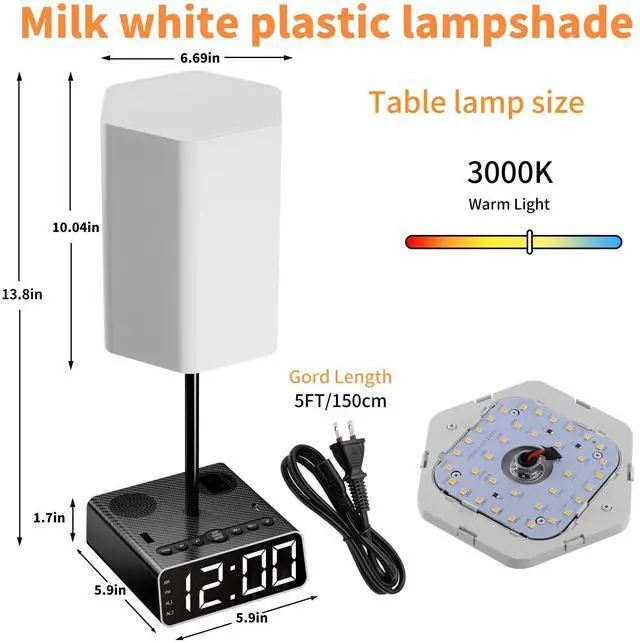
Bedside table lamp is designed with 2 USB (USB-A & USB-C) charge ports and 1 AC outlets. You can charge your mobile phones, laptops and other appliance at the same times.

This table lamp provides warm illumination and allows you to search for 'BT500' to connect and play your favorite music. Illuminate your space while enjoying the pleasure of music.

See More About Sussex


5-IN-1 Table Lamp
- 5-IN-1 Table Lamp combines with bedroom essentials all together- Bedside Lamp, Bedside charging station, Alarm clock, Speakers and Radio.
- Table Lamp touch control 3-way dimmable, and Charging Station with USB C & A, AC Ports, and Dual alarm clock, and Speakers
- This organization Lamp helps getting rid of the clutter on your nightstand!
Specifications

3 in 1 Charging Hub
- Max Power: 1250W (10A Max).
- AC Input: 100-240V 50/60 Hz.
- USB A: 5V/3A 15W.
- USB C: 5V/3A 15W.
- Cord Length: 6FT.

Time Setting
- To adjust the time, hold the CLOCK button for 2seconds.
- The hour will start flashing first.
- Use the VOL-/- or VOL+/+ buttons to select the desired number.
- Once you have finished adjusting the hour, press the button again to switch to minute adjustment mode.
- Use the VOL-/- or VOL+/+ buttons to jump to the desired minute.
- Finally, Press the CLOCK button to complete the time adjustment.
- The clock operates in a 12-hour time format. When the time is set to the afternoon, the PM indicator will light up; when set to the morning, the AM indicator will light up.

FM/BT mode
- To press FM/BT button to display the icon on the screen and the item will be go on mode.
- To press AL2 button or AL1 shortly to source the channel one by one.To press AL2 button for 2 seconds to source the channels automatically, then press clock button for 2 seconds to display the P01... and to press the clock button shoryly to record the channel.
- To press VOL+ and VOL- to adjust the voice.
- To press FM/BT button for 2 seconds to turn off BT.

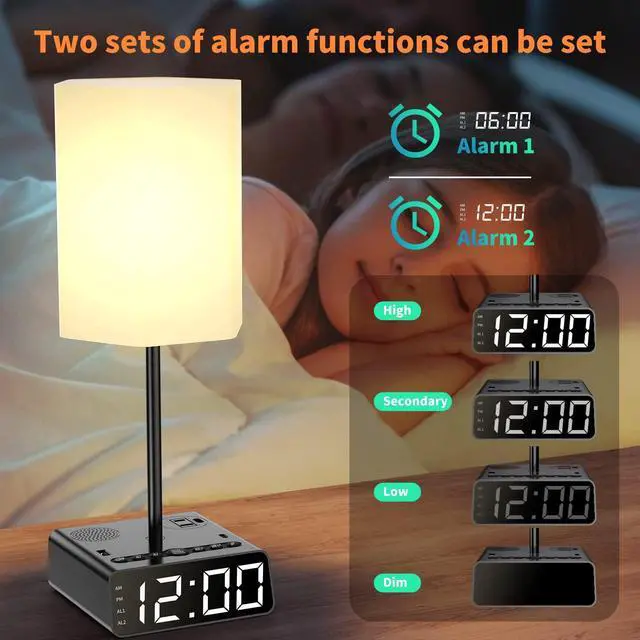
Alarm Setting
- To set the alarm, long-press AL1 to enter the alarm setting mode.
- The display will flash, and you can press VOL-/- or VOL+/+ to select the hour.
- Press AL1 again to confirm the selected hour and enter the minute setting state.
- Once the screen is flashing, use VOL-/- or VOL+/+ to select the minute.
- Press AL1 again to confirm the selected minute, exit the setting mode, and return to the clock state.
- AL2 can be set the same way as AL1.

Alarm Clock Dimmer & Snooze Setting and Battery Memory
- The default LED display brightness when powered on is set to maximum.
- In clock mode, a brief press of the DIMMER/SNOOZE/CLOCK button will reduce the LED brightness to 2/3 of the maximum.
- Press the button again to decrease the LED brightness to 1/3 of the maximum.
- Press the button once more to set the LED brightness to 0.
- When AL1 is ringing, press the DIMMER/SNOOZE/CLOCK button to temporarily silence the alarm for the set duration (9 minutes by default).
- The display will stop the current ringing tone and enter nap mode. In this mode, AL1 will flash. To exit nap mode, press AL1 twice while the alarm is still active.
- AL2 can be configured in the same manner as AL1.
- Install 2 AAA batteries(Not Included) in the battery compartment to maintain timekeeping and alarm settings in case of a power failure or disconnection of the power cord.
Installation and Operation for The Lamp

Step 1: Insert accessory 1 into the lamp holder and clamp it tightly.

Step 2: Alignment of the snap card snap schematic.

Step 3: Put the lampshade down and snap it tightly to complete the assembly Tap the pole to progress, turn on the light and adjust the brightness.

 Table Lamp with Desk Charging Station |  Dual Alarm Clock with Desk Charging Station Wireless Charging |  Dual Alarm Clock with Desk Charging Station | |
|---|---|---|---|
| Customer Reviews | — | — | — |
| Price | — | — no data | — no data |
| Qty of AC Outlets & USB Ports | 1 USB C, 1 USB A, 1 AC | Wireless Charging, 1 USB C, 1 USB A, 2 AC | 2 USB C, 2 USB A, 2 AC |
| Output | USB A & C: 5V/Max 3A, 15W | USB A & C: 5V/3.4A, PD 17W; Wireless Charging: PD 15 | 2 USB A: 5V/2.1A; 1 USB C: 5V/2.1A; 1 USB C: 5V/3A, 9V/2.22A, 12V/1.67A, PD 20W |
| Wireless Charging | x | ? | x |
| Cord Length | 6 FT | 6 FT | 6 FT |
| Alarm Clocks | Dual | Dual | Dual |
| Snooze Duration | 9 Minutes | 9 Minutes | 9 Minutes |
| Display Brightness | 4 Levels Adjustable | 4 Levels Adjustable | 4 Levels Adjustable |
| Table Lamp | ? | x | x |
| Radio | ? | x | x |
| Speakers | ? | x | x |
5-IN-1 Table Lamp
- 5-IN-1 Table Lamp combines with bedroom essentials all together- Bedside Lamp, Bedside charging station, Alarm clock, Speakers and Radio.
- Table Lamp touch control 3-way dimmable, and Charging Station with USB C & A, AC Ports, and Dual alarm clock, and Speakers
- This organization Lamp helps getting rid of the clutter on your nightstand!
Specifications
| Alarm Clocks: | Dual |
| Time Format: | 12 Hour |
| Snooze Duration: | 9 Minutes |
| Display Brightness: | 4 Levels Adjustable |
| Battery Backup: | 2* AAA Batteries (Not Included) |
| AC Input/Output: | 110-240V, 50/60Hz ( Max 10A) |
| Max Power: | 1250W (10A Max) |
| USB A & C Output: | 5V/3A 15W |
| Cord Length: | 6 FT |
| LED Bulb: | 8W(80W Max) |
| Color Temperature: | 2700K |
| Horn Power: | 3W * 1 |
| Radio | FM |
| Extra Capabilities: | Speakers |

3 in 1 Charging Hub
- Max Power: 1250W (10A Max).
- AC Input: 100-240V 50/60 Hz.
- USB A: 5V/3A 15W.
- USB C: 5V/3A 15W.
- Cord Length: 6FT.

Time Setting
- To adjust the time, hold the CLOCK button for 2seconds.
- The hour will start flashing first.
- Use the VOL-/- or VOL+/+ buttons to select the desired number.
- Once you have finished adjusting the hour, press the button again to switch to minute adjustment mode.
- Use the VOL-/- or VOL+/+ buttons to jump to the desired minute.
- Finally, Press the CLOCK button to complete the time adjustment.
- The clock operates in a 12-hour time format. When the time is set to the afternoon, the PM indicator will light up; when set to the morning, the AM indicator will light up.

FM/BT mode
- To press FM/BT button to display the icon on the screen and the item will be go on mode.
- To press AL2 button or AL1 shortly to source the channel one by one.To press AL2 button for 2 seconds to source the channels automatically, then press clock button for 2 seconds to display the P01... and to press the clock button shoryly to record the channel.
- To press VOL+ and VOL- to adjust the voice.
- To press FM/BT button for 2 seconds to turn off BT.

Alarm Setting
- To set the alarm, long-press AL1 to enter the alarm setting mode.
- The display will flash, and you can press VOL-/- or VOL+/+ to select the hour.
- Press AL1 again to confirm the selected hour and enter the minute setting state.
- Once the screen is flashing, use VOL-/- or VOL+/+ to select the minute.
- Press AL1 again to confirm the selected minute, exit the setting mode, and return to the clock state.
- AL2 can be set the same way as AL1.
Alarm Clock Dimmer & Snooze Setting and Battery Memory
- The default LED display brightness when powered on is set to maximum.
- In clock mode, a brief press of the DIMMER/SNOOZE/CLOCK button will reduce the LED brightness to 2/3 of the maximum.
- Press the button again to decrease the LED brightness to 1/3 of the maximum.
- Press the button once more to set the LED brightness to 0.
- When AL1 is ringing, press the DIMMER/SNOOZE/CLOCK button to temporarily silence the alarm for the set duration (9 minutes by default).
- The display will stop the current ringing tone and enter nap mode. In this mode, AL1 will flash. To exit nap mode, press AL1 twice while the alarm is still active.
- AL2 can be configured in the same manner as AL1.
- Install 2 AAA batteries(Not Included) in the battery compartment to maintain timekeeping and alarm settings in case of a power failure or disconnection of the power cord.
Installation and Operation for The Lamp
Step 1: Insert accessory 1 into the lamp holder and clamp it tightly.
Step 2: Alignment of the snap card snap schematic.
Step 3: Put the lampshade down and snap it tightly to complete the assembly Tap the pole to progress, turn on the light and adjust the brightness.
Table Lamp with Desk Charging Station | Dual Alarm Clock with Desk Charging Station Wireless Charging | Dual Alarm Clock with Desk Charging Station | |
|---|---|---|---|
| Customer Reviews | — | — | — |
| Price | — | — no data | — no data |
| Qty of AC Outlets & USB Ports | 1 USB C, 1 USB A, 1 AC | Wireless Charging, 1 USB C, 1 USB A, 2 AC | 2 USB C, 2 USB A, 2 AC |
| Output | USB A & C: 5V/Max 3A, 15W | USB A & C: 5V/3.4A, PD 17W; Wireless Charging: PD 15 | 2 USB A: 5V/2.1A; 1 USB C: 5V/2.1A; 1 USB C: 5V/3A, 9V/2.22A, 12V/1.67A, PD 20W |
| Wireless Charging | x | ? | x |
| Cord Length | 6 FT | 6 FT | 6 FT |
| Alarm Clocks | Dual | Dual | Dual |
| Snooze Duration | 9 Minutes | 9 Minutes | 9 Minutes |
| Display Brightness | 4 Levels Adjustable | 4 Levels Adjustable | 4 Levels Adjustable |
| Table Lamp | ? | x | x |
| Radio | ? | x | x |
| Speakers | ? | x | x |
Discover Elegance: Sussex
Explore convenience with our chargers.
Illuminate, Charge, and Play with Style!
Discover the ultimate blend of functionality and style with Sussex.
Our table lamp isn't just about lighting up your space; it's a versatile companion that offers much more. Equipped with USB ports, power outlets, and built-in speakers, it simplifies your daily routine. Charge your devices conveniently, play your favorite music, and wake up to a customizable, dimmable alarm clock.
The intuitive touch controls make operation effortless, making it ideal for bedrooms, kids' rooms, or study spaces. Sussex enhances your environment, providing exceptional lighting and enhancing your multimedia experience.
Choose Sussex for modern, multifunctional living. Illuminate, charge, and play with style all in one. Elevate your space with Sussex, where innovation meets illumination.
Bedside table lamp is designed with 2 USB (USB-A & USB-C) charge ports and 1 AC outlets. You can charge your mobile phones, laptops and other appliance at the same times.
This table lamp provides warm illumination and allows you to search for 'BT500' to connect and play your favorite music. Illuminate your space while enjoying the pleasure of music.
See More About Sussex