
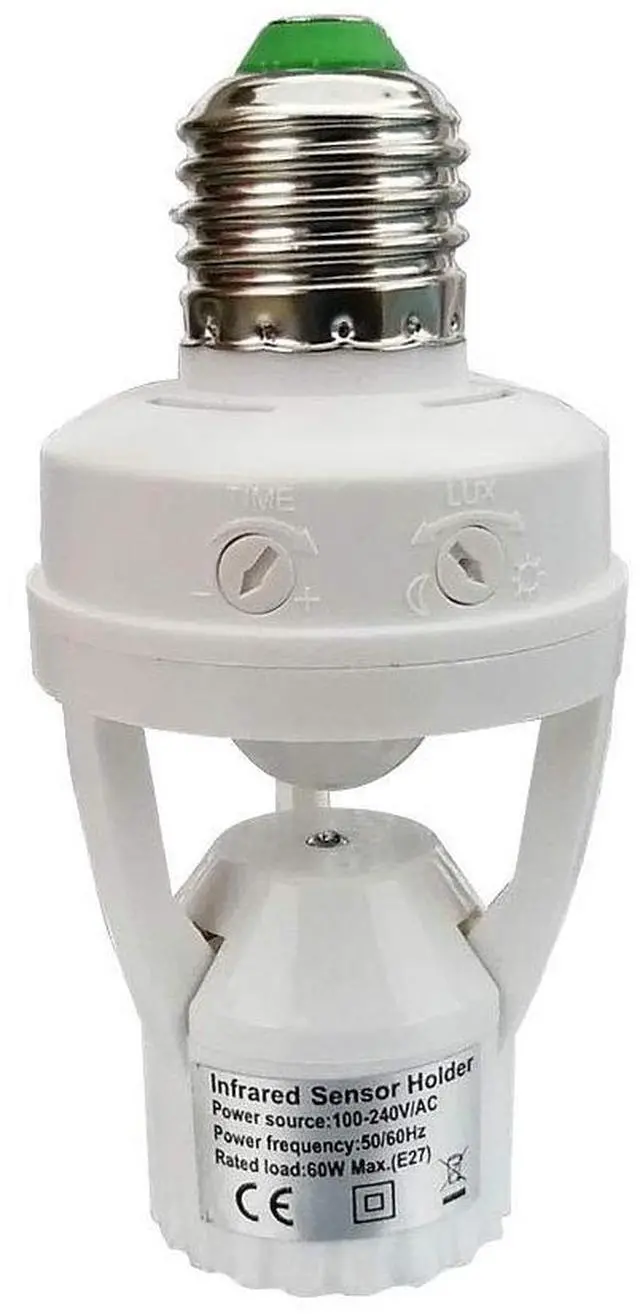


Specifications:
Power Source: 100-240V/AC
Rated Load:<60W Max.
Detection Distance: 6m max
Time-Delay: Min.10sec±3sec Max. 5min±1min (adjustable)
Ambient Light: 3-2000 LUX (adjustable)
Question: Will the motion activated light sockets work in an enclosed lampshade ?
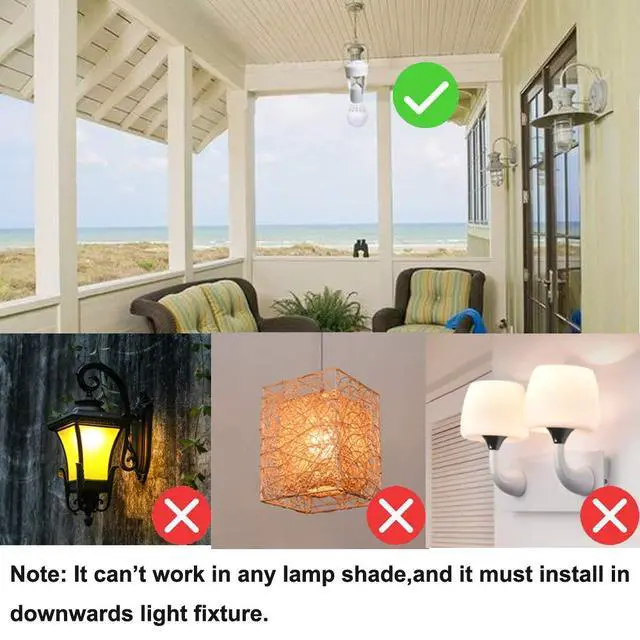
Answer: The motion activated light sockets can only work in an open lampshade and facing down. Or the glass shade will block the sensor.
Question: What's the maximum voltage, can it work with 230V ?
Answer: The motion sensor light sockets can work via AC100V-240V.
Question: Can I use this motion sensor light socket outdoor?
Answer: The motion sensor light socket can't penetrate the glass and walls to detect. Please do not fix the socket into an enclosed lampshade or the glass-shadewill block the sensor. Can use indoor only.
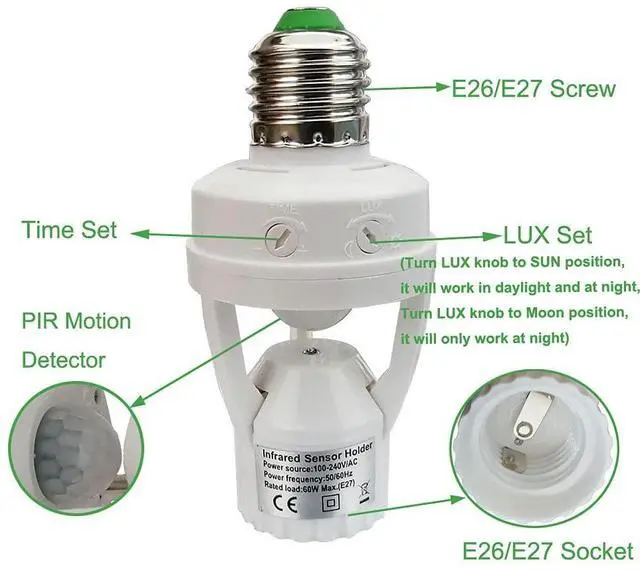
Question: What is the Sensor Range of this motion sensor light socket?
Answer: This motion sensor light socket offers 360-degree motion detection andhas a sensitivity range of up to 12 feet when mounted 8 feet above the floor. ThePIR motion light will light up automatically while the motion sensor detect motion in the detective range in the dark.
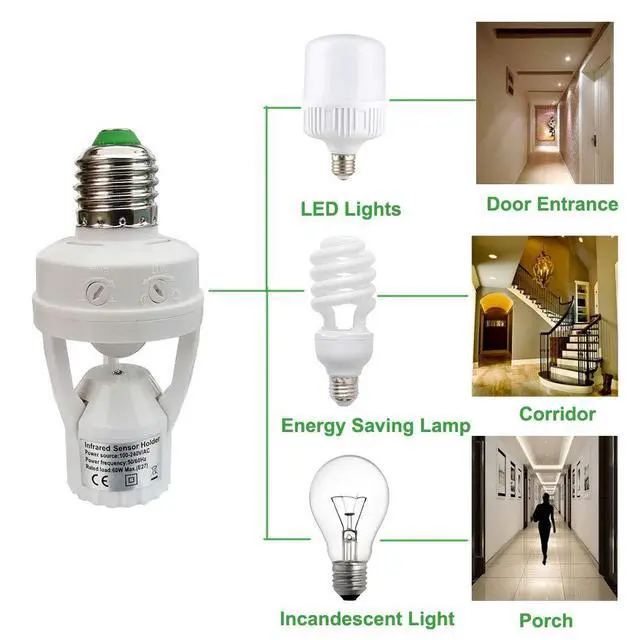
Question: What Bulb can work with? Answer: The motion sensor light sockets is suitable for all E26/E27 Light Bulb(Max Wattage<60W), such as LED lamp,Incandscent light,Halogon light, energy-saving lamps and so on.


NOTES:
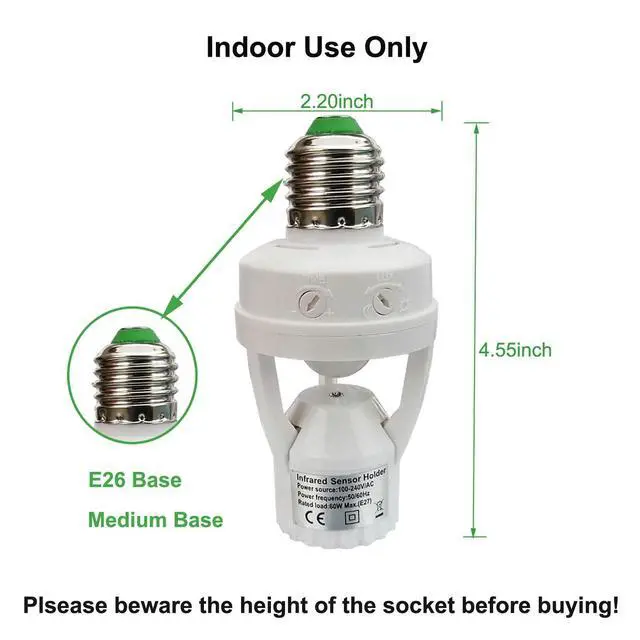
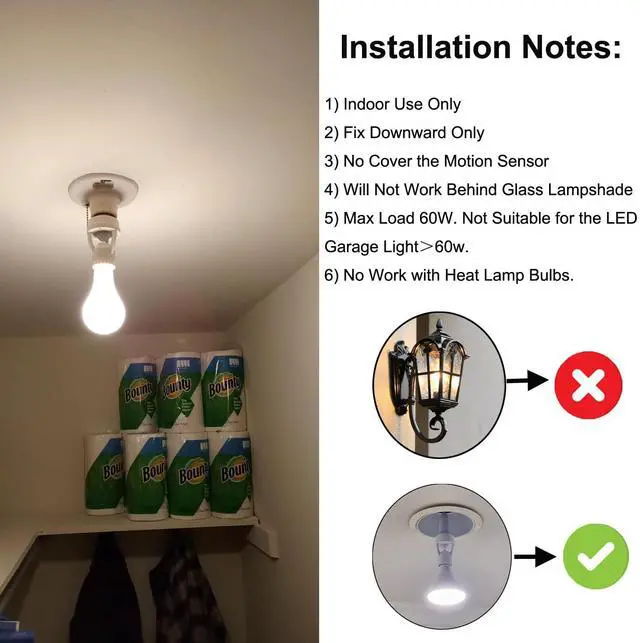
1) Can use it indoors only.
2) The motion sensor light adapter should be installed downward and no higher than 10 feet, or the sensor will not work right.It can’t be installed horizontally or facing upward.
3) No cover the Motion Sensor Ball
4) Please do not fix the socket into an enclosed lampshade, or the glass shade will block the sensor.
5) Max load 60W. Not suitable for the LED garage light>60w. No work with heat lamp bulbs.
6) Please make sure the motion sensor is facing the desired motion area with proper distance and angle.If the room
is too large, this socket may not suitable.
7) Make sure the 2 bulb spacing is more than 15ft.
8) When testing in daylight, please turn the LUX knob to the SUN position, otherwise, the sensor lamp would not work.
9) Its working temperature is -4F-104F, if the weather is too cold or too hot, the sensor may not work well, Please take
care of this before buying!!
10) For safety: Ensure power is disconnected before installation to prevent electric shock.
11)To increase the bulb's sensitivity, please try to adjust the Angle and Height of the bulb installation, and make the sensor toward the direction people are coming.
12) When installed it in the lampshade, pay attention to whether the size of the lamp body is suitable for the lampshade,the lampshade may effect the sensitive of the socket.

Stairs/ Front door Lighting

Corridor/Aisle Lighting

Garage Lighting

Basement/Storage room Lighting
 PIR Motion Sensor Light Socket,E26/E27 Smart Lamp Bulb Holder Adapter Auto On... |  Taigeguang Motion Activated Light Socket,E26 Motion Security Light Bulb Socke... |  Motion Sensor Light Socket,E26 E27 PIR Motion Screw Bulb Adapter Indoor Use O... |  Motion Sensor Switch Indoor Plug in Motion Sensor Light Sockets Adjustable Mo... |  Motion Sensor Light Socket Splitter Adapter,2 in 1 Light Socket Extender with... |  Plug in Motion Sensor Outlet Light Control,Indoor Motion Sensor Switch Plugs,... | |
|---|---|---|---|---|---|---|
| Customer Reviews | — | — | — | — | — | — |
| Price | — | — | — | — | — | — |
| Light Socket Quantity | 1 PC | 2 PCS | 3 PCS | 2 PCS | 2 PCS | 2 PCS |
| Sensor | PIR Motion Sensor | PIR Motion Sensor | PIR Motion Sensor | PIR Motion Sensor | PIR Motion Sensor | PIR Motion Sensor |
| Installation angle | Fix Downward | Fix Downward | Fix Downward | Fix Downward | Fix Downward | Fix Downward |
Troubleshooting Guide
1. Light does not turn on at all:
· Check Power: Ensure the wall switch controlling the light socket is turned on.
· Check Bulb: Please confirm you are using a compatible bulb. This socket is suitable for most E26/E27 screw-in bulbs, such as LED, CFL, or incandescent bulbs. However, the maximum wattage must be less than 60W, and it cannot be used with heating bulbs (like heat lamps).
· Check if the bulb is screwed in tightly, or if the filament is burnt out (indicated by a blackened tip).
· Check Mode Settings: Light Control (LUX): If the knob is turned to the "Moon" (crescent moon) mode, the light will not turn on during the daytime for testing. Please turn it to the "Sun" mode for the light to operate both day and night. After adjusting, please wait for the sensor to re-initialize (approx. 10-30 seconds).
2. Light stays on constantly (or triggers falsely):
· Check Installation Location: Is the sensor pointing directly at an air conditioning vent, a heater, or outdoor moving hot air currents? Interference from heat sources can cause false triggering.
· Check for Obstructions: Is the sensor window covered by dust, cobwebs, or stickers?
· Time Setting (TIME): Is the delay time for turning off the light set too long?
3. Shortened sensing distance / Insensitivity:
· Ambient Temperature Effect: When the room temperature in summer is close to human body temperature, the sensing distance naturally shortens or sensitivity decreases. This is a normal physical phenomenon.
· Lens Cleaning: Gently wipe the infrared lens surface with a soft cloth to remove any dust.
4.The bulb cannot be tightened securely
· Check the center contact spring (most common cause): If the bulb feels loose even when screwed all the way in, or if it turns on and off intermittently, unplug the bulb and use an insulated tool (such as plastic tweezers or a wooden toothpick) to gently pry the small contact spring in the center of the socket outward by 2–3 mm. Reinstall the bulb, keeping it vertical and screwing it in gently without applying excessive force.
· Some energy-saving or LED bulbs have a shorter metal base and may not fully engage with the threads inside the socket. Before purchasing, carefully check the socket size and replace with an E27/E26 bulb whose metal base is appropriately sized for the fixture.
· Always screw in the bulb by hand, stopping when slight resistance is felt. Do not use tools or overtighten, as this may damage the threads or internal wiring. If the bulb appears tilted,wobbles, or flickers after installation, stop using it immediately.
Safety Warning: Before performing any wiring, disassembly, or bulb replacement, be sure to turn off the power to avoid electric shock.
Specifications:
Power Source: 100-240V/AC
Rated Load:<60W Max.
Detection Distance: 6m max
Time-Delay: Min.10sec±3sec Max. 5min±1min (adjustable)
Ambient Light: 3-2000 LUX (adjustable)
Question: Will the motion activated light sockets work in an enclosed lampshade ?
Answer: The motion activated light sockets can only work in an open lampshade and facing down. Or the glass shade will block the sensor.
Question: What's the maximum voltage, can it work with 230V ?
Answer: The motion sensor light sockets can work via AC100V-240V.
Question: Can I use this motion sensor light socket outdoor?
Answer: The motion sensor light socket can't penetrate the glass and walls to detect. Please do not fix the socket into an enclosed lampshade or the glass-shadewill block the sensor. Can use indoor only.
Question: What is the Sensor Range of this motion sensor light socket?
Answer: This motion sensor light socket offers 360-degree motion detection andhas a sensitivity range of up to 12 feet when mounted 8 feet above the floor. ThePIR motion light will light up automatically while the motion sensor detect motion in the detective range in the dark.
Question: What Bulb can work with? Answer: The motion sensor light sockets is suitable for all E26/E27 Light Bulb(Max Wattage<60W), such as LED lamp,Incandscent light,Halogon light, energy-saving lamps and so on.
NOTES:
1) Can use it indoors only.
2) The motion sensor light adapter should be installed downward and no higher than 10 feet, or the sensor will not work right.It can’t be installed horizontally or facing upward.
3) No cover the Motion Sensor Ball
4) Please do not fix the socket into an enclosed lampshade, or the glass shade will block the sensor.
5) Max load 60W. Not suitable for the LED garage light>60w. No work with heat lamp bulbs.
6) Please make sure the motion sensor is facing the desired motion area with proper distance and angle.If the room
is too large, this socket may not suitable.
7) Make sure the 2 bulb spacing is more than 15ft.
8) When testing in daylight, please turn the LUX knob to the SUN position, otherwise, the sensor lamp would not work.
9) Its working temperature is -4F-104F, if the weather is too cold or too hot, the sensor may not work well, Please take
care of this before buying!!
10) For safety: Ensure power is disconnected before installation to prevent electric shock.
11)To increase the bulb's sensitivity, please try to adjust the Angle and Height of the bulb installation, and make the sensor toward the direction people are coming.
12) When installed it in the lampshade, pay attention to whether the size of the lamp body is suitable for the lampshade,the lampshade may effect the sensitive of the socket.
Stairs/ Front door Lighting
Corridor/Aisle Lighting
Garage Lighting
Basement/Storage room Lighting
PIR Motion Sensor Light Socket,E26/E27 Smart Lamp Bulb Holder Adapter Auto On... | Taigeguang Motion Activated Light Socket,E26 Motion Security Light Bulb Socke... | Motion Sensor Light Socket,E26 E27 PIR Motion Screw Bulb Adapter Indoor Use O... | Motion Sensor Switch Indoor Plug in Motion Sensor Light Sockets Adjustable Mo... | Motion Sensor Light Socket Splitter Adapter,2 in 1 Light Socket Extender with... | Plug in Motion Sensor Outlet Light Control,Indoor Motion Sensor Switch Plugs,... | |
|---|---|---|---|---|---|---|
| Customer Reviews | — | — | — | — | — | — |
| Price | — | — | — | — | — | — |
| Light Socket Quantity | 1 PC | 2 PCS | 3 PCS | 2 PCS | 2 PCS | 2 PCS |
| Sensor | PIR Motion Sensor | PIR Motion Sensor | PIR Motion Sensor | PIR Motion Sensor | PIR Motion Sensor | PIR Motion Sensor |
| Installation angle | Fix Downward | Fix Downward | Fix Downward | Fix Downward | Fix Downward | Fix Downward |
Troubleshooting Guide
1. Light does not turn on at all:
· Check Power: Ensure the wall switch controlling the light socket is turned on.
· Check Bulb: Please confirm you are using a compatible bulb. This socket is suitable for most E26/E27 screw-in bulbs, such as LED, CFL, or incandescent bulbs. However, the maximum wattage must be less than 60W, and it cannot be used with heating bulbs (like heat lamps).
· Check if the bulb is screwed in tightly, or if the filament is burnt out (indicated by a blackened tip).
· Check Mode Settings: Light Control (LUX): If the knob is turned to the "Moon" (crescent moon) mode, the light will not turn on during the daytime for testing. Please turn it to the "Sun" mode for the light to operate both day and night. After adjusting, please wait for the sensor to re-initialize (approx. 10-30 seconds).
2. Light stays on constantly (or triggers falsely):
· Check Installation Location: Is the sensor pointing directly at an air conditioning vent, a heater, or outdoor moving hot air currents? Interference from heat sources can cause false triggering.
· Check for Obstructions: Is the sensor window covered by dust, cobwebs, or stickers?
· Time Setting (TIME): Is the delay time for turning off the light set too long?
3. Shortened sensing distance / Insensitivity:
· Ambient Temperature Effect: When the room temperature in summer is close to human body temperature, the sensing distance naturally shortens or sensitivity decreases. This is a normal physical phenomenon.
· Lens Cleaning: Gently wipe the infrared lens surface with a soft cloth to remove any dust.
4.The bulb cannot be tightened securely
· Check the center contact spring (most common cause): If the bulb feels loose even when screwed all the way in, or if it turns on and off intermittently, unplug the bulb and use an insulated tool (such as plastic tweezers or a wooden toothpick) to gently pry the small contact spring in the center of the socket outward by 2–3 mm. Reinstall the bulb, keeping it vertical and screwing it in gently without applying excessive force.
· Some energy-saving or LED bulbs have a shorter metal base and may not fully engage with the threads inside the socket. Before purchasing, carefully check the socket size and replace with an E27/E26 bulb whose metal base is appropriately sized for the fixture.
· Always screw in the bulb by hand, stopping when slight resistance is felt. Do not use tools or overtighten, as this may damage the threads or internal wiring. If the bulb appears tilted,wobbles, or flickers after installation, stop using it immediately.
Safety Warning: Before performing any wiring, disassembly, or bulb replacement, be sure to turn off the power to avoid electric shock.