Your Browsing History

Vidas V.
Joined on 10/02/05
0
0
product reviews
- 4
Works well but not perfect. 92mm fan mod
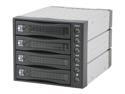
Athena Power BP-SATA3141B RAID 0 / 1 / 5 / 10 4 3.5" Drive Bays 3 x 5.25" Bay for 4 x 3.5" SATA HDD Backplane
Pros: In an effort to build servers for clients with limited budgets and don't want to pay for an Intel server, a few of these were purchased too add some features of a cheaper RM chassis. Installation is easy and straight-forward, just dont loose the screws because they dont give you extras. Yes I have mistakenly turned off the wrong drive, but fortunately it was after i created the array, before data was migrated. Just had to recreate.
Cons: Now, no product is perfect, this product leaves me wanting more. First cooling is lacking, IMO the stock fan isn't loud, but it does not cool at all. Going from just fans in front of each drive, to the enclosure, temps jumped about 8-10 C per drive (SMART internal temps.) Since noise isnt an issue, ive decided to stick a 92mm high speed fan on (had a few BTX heatsinks laying around, see notes) Another con would be the locking method, just make sure you hold the handle so it doesnt pop out when you attempt locking, because the slightest pressure will release the handle and possibly disconnect the drive. Yes the bezel doesnt fit properly, but who cares?
Overall Review: For the modification: Basically I took a BTX heatsink fan, one that is notorious for high RPMs and higher noise. Unfortunatly there is no way to mount a fan like this to the unit, except epoxy. Took the stock fan out, saved the connector. Put connector on btx fan, find a way to route the cable into the unit (use the hole for the fan speed switch.) Figure out how you are going to mount it, and cut out the grille for the stock fan, too much airflow restriction. Mix up some epoxy, or your plastic glue of choice, and apply to the corners of the fan, on the blade side (so its pulling from the unit.) Apply moderate pressure and allow to cure, if you do it properly with the correct glue, and skuff up all glued edges, theres no reason why it wouldnt stay on. Temps went back down after this, using fan on low setting. It still isnt as loud as any of the other servers in my rack.
5/31/2007See more detail
nifty little toy to have

P3 Kill A Watt Electricity Load Meter and Monitor
Pros: pretty much just like the rest of the reviews, the product works and you can change to view power draw, kWh meter, etc... and yes it takes a few seconds to get a baseline to give you the average numbers. It is fairly accurate with the numbers on my Amprobe when clamped on the same line, but i assume these units could have different accuracies, ymmv.
Cons: no battery to store settings, I have gotten rather annoyed when the power went out in the middle of a week long test and lost my accumulated kWh reading. Also cant hook up to my 230volt input battery backups out of the box.
Overall Review: No 230v model (on NewEgg), although I may get creative and rig some of these for 230v, which should be possible, depending on exactly how these things work. It would be easy if it worked like an Amprobe and clamped around the hot, but it may be different. If I get around to it Ill post back with results as long as I didnt BBQ myself. (do not try to do this btw, you didnt get this idea from me.)
8/20/2008See more detail
Worked flawlessly for 1 yr (dead now)
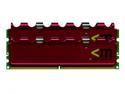
Mushkin Enhanced REDLINE 2GB (2 x 1GB) DDR2 1000 (PC2 8000) with EPP Profile Dual Channel Kit Desktop Memory Model 996525
Pros: Worked flawlessly and even OCed nicely in the first month, and ran stock after that in my gaming system. (believe me, its cooled well in my rack with conditioned power and climate control.)
Cons: Well, after about a year and not restarting unless I needed to, I decided to restart for an update and got the dreaded C1 post code. Tried ram in 2 mobos I had on hand, same problem. every configuration. Took the ram into work to do further testing, (Im a repair tech) and little luck. What Ive noticed is the system would post with a single, lower clocked memory, like ddr2 667 or 800mhz, but would hang bad on post, not getting past the point where it would count these modules.
Overall Review: Well, I didn't expect this memory to post at all when I paired it with a lower clocked memory, but it did, sorta. It more or less confirmed that both modules were flaky or bad, which means Ill have to try to get a manufacturer RMA. I wasnt getting C1 codes when I paired the ram with some known good, but running at lower speeds, but the dreaded C1 was always there with this memory alone or in the first slot. (oh I did get a 2nd opinion on the memory from a fellow tech and I have 2 expensive paperweights, or future key chains if non-RMAable.) /me shutters.
8/19/2007See more detail
Works in Acer Altos G301 / PowerEdge 600SC
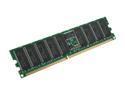
CORSAIR 1GB ECC Registered DDR 400 (PC 3200) Server Memory Model CM72SD1024RLP-3200
Pros: Compatible with the slower mainboards. Some of the DDR266 compatible mainboards have problems with some DDR400 memory, but so far this memory has had a 100% track record with every server ive tried it in. Acer Altos G301 and a few PowerEdge 600SCs (both have identical mainboards minus bios.)
Cons: Price. Yes for businesses this isn't a problem, but if you are a tinkerer that picked up a cheap server (in this case this Acer) and wanted to upgrade the memory, it costs a little bit more than regular desktop memory. In my case it isn't a con. In reality its fairly cheap.
Overall Review: Had a client roll in with an Acer Altos G301 (identical mainboard to the PowerEdge 600SCs we have in the shop) with no memory, after extensive research, we found that it uses DDR266 Registered ECC, it wont post with anything else. This memory allowed the system to fire right up, although it only ran at DDR266 speeds, but that is to be expected with a DDR266 mainboard.
5/31/2007See more detail