
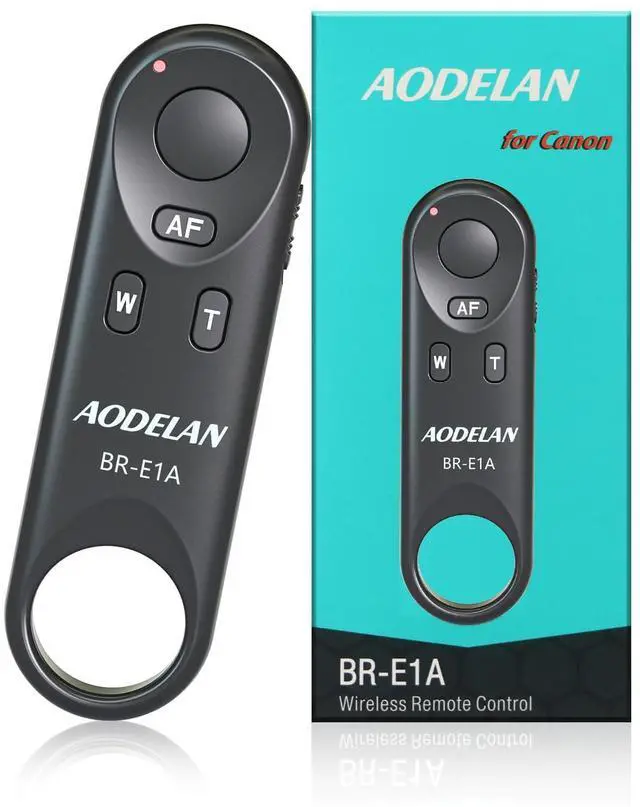
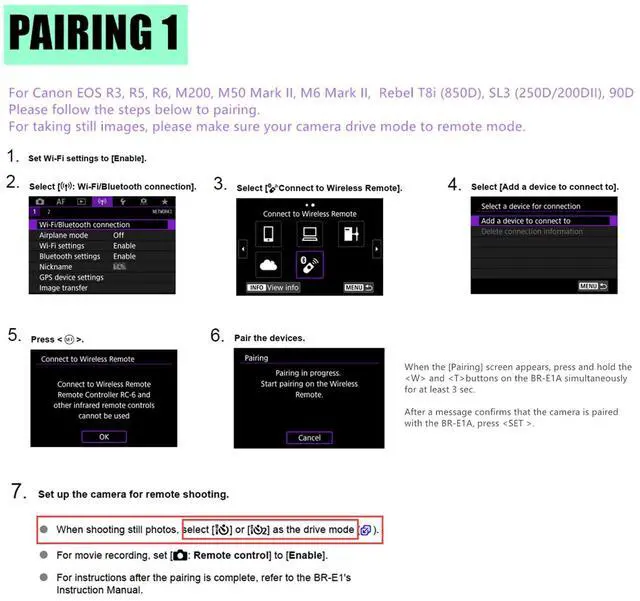


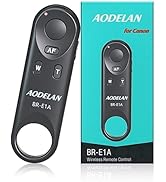
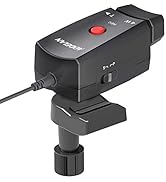
AODELAN Wireless Remote Control BR-E1A enables the camera operations to be performed wirelessly, including shooting still photos and videos, focusing with AF and zooming (the feature of zooming only works when using with the power zoom adapter (sold separately).
PLS NOTICE that AODELAN canon wireless remote control JUST COMPATIBLE WITH EOR RP/ EOS R/ R5/ R6 / 6D Mark II / 77D / 800D(EOS Rebel T7i) / 200D(EOS Rebel SL2) / M50 / PowerShot SX70 HS.
HOW TO USE (Please send us if you have any questions)
1. Set the camera for still photo shooting:
- Clear remote controller connection information first if you have pair other remote before- select "wireless communication setting "- select "bluetooth function"- select "check or clear connection info".
- Pairing: 2. select "wireless communication setting "- select "bluetooth function"- select "remote"- select "pairing", in this step, hold and press the W and T on remote control simultaneously for 3 sec. or more. The indicator will blink in the pairing process, and it will blink one more time when pairing is complete.
- Set the drive mode of the camera to (remote control).
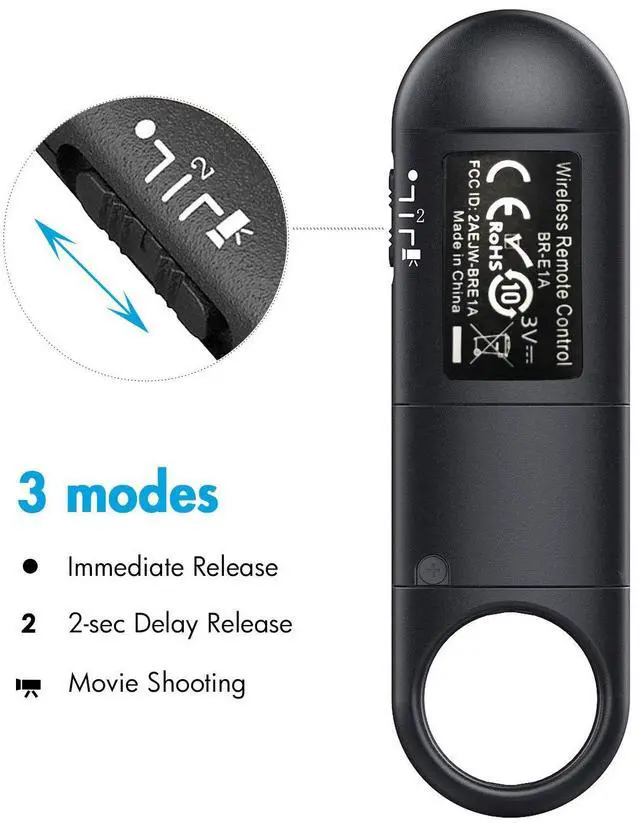
- Set the shutter release timing/movie shooting switch on the BR-E1A to the <·> (immediate release) or <2> (2-sec. delay release) position.
2. For video shooting:
- Set the camera for movie shooting and set [Remote control] to [Enable] from the menu screen of the camera.
- Set the shutter release timing/movie shooting switch on the BR-E1A to the (movie shooting) position.

Responsive and Easy To Use
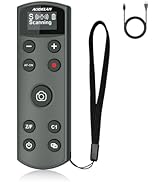
It is small size,you can hidden it in your hand.And with Lanyard sling you can hang it around your neck or camera ,it is easy to carry and would not be easy to lose.
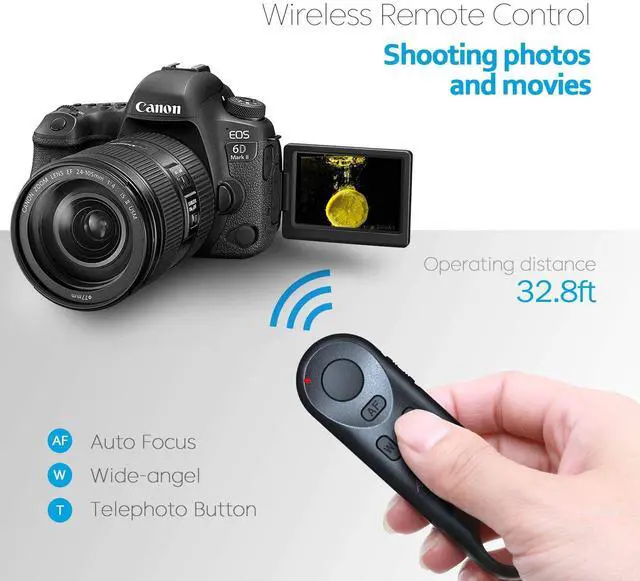
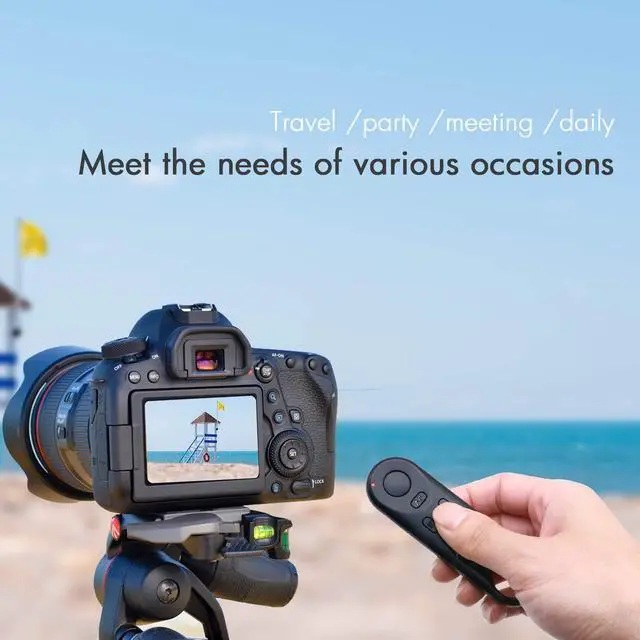
This wireless remote control operating range up to 10m/32.8ft, you can shutter release in any direction,you dont have to aim the remote at the camera.

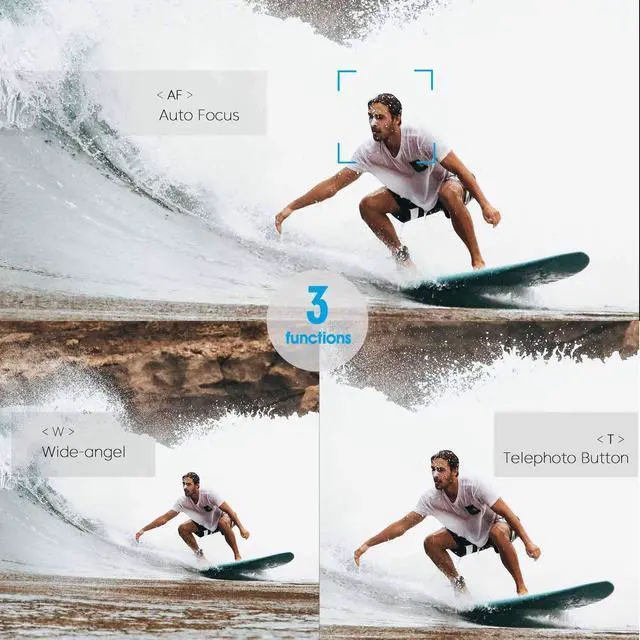
Shooting Still Photos and videos, Focusing with AF and Zooming
1.Camera remote control BR-E1A besides shooting still photo (support immediate release and 2-sec delay release.) also can shooting videos.
2. Compatible with power zoom Adapter,but pls notice that zooming only works when using with the Canon PZ-E1 Power Zoom Adapter (NOT INCLUDE),
and movement of the EF-S 18-135mm f/3.5-5.6 IS USM lens.
3.It was easy to sync and easy to use to focus and take pictures or selfies.
4.Avoid shake that ruins the picture.


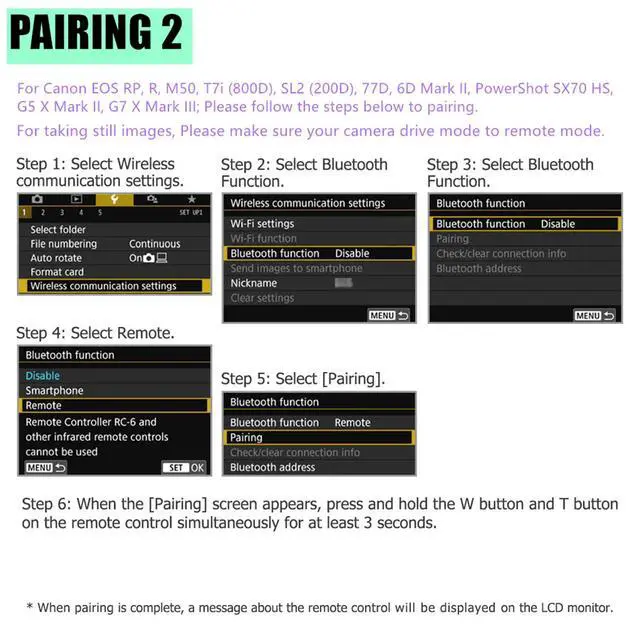
How to connect to your camera:
1.Turn on your camera - press setting - choosing Remote control - Enable.
2.Choosing wireless communication setting - function - Remote - Pairing.
3.Press the remote control W and T at the same time
4.In your camera you will see Paired with ,you need to press ok.It is finish to pair.
How to setting your camera and remote:
Taking photo:
For remote control: press the remote control to shutter release photo position.
For camera:setting the camera to Non-recording mode - drive mode to remote control.
Start/Stop video recording:
For remote control:press the remote control to recording position.
For camera:setting video mode - The drive mode is adjusted to the REMOTE CONTROL - The remote control should be enabled (the camera only sees this option when the remote control to the recording position)
For M50 Pairing Settings:
1.For your camera setting: go to setting under the wrench settings - choose wireless communication - choose function - choose remote.
2.Once pairing is highlighted on the camera,
for your remote control setting: you simply hold down the W and the T button on the remote for a few seconds and it should connect.
3.Once the remote is paired with the camera, on the M50
you need to choose a camera setting - enter the MENU - in the CAMERA menu on the first tab - scroll down to "Drive Mode" - it to to "self-timer:10sec/remote" - stress the "remote" part of that.
4.On the remote when the switch on the side is all the way up, that is for taking still images. When the switch is all the way down, that is for starting and stopping video recording.
PLS NOTICE:
Make sure your camera drive mode to remote mode.
 br e1a for canon |  timer shutter for canon |  wireless remote for canon |  wired remote for canon |  Speedlite Monolight Kit | |
|---|---|---|---|---|---|
| Customer Reviews | — | — | — | — | — |
| Price | — | — | — | — no data | — no data |
| function | Shooting Still Photos and videos, Focusing with AF and Zooming | 5 setting for timing control: Delay, Interval and Long, N, BKLN; 4 modes for shutter release control: S, C, B, 2S. | Support autofocus, Single shooting, BULB shooting and Delay release of 3s shooting | 5 setting for timing control: Delay, Interval and Long, N, BKLN; 4 modes for shutter release control: S, C, B, 2S. | for studio lighting |
| way to control | wireless control | wireless and wired control | wireless and wired control | wired control | flash trigger control or camera control |
| Compatible with cameras | Compatible with the listing list cameras | Compatible with Canon/Fujifilm/Olympus cameras | Compatible with Canon/Fujifilm/Olympus cameras | Compatible with Canon/Fujifilm/Olympus cameras | fully compatible with Profoto System |


We have been focusing on the camera accessories industry more than 15 years, integrating production, research and development and sales.
Camera wireless/wired shutter remote, release cable, flash trigger, battery pack, Camcorder Zoom Controller it is our main product.
Our aim is to supply fast, superior and valuable product and shopping experience to customers.
Best-sellers
Wireless Flash Trigger

New Coming
This BR-E1A remote works at first, but after a while it wont pair.Why?
Check all your settings. Make sure that the remote is switch to photo or video.
This BR-E1A remote can working with videos recording, but can’t take still picture. Why?
Check whether if had select on the remote from video to photos mode or set the drive mode to Self-timer: 10sec/Remote.
This BR-E1A remote show had paired, but can’t take still picture. Why?
Check select on the remote set to "photo" mode, setting to your camera to "Drive Mode" - it to to "self-timer:10sec/remote" - stress the "remote" part of that.
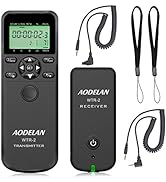
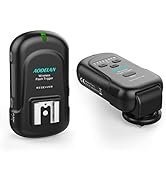
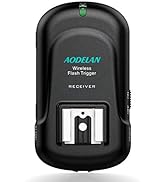
Does have to attached the WTR-2 receiver on the hot shoe?
Don't need, the connection between camera and receiver is the shutter release cable, not the hot shoe.
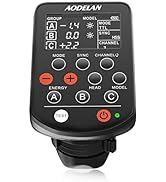
This WTR-2 timer shutter how many photos will allow to take at one time?
number of shots: 1-199 photos programmable and - - being unlimited photos.
This WTR-2 shutter can how long of an exposure (single) can you take?
Exposure time: 0s to 99hrs 59min 59s in one second increments.To get a single exposure, set the "N" value to 1. Start the exposure by pressing the "play" button.


AODELAN Wireless Remote Control BR-E1A enables the camera operations to be performed wirelessly, including shooting still photos and videos, focusing with AF and zooming (the feature of zooming only works when using with the power zoom adapter (sold separately).
PLS NOTICE that AODELAN canon wireless remote control JUST COMPATIBLE WITH EOR RP/ EOS R/ R5/ R6 / 6D Mark II / 77D / 800D(EOS Rebel T7i) / 200D(EOS Rebel SL2) / M50 / PowerShot SX70 HS.
HOW TO USE (Please send us if you have any questions)
1. Set the camera for still photo shooting:
- Clear remote controller connection information first if you have pair other remote before- select "wireless communication setting "- select "bluetooth function"- select "check or clear connection info".
- Pairing: 2. select "wireless communication setting "- select "bluetooth function"- select "remote"- select "pairing", in this step, hold and press the W and T on remote control simultaneously for 3 sec. or more. The indicator will blink in the pairing process, and it will blink one more time when pairing is complete.
- Set the drive mode of the camera to (remote control).
- Set the shutter release timing/movie shooting switch on the BR-E1A to the <·> (immediate release) or <2> (2-sec. delay release) position.
2. For video shooting:
- Set the camera for movie shooting and set [Remote control] to [Enable] from the menu screen of the camera.
- Set the shutter release timing/movie shooting switch on the BR-E1A to the (movie shooting) position.
Responsive and Easy To Use
It is small size,you can hidden it in your hand.And with Lanyard sling you can hang it around your neck or camera ,it is easy to carry and would not be easy to lose.
This wireless remote control operating range up to 10m/32.8ft, you can shutter release in any direction,you dont have to aim the remote at the camera.
Shooting Still Photos and videos, Focusing with AF and Zooming
1.Camera remote control BR-E1A besides shooting still photo (support immediate release and 2-sec delay release.) also can shooting videos.
2. Compatible with power zoom Adapter,but pls notice that zooming only works when using with the Canon PZ-E1 Power Zoom Adapter (NOT INCLUDE),
and movement of the EF-S 18-135mm f/3.5-5.6 IS USM lens.
3.It was easy to sync and easy to use to focus and take pictures or selfies.
4.Avoid shake that ruins the picture.
How to setting your camera and remote:
How to connect to your camera:
1.Turn on your camera - press setting - choosing Remote control - Enable.
2.Choosing wireless communication setting - function - Remote - Pairing.
3.Press the remote control W and T at the same time
4.In your camera you will see Paired with ,you need to press ok.It is finish to pair.
Taking photo:
For remote control: press the remote control to shutter release photo position.
For camera:setting the camera to Non-recording mode - drive mode to remote control.
Start/Stop video recording:
For remote control:press the remote control to recording position.
For camera:setting video mode - The drive mode is adjusted to the REMOTE CONTROL - The remote control should be enabled (the camera only sees this option when the remote control to the recording position)
For M50 Pairing Settings:
1.For your camera setting: go to setting under the wrench settings - choose wireless communication - choose function - choose remote.
2.Once pairing is highlighted on the camera,
for your remote control setting: you simply hold down the W and the T button on the remote for a few seconds and it should connect.
3.Once the remote is paired with the camera, on the M50
you need to choose a camera setting - enter the MENU - in the CAMERA menu on the first tab - scroll down to "Drive Mode" - it to to "self-timer:10sec/remote" - stress the "remote" part of that.
4.On the remote when the switch on the side is all the way up, that is for taking still images. When the switch is all the way down, that is for starting and stopping video recording.
PLS NOTICE:
Make sure your camera drive mode to remote mode.
br e1a for canon | timer shutter for canon | wireless remote for canon | wired remote for canon | Speedlite Monolight Kit | |
|---|---|---|---|---|---|
| Customer Reviews | — | — | — | — | — |
| Price | — | — | — | — no data | — no data |
| function | Shooting Still Photos and videos, Focusing with AF and Zooming | 5 setting for timing control: Delay, Interval and Long, N, BKLN; 4 modes for shutter release control: S, C, B, 2S. | Support autofocus, Single shooting, BULB shooting and Delay release of 3s shooting | 5 setting for timing control: Delay, Interval and Long, N, BKLN; 4 modes for shutter release control: S, C, B, 2S. | for studio lighting |
| way to control | wireless control | wireless and wired control | wireless and wired control | wired control | flash trigger control or camera control |
| Compatible with cameras | Compatible with the listing list cameras | Compatible with Canon/Fujifilm/Olympus cameras | Compatible with Canon/Fujifilm/Olympus cameras | Compatible with Canon/Fujifilm/Olympus cameras | fully compatible with Profoto System |
We have been focusing on the camera accessories industry more than 15 years, integrating production, research and development and sales.
Camera wireless/wired shutter remote, release cable, flash trigger, battery pack, Camcorder Zoom Controller it is our main product.
Our aim is to supply fast, superior and valuable product and shopping experience to customers.
Best-sellers
Wireless Flash Trigger
New Coming
This BR-E1A remote works at first, but after a while it wont pair.Why?
Check all your settings. Make sure that the remote is switch to photo or video.
This BR-E1A remote can working with videos recording, but can’t take still picture. Why?
Check whether if had select on the remote from video to photos mode or set the drive mode to Self-timer: 10sec/Remote.
This BR-E1A remote show had paired, but can’t take still picture. Why?
Check select on the remote set to "photo" mode, setting to your camera to "Drive Mode" - it to to "self-timer:10sec/remote" - stress the "remote" part of that.
Does have to attached the WTR-2 receiver on the hot shoe?
Don't need, the connection between camera and receiver is the shutter release cable, not the hot shoe.
This WTR-2 timer shutter how many photos will allow to take at one time?
number of shots: 1-199 photos programmable and - - being unlimited photos.
This WTR-2 shutter can how long of an exposure (single) can you take?
Exposure time: 0s to 99hrs 59min 59s in one second increments.To get a single exposure, set the "N" value to 1. Start the exposure by pressing the "play" button.