Your Browsing History

Justin H.
Joined on 07/17/07
0
0
product reviews
- 8
Perfect memory - can't beat Corsair
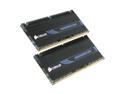
CORSAIR DOMINATOR 4GB (2 x 2GB) DDR3 1600 (PC3 12800) Desktop Memory Model CMD4GX3M2A1600C8
Pros: This memory performs like a champ - it registers a 7.6 out of 7.9 on the Windows Experience Index. Out of the box, it runs at standard SPD speeds of DDR3-1333 @ 9-9-9-24 and what people need to understand is that the DDR3-1600 label is just a guarantee from Corsair that the modules will operate at a higher speed. But that means that you have to set that speed - and with this RAM it couldn't be easier. On my Gigabyte P55M-UD2 board, I just had to enable XMP in the BIOS and everything adjusted automatically. Another great resource from Corsair is the Labs link on their website that tests overclocks on various modules on various motherboards and posts screenshots of the BIOSes - definitely something to check out. Did I mention how great they feel and look - the heatsinks aren't taped on like with some other manufacturers.
Cons: No cons at all - these worked absolutely perfectly - but if you do have problems, make sure you've updated your BIOS.
Overall Review: I got these on sale on Black Friday, and even though they were still slightly more expensive than a set from G.Skill, I went with the Corsair brand. You really can't go wrong with Corsair, and this being my first build, they've definitely got a lifelong customer. Needless to say, Newegg's already got a lifelong customer here - thanks. My first build: Case: Antec Nine Hundred Two Mobo: Gigabyte P55M-UD2 CPU: Intel Core i5-750 RAM: 2 x 2GB Corsair Dominator DDR3-1600 GPU: XFX ATI Radeon HD 4890 1GB (ZSFC) PSU: Corsair VX450 HDD: Western Digital Caviar Black 1TB Monitor: Dell SP2309W Speakers: Logitech X-540
12/14/2009See more detail
The Best Value Cooler Available
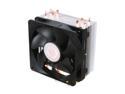
Cooler Master Hyper 212 Plus - CPU Cooler with 4 Direct Contact Heatpipes
Pros: The Hyper 212 Plus dropped the temps on my stock-speed i5-750 by about 10C at idle from the low 30s to the low 20s. While the fan is by no means quiet, particularly at load, it's a ton better than my old Intel cooler. Plus, the PWM feature ratchets down the RPMs at idle, which essentially silences the fan. Even though I'd never installed a heatsink before and the bundled instructions stink, the assembly was simple and straightforward and the fan clip system is ingenious. If you're having trouble installing the cooler, check out Cooler Master's website - they have a video that shows you how it's done.
Cons: No real negatives here, just a few warnings. First of all, do your research to see if the cooler will fit in your system. That means making sure you will have enough clearance over any and all mobo sinks and RAM sinks, and if the side of your case will accomodate the height of the 212 Plus. In my system (specs below), the only fitment issue I have is that the fan overhangs one of the DIMM slots. While the sink itself comes close to both my graphics card and the side of the case, there's still about an inch to spare. As mentioned before, the stock fan is just OK - a better bet would be Scythe's Slip Stream 120 with PWM, which I'd pick up if it were in stock. Finally, tinting the sink requires some attention since there are ridges on either side of the exposed heatpipes that need to be filled with TIM. Check out Arctic Silver's site for great detailed tinting instructions.
Overall Review: The reason I decided to ditch my old Intel cooler wasn't because I wanted to overclock the heck out of my CPU but because I just couldn't stand the noise of the fan anymore. So even though the Hyper 212 Plus satisfied my needs, it may not be the best choice for more aggressive enthusiasts. That said, I would highly recommend this cooler to anyone looking to squeeze out more performance at minimal cost. Even if you were to replace the so-so bundled fan, your all-in cost would still be less than most other high-performance coolers. I didn't buy this part from Newegg, but they supplied the other parts for my build, so I gotta give props. My first build: Case: Antec Nine Hundred Two Mobo: Gigabyte P55M-UD2 CPU: Intel Core i5-750 RAM: 2 x 2GB Corsair Dominator DDR3-1600 GPU: XFX ATI Radeon HD 4890 1GB (ZSFC) PSU: Corsair VX450 HDD: Western Digital Caviar Black 1TB Monitor: Dell SP2309W Speakers: Logitech X-540 Heatsink: Cooler Master Hyper 212 Plus
10/19/2010See more detail
Awesome performance but one major bug

XFX Radeon HD 4890 1GB GDDR5 PCI Express 2.0 x16 CrossFireX Support Graphics Card HD-489X-ZSFC
Pros: This card plays all my games (COD4 baby) at max settings at my monitor's native resolution (2048 x 1152) without any slow down or frame skipping. The card itself also looks great with its black PCB and XFX styling inside my Antec Nine Hundred Two.
Cons: My number one complaint may actually be with the drivers from ATI, but I'm still deducting an egg for it. At idle, the card seems to suffer from multiple-personality-disorder in that it can't decide what speed it wants to run the fan. As a result, the fan keeps revving up and down, which starts to get really annoying. I ended up doing a bunch of research and downloading a third-party program called Riva Tuner and creating my own fan profiles to keep the fan in check. Now that the card's on some medication, everything's fine but this was the only thing that prevented my first build from being problem-free. Also, the accessory package is a bit scarce - I liked the dual-molex power adapters but I wish there was a DVI-HDMI adapter rather than one for DVI-VGA.
Overall Review: Of all the components I purchased for my first build, this was the only one I didn't give 5-eggs. That being said, I have no complaints about this card's performance and now that I've fixed the fan problem, everything's running smoothly in my system. I just don't really get how with such a mature chip like the RV790, there can still be problems like this, though I always had XFX's lifetime warranty to fall back on. Thanks to Newegg for their great service. My first build: Case: Antec Nine Hundred Two Mobo: Gigabyte P55M-UD2 CPU: Intel Core i5-750 RAM: 2 x 2GB Corsair Dominator DDR3-1600 GPU: XFX ATI Radeon HD 4890 1GB (ZSFC) PSU: Corsair VX450 HDD: Western Digital Caviar Black 1TB Monitor: Dell SP2309W Speakers: Logitech X-540
12/14/2009See more detail
Enthusiast performance at a budget price
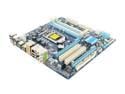
GIGABYTE GA-P55M-UD2 LGA 1156 Intel P55 Micro ATX Intel Motherboard
Pros: I've really had no problems at all with this board. It POSTed on my first boot with no issues, it easily enabled XMP for my memory and it recognized all my hardware. Just be sure that before you do anything, update the BIOS - just wail on the <END> key during bootup to enter Q-Flash and use your USB stick to update. Also, comparing several manufacturers online, I think Gigabyte has the best documentation - their manual is very detailed, easy to follow and answers all your questions.
Cons: Since everything worked great, my gripes are all pretty minor, though there are a handful of them and probably all related to the fact that this is a mATX board. First, I felt that the placement of the CPU power connector could have been a little better - rather than going behind the motherboard tray I had to route the power cable over the top of my graphics card to reach (though I blame Corsair just as much for that). Also, the front-panel audio is buried behind the PCIe slot. Speaking of the PCIe, it sits very close to the memory banks and I may have to remove my graphics card to add more memory in the future. If you plan on doing CrossFire, go with Gigabyte's UD4s or higher since they provide dual x8 links rather than a x16 and a crippled x4 like on the UD2 and UD3s. Also for some reason, my Windows 7 Ultimate installation booted up really slowly but in the end it worked fine. Lastly, the accessory package is pretty skimpy - you only get two SATA cables and a dual IDE cable.
Overall Review: Since this was first build, I didn't really know what to expect from the motherboard - the last thing I wanted was for something to go wrong. Thankfully nothing went wrong, and I have to credit Gigabyte for that. Everything was recognized correctly and I booted into Windows in no time. The price on this board is almost criminal - you get a high quality, well performing board from a solid manufacturer for just over $100. And as you can tell from looking at my system specs, this board is for both enthusiasts and budget builders alike. Thanks to Newegg for making my first build a breeze. My first build: Case: Antec Nine Hundred Two Mobo: Gigabyte P55M-UD2 CPU: Intel Core i5-750 RAM: 2 x 2GB Corsair Dominator DDR3-1600 GPU: XFX ATI Radeon HD 4890 1GB (ZSFC) PSU: Corsair VX450 HDD: Western Digital Caviar Black 1TB Monitor: Dell SP2309W Speakers: Logitech X-540
12/14/2009See more detail
The best mainstream processor for the money
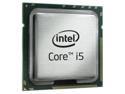
Intel Core i5-750 - Core i5 Lynnfield Quad-Core 2.66 GHz LGA 1156 95W Processor - BX80605I5750
Pros: This processor is a massive upgrade from my old Pentium 4. It runs HD video and games with absolutely no problems or lagging. At stock speeds, it generates a Windows Experience Index of 7.3 out of 7.9 and I have not yet encountered any situation where my computer is being slowed down because of the processor. Also, when my computer is idle, the clock speed slows down to around 1.2Ghz to increase power savings. However, it seems that when I overclock my RAM using XMP, I lose those savings, so I'm just running at DDR3-1333, but correct me if I'm wrong.
Cons: As others have pointed out, the boxed fan/heatsink is not that great. It gets pretty loud even at low speeds and doesn't do a very good job of keeping temps down. I'm not an overclocker so this isn't a big deal for me but if you are planning to OC the processor I'd definitely recommend upgrading the fan/heatsink.
Overall Review: For the price, this processor is awesome value for the money. Unless you have a spare C-note laying around, I don't think it's necessary to step up to the i7-860, which essentially just provides an extra multiplier and HyperThreading. Props to Newegg for their impeccable service. My first build: Case: Antec Nine Hundred Two Mobo: Gigabyte P55M-UD2 CPU: Intel Core i5-750 RAM: 2 x 2GB Corsair Dominator DDR3-1600 GPU: XFX ATI Radeon HD 4890 1GB (ZSFC) PSU: Corsair VX450 HDD: Western Digital Caviar Black 1TB Monitor: Dell SP2309W Speakers: Logitech X-540
12/14/2009See more detail
Stunning case with awesome styling and functionality
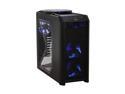
Antec Nine Hundred Two Black Steel ATX Mid Tower Computer Case
Pros: The case is absolutely stunning - the all-black styling gives it a polished, yet beastly look. There's plenty of ventilation, courtesy of two front fans, a rear fan and a massive top fan, all of which can be daisy-chained in case you're short on 4-pin molex connectors. Inside the case, the holes around the motherboard tray really help with cable management and keep the wire clutter down. It's hard to tell from the photos but there is actually space at the top of the tray to pass wires through. Also, Antec did a nice job of packaging - the box is eye-catching and sturdy and the case itself is covered in a plastic bag and held on both sides by some kind of plasticky-styrofoam bookends (not the stuff you can just snap in half).
Cons: The only gripe I have about this case is that you'll get to know your screwdriver pretty well any time you want to install something. Everything is secured by screws and it's especially time-consuming to add drives because you have to first remove both side panels and for 3.5" drives, you then have to remove the desired cage. I took the advice of another reviewer and just left the screws off on one side so I only have to remove one side panel to get to the cages. Lastly, the fans do get noticeably loud if you ever decide to crank them up all the way, otherwise they're pretty much silent.
Overall Review: Overall, I would highly recommend this case due to its combination of awesome styling and functionality. Since this was my first build, I wasn't really sure what to look for in terms of features, but I think that the next time I'm in the market for a case I'll probably look for one that's more tool-less. But with everything this case has going for it, having to deal with a bunch of screws is a minor inconvenience. Of course, I have to give props to Newegg - I ordered Sunday afternoon with standard shipping and received it Tuesday. My first build: Case: Antec Nine Hundred Two Mobo: Gigabyte P55M-UD2 CPU: Intel Core i5-750 RAM: 2 x 2GB Corsair Dominator DDR3-1600 GPU: XFX ATI Radeon HD 4890 1GB (ZSFC) PSU: Corsair VX450 HDD: Western Digital Caviar Black 1TB Monitor: Dell SP2309W Speakers: Logitech X-540
12/8/2009See more detail