Your Browsing History

Robert M.
Joined on 06/25/01
0
0

product reviews
- 7
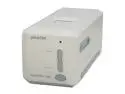
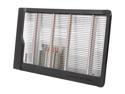
Plustek OpticFilm 7300 A17-BBM31-C 48bit CCD Single Pass 7200 x 7200 dpi Hardware Resolution Scanner
Pros: Very high quality for the price, great slide holder, useful slide viewer, can grab lots of detail from shadows with the right software. I got this on sale here at NewEgg, but even at full MSRP this is a deal to beat. A full, useful 3600dpi for less than a small fortune is hard to find, but here we are. The slide holder is very effective, I only recommend you take a moment after inserting one to flip the holder over and square up the frame with the opening so you don't have to straighten scans after the fact. That viewer window on top of the unit is great, although the blue of the cold cathode shifts your color a bit (not in your scans, though, don't worry). The bundled software leaves something to be desired, but the scanner's API apparently lets developers control the exposure time of the CCD. VueScan, for example, can do this, and I've gotten some great scans from old slides of my father's; ISO 400 pushed to 1600 in a cave, I can pull detail invisible to the naked eye.
Cons: Can't reach 7200dpi, poor negative holder, Silverfast. I don't know if the Nyquist limit is to blame, but scanning at 7200dpi doesn't produce any more detail than 3600dpi. The lens I'm using isn't high end by any means, so the photos I'm scanning may not have detail of such high frequency in them, but the scruffy little strands of cardboard around the edges of slide mounts should become more clearly defined as the dpi goes up; this holds true up to 3600, beyond that I just get bigger files (and serious chroma aliasing at 7200). The negative holder is a pain to close. I have to delicately place the film strip in and snap it closed as quickly as I can or else the film wants to jump up and out of the mount. Manageable, but frustrating. The metal nub the film holders seat on has also weakened, and it's become harder to center frames well. And Silverfast? I've heard people complain about it before, now I understand. Lets you work well enough, but grab a copy of VueScan if you can.
Overall Review: I have a series of scans up on Flickr, under the same account name I'm using here, "ItEndsWithTens" (no links allowed in NewEgg reviews). Check the "Film" set to find them. The histograms were adjusted, and some negatives were further color corrected to match the prints, but none have been sharpened, and I didn't do any grain reduction, so you should get some idea of the scanner's abilities. I'm sorry to hear about everyone's Mac problems, and it's a serious problem that deserves to be addressed, but I can only judge the product by my personal experience; I got exactly what I expected, so I'm extremely satisfied with my purchase.
12/12/2009See more detail
Petite, unique, and adorable, like I wish I was
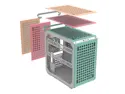
Cooler Master QUBE 500 Flatpack Macaron Small High Airflow Mid-Tower ATX Customizable Gaming PC Case, Mint, Pink, Cream, Tempered Glass, Vertical GPU Mount, USB-C, Carrying Handle, Gem Mini (Q500-DGNN-S00)
Pros: -Full size ATX mobo/PSU in a case that's only about 15" deep (ignoring the top rear handle protrusion), which was my primary motivation for getting this. Fits on my 24" deep desk with room to spare for my mousepad. -Comes in colors beyond the stock industry standard options. Black was a nice sea change from retro beige back in the day, and white was a pleasant step beyond that, but for my money they're all kind of tired after this many years. I might have gone for really intense, vibrant colors if they were available here, but the pastels are nonetheless fantastic, and I find the "cream" yellow panels complement my room lighting and desktop immaculately. The Macaron edition offering three colors to mix and match is a delight. -Decent number of storage mounting options. In the strictest sense you could have 4x3.5" drives and 1x2.5" at the same time, or 3 of each, though to be fair that depends on what kind of cooling you have and where everything is positioned. My system is air cooled, and I currently only have 1x2.5" SSD and 2x3.5" HDDs, but the side bracket and the ceiling mount would allow adding even more. For the past few weeks I had my lightest weight HDD mounted in the ceiling position; I only moved it to the back of the motherboard panel because the drive itself was a little too noisy when up top, not because there was anything wrong with the mounting spot itself. The drive in question weighs just under a pound, so I don't know if I'd trust anything heavier up there, but for single-platter mechanical drives, or maybe some 2.5" drives with some sort of adapter, I wouldn't hesitate to use it again. -Those vibration dampening grommets work rather well, too! I've never been bothered by seek noise, personally, but the incessant rising and falling drone of mechanical drives, especially at 7200rpm, always used to drive me crazy. These mounts do a respectable job, and though it'll never be as quiet as full on elastic suspension, I'm quite content to use what Cooler Master has come up with here. -The flatpack, DIY nature of the case makes accessing whatever you need rather trivial. Taking frame panels off to get to some otherwise cramped location is very nice, and makes mounting fans and HDDs much less painful than it'd be otherwise. -Shocking amount of cable management space for something so small. I'm using an old Corsair TX650W non-modular PSU, and I had just enough space for the huge amount of wiring this thing has. The two Molex cables had to get bundled up and cable tied out of the way, but I had a comfortable spot to do just that, with a nice little tie off location (that might actually be unusable if I had the side bracket installed, I'm not sure, so take that with a grain of salt). In a situation like mine I'd also strongly recommend what I did here, namely picking up some plastic caps to cover any connectors you're not using. With the case being so wide open, especially the top panel, there's that much more risk of debris or liquid finding its way in.
Cons: -"Build as you unbox" is a cute gimmick, but the product includes glass and had to travel thousands of miles to get to me, so the first thing I did was unpack the whole thing. I dug down through the layers to check the glass panel, then put it all back in the box before starting my build. Spoils the joy of unboxing a bit, though I'll admit I don't know how you could redesign the packing material to obviate the need to check everything. Luckily in my case it was all intact. -Fit and finish are a bit lacking, in that the snap on fascia panels have corners that don't want to push all the way in. Seems like it's the rubber parts on the posts that have some sort of QA issue? I'm not an expert in that sort of thing. In any event, I found that pressing down on the rubber with a spudger, while also pressing down on the panel itself with my other hand, helped things along and now my case panels fit almost perfectly. Still noticeably uneven if you run a finger along the edge, but not glaring to the naked eye, and not enough to affect my rating. -The 3.5" drive mounts on the ceiling and floor of the case go left-to-right, not lengthwise along the case, which forces the SATA power and data cables to make some seriously tight bends against the motherboard panel. I'm almost confident the radius of those bends is still within the relevant wiring specs, but it still makes me uncomfortable. The side-to-side orientation also means no ability to use tool-free 3.5" to 2.5" adapter caddies, since those demand that the drives slide in and out along the caddies' length. There do, however, exist brackets to mount 3.5" devices in a 120mm fan position (thereby allowing a 90 degree turn because fan mounts are square), and I definitely plan to experiment with those in future. -The side bracket has a mounting spot for a 3.5" drive, but doesn't allow use of the vibration grommet system. I appreciate this feature was likely just a last minute value-add, and it's nice to have at all, but it does mean putting an HDD there will demand putting up with more droning noise. Not a huge issue, but worth keeping in mind if you're trying to plan a build. -Still no spare parts! Researching this case shows this has been an issue since it launched, and it's disappointing to see nothing has changed. Whether it's further customization you want (a second mesh panel for airflow, or even a second glass panel to show off your slick cable routing), or just a replacement for a broken part, it'd really be nice to have parts available online to just buy without having to go through customer service.
Overall Review: Truth be told, the DIY nature of this case, as well as the flatpack design and customizability, were not important to me when I decided to grab one. My goal was to consolidate my workspace; years ago I bought a desk with wheels so I could conveniently move around my space when necessary, and I made sure it was only 24" deep so I could fit through a particular doorway. Everything but my PC was on the desk already, so it was a matter of finding something small enough to fit the tiny remaining footprint available. I'd resigned myself to eventually having to shell out the cash for at most some microATX hardware to fit a small space like mine, but on a hunch one day I looked into the smallest full ATX cases available, and sure enough Cooler Master was offering this cute little thing. The front-to-back dimension first caught my eye, the color options got me worked up, and the number of storage mounting locations finally sold me. I've never been big on case windows, not because I don't love looking at computer parts (I'm a huge dork, and circuit boards are cool) but because every case these days has one, and combined with the standard issue unicorn vomit RGB lighting you see everywhere it all just blends together and strikes me as kind of ho-hum. The QUBE 500 Macaron edition was a different story, and so far I'm just as thrilled with it as I thought I'd be. There are compromises you have to make, features to trade off with one another, to be sure, but the ability this case offers you to prioritize what's most important to you is superb. I miss the option of front drive bays, since I'm old and like having an optical drive or maybe a card reader on hand, but definitely not enough to be upset by this purchase. I absolutely love this case so far, and I can tell I'm going to get some serious use out of it. Well done, Cooler Master! I hope the rest of the industry takes the hint and expands on these ideas. Build details: Xeon E5-2690v4 (135w, idles in the low to mid 30s at worst, depending on ambient temp) Machinist MR9A V1.0 4x32GB SK Hynix DDR4-2400T Sapphire Nitro RX 580 (260mm long, idles in mid to high 20s) Corsair TX650W PSU (150mm long, i.e. top to bottom when mounted vertically in this case) Noctua NH-C14 HSF 2xNoctua NF-A14 case fans (intake) 3xNVMe PCIe 3.0x4 drives (two on motherboard, one in expansion card, all full speed) 2xHDDs (one 7200rpm, one 5400) 1xSATA SSD (all storage stays under 40c even under load)
5/2/2025See more detail
Haswell that ends well
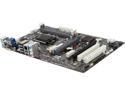
ECS H81H3-A3 LGA 1150 Intel H81 HDMI USB 3.0 ATX Intel Motherboard
Pros: -Stable when running under more stress than I'll ever put the board through. Nineteen passes in Memtest86+ over more than twenty-four hours, then the next twenty-four running the AIDA64 stress test with CPU/FPU/cache/system memory/GPU options enabled, all with no errors, bugchecks, or other strange behavior. -The PCI-E 3.0 slot is separated from the slot underneath it by an extra space, so dual slot graphics cards don't waste one of your future expansion possibilities. This comes with a caveat, mind you, as you'll see among the Cons. -All solid caps. As of this writing, the photos on the ECS website, and that you might find in, say, the jungle, feature board version A, which I take it is an engineering sample, and which has a few electrolytic caps. Based on those, and the marketing copy of "Solid Capacitor for CPU VRM", I thought only some of them would be solid, but no! The shots here on Newegg are in fact correct, and version 1.0A is solid all around. -Nice, wide bend on the CPU retention latch. Easy to grab and slide out, and as you lift it up it even picks up the face of the bracket for you. I haven't been in the market for a new motherboard for almost seven years, so maybe this is standard, but I've never seen it, so I'm impressed.
Cons: -Incomplete Haswell Refresh support out of the box. My Pentium G3258 booted, but the IGPU didn't function, and there were problems with reset/reboot. Namely that it wouldn't, and I'd have to hold in the power button to force the system off. Furthermore, disabling "ME Control", so I could update the BIOS, would send the system into a fit of on/off cycles that prevented it from booting unless the CMOS was reset. I ended up grabbing a used Celeron G1820 to do the BIOS update; it had the same bizarre on/off business after ME Control was disabled, but eventually booted, and the BIOS updater worked like a charm (from Windows, even!). After the update the G3258 is working beautifully. I'm not too upset, as the ECS website explains you'll need an update for these processors, but it's still disappointing: a BIOS with Haswell-R support was released about six months before I bought this thing, but I still got a board with the July 18th, 2013 build. The BIOS chip itself isn't one of the nicer socketed types, either, so it's not as if ECS could have simply sent me a new one. -No more support for "Non Z OC". According to NewsID number 1589 in the ECS NewsRoom, both the latest BIOS and the one shipped with the board are too new to allow it. I hadn't expected to win any overclocking contests, but a little boost might have been nice. The G3258 is still a solid performer for my needs, so for me it's not a big deal, but if you're looking to overclock (and have Broadwell support for later this year) you'll be better off with a 9 series chipset. -The blue VGA connector block is only mounted at the bottom, where it's soldered. There's no bracing anywhere else, so it's easy to accidentally bend. I managed to catch myself in time to avoid doing so, but I still came frighteningly close. You should be fine unless you're a hamfisted oaf like me when it comes to handling electronics. -The board is narrow at only 7.5", so the DIMM slots cozy right up to the HSF mounting area. Things fit neatly on my system, with a Noctua C14 in "high profile" mode (the bottom fan removed) and a pair of Gino SO-DIMM to DIMM adapters I picked up to use some good laptop RAM I had sitting around. The adapters are thicker than most memory I've seen, even memory with heatspreaders. I did try the stock Intel cooler initially, and these oddball things fit next to that just fine, so normal RAM shouldn't be an issue. Just pay attention to clearances if you have a third party heatsink/fan. -The CMOS battery and reset jumper are in the otherwise unused space between the graphics card slot and second PCI-E x1 slot. Large dual slot graphics cards, or aftermarket coolers like my Accelero S1 Plus, block access, so the card has to come out every time you need to reach them. Luckily you can hold Page Up on boot to reset the CMOS to its defaults, but if you ever need the actual jumper it can be a pain to get to.
Overall Review: To be clear, I chose to list only the surprising things in the above categories, in the interest of both brevity and reviews' character limit. Beside the Haswell Refresh stuff, which I felt warranted mentioning anyway, the other notes are things I didn't see coming (though in retrospect I should have, since most are evident when looking at the product photos). When I take into account the things I knew up front, the Pros outweigh the Cons dramatically. This board was worth the extra legwork, for me at least. It was available at a significant discount when I bought it, and between that, a little extra from a rebate, and the going rates for used 1150 Celerons as of this writing, I consider the board a good deal. It's the only one I could find in my price range that had USB 3.0, SATA III, PCI-E 3.0 x16, and a good selection of intelligently placed expansion slots. More of those things would always be nice, but the limited number of each is mostly born of the H81 chipset, not the motherboard's engineering. The one hoop I had to jump through to get this thing working was a pain, but worth it in my situation. At MSRP, with no rebate, and no way to get rid of the spare processor, things would be different, though there still wouldn't be many boards with this particular set of features in its price range, so I still might have chosen it. What I'm willing to put up with myself, however, is not the same as what I'd foist on others when asked for recommendations. If you want to run a Haswell Refresh processor on this board, and either have an older Haswell already or don't mind spending the money on a spare CPU to do the BIOS update, you might find yourself pleased with the purchase. If you just want to run an older 1150 part you'll face even less hassle. Otherwise, you might be happier looking elsewhere.
1/14/2015See more detail
's one quiet fan you got there
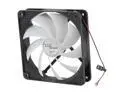
ARCTIC S1+ Turbo Module Fluid Dynamic Active Cooling Fan for Accelero S1+
Pros: Can't hear it from more than a couple of inches away at 7V, but even then provides what I'd consider a worthwhile cooling improvement. Includes a spare tube of thermal compound, which I suppose is nice to have around, and two spare rubber fan mounts. My EVGA GT440, with its stock cooler, idled at ~36C, and after fifteen minutes of FurMark's Burn-in Test, at default settings, hit a maximum of ~93C. The S1 Plus passive setup brought that down to ~33C and ~68C, respectively. Adding the Turbo Module, even at its low setting of 7V, improved the numbers to ~30C and ~51C (at 12V I measured the same numbers, even after double checking the connector; ambient temp was much lower, so I suspect that's just the limit of what my case's airflow can accomplish).
Cons: You lose an extra two expansion slots, beyond the one from the S1 Plus; getting the extra performance at a low noise level is worth it to me, but may not be to others, though to be fair if I need to use those slots the passive performance of the S1 Plus on my card is still perfectly acceptable. Installing the rubber mounts is a little trying, I snapped one in impatience. Slow, steady, straight-on pressure and you'll be fine, though who knows how I'm going to remove them if I ever need to. It does look like Arctic sells packs of spare mounts for a few dollars, so I guess I shouldn't be too worried.
6/22/2013See more detail
Just shut your mouth and keep cool
ARCTIC Accelero S1 Plus VGA Cooler - nVidia & AMD, Silent Passive Cooling, SLI/CrossFire
Pros: Solid performance even without turbo module (beats the pants off my card's obnoxious stock cooler even under full load), fairly straightforward installation, includes heatsinks for RAM and voltage regulators. My EVGA GT440, with its stock cooler, idled at ~36C, and after fifteen minutes of FurMark's Burn-in Test, at default settings, hit a maximum of ~93C. The S1 Plus passive setup brought that down to ~33C and ~68C, respectively. Adding the Turbo Module, even at its low setting of 7V, improved the numbers to ~30C and ~51C (at 12V I measured the same numbers, even after double checking the connector; ambient temp was much lower, so I suspect that's just the limit of what my case's airflow can accomplish). I'm a man who appreciates curves in the right places, but this is one I'm glad to see flattened.
Cons: On my graphics card, the chipset is set toward the back, so the card doesn't balance on the copper base while you're attaching the screws. I needed one hand to steady the board itself while the other does the initial threading. Not the end of the world, but with the screws, spacers, and washers to worry about at the same time things were a little touchy. I had to remove the plastic guard to fit this thing in on my ASRock 4CoreDual-SATA2 R2.0 motherboard; the fins reach back over the IDE connectors, and it's a tight fit. Without the plastic the cables have a much easier time passing by. As for the case itself, mine is wide enough (just over seven inches from the motherboard tray to the inside of the opposite wall) that the guard wouldn't have hit the side panel, but others may not be so lucky. The heatsink technically only eliminates one slot next to the card, but clearance is just about nonexistent, and I wouldn't feel comfortable for a second putting a card right next to the fins. If you really had to, maybe some electrical tape or other insulating material would help? I don't know electricity as well as I should, don't take my word for it. Godawful, atrocious, all but worthless thermal epoxy; the squarish heatsinks had a nice amount of surface area to attach to on the memory chips, so those stuck, but the MOSFETs don't give enough to grab on to, even after an extra paranoid fifteen hour plus cure time. I like the idea of something I can remove and replace easily, but the execution here leaves something to be desired. At least the giant fin array will catch any of the small heatsinks when they inevitably work loose and fall off.
Overall Review: I got the turbo module as well, and with the extra airflow I felt comfortable simply getting rid of the heatsinks on everything but the RAM. After three months the card's still cranking away, no glitches, stop screens, lockups, or other funny business.
6/22/2013See more detail
A burger that's actually good for you
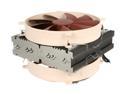
Noctua NH-C14 140mm x 2 SSO CPU Cooler
Pros: Effective, easy to install, uses a mounting system I'm confident in, and is bundled with every little extra nicety I could ask for, including the single best instruction manual I've ever seen. For my stock Q6600, idling for ~15 minutes with my previous HSF stabilized at ~45C, while with the C14 using the Ultra Low Noise Adapters I'm holding ~26C. When testing with a 15 minute Prime95 Small FFT test, full load is now ~42C. What little noise there is is of a rather pleasing, smooth, soft character.
Cons: The way I have it installed (heatpipes toward the back of the case), my Kingston HyperX RAM fits with a couple millimeters of clearance since that line uses simple, flat spined heat spreaders, but installation/removal of DIMMs is likely to be annoying. The orientation I'm using also makes attaching the ATX power connector to the header of my ASRock 4CoreDual-SATA2 R2.0 a game of centimeters. I opted to install the heatsink first, then connect the cables afterward, and it wasn't as cumbersome as I'd expected it to be.
Overall Review: There are competitors that perform as well at lower prices, but this was a chance to get exactly the product I needed while also supporting a company that puts tremendous thought into the design of its products and support of its customers, and that was important to me.
6/22/2013See more detail
seller reviews
- 1
All I could ask for
They had exactly the part I needed, it shipped out in no time, and showed up exactly as specified on the product page. I didn't have occasion to contact the seller for support, but the experience I did have was smooth and straightforward. I'll definitely keep them in mind the next time I need something they sell!
On-time
Delivery
Product
Accuracy
Customer Service
Satisfactory
3/24/2025See more detail