
Building your first machine for local AI feels intimidating, but it comes down to a handful of good decisions made in the right order. Running large language models, generating images in Stable Diffusion, or rendering 3D scenes on your own hardware means no monthly subscriptions, no usage caps and no sending your data to someone else’s cloud. This guide walks you through a complete, no-compromise AI workstation part by part, in the order that actually matters, and explains why each piece is here. Every price below was checked on Newegg on August 15, 2026. If you remember only one thing, remember this: for AI work, the amount of VRAM on your graphics card is the single most important number in the whole build.
Why Build an AI Workstation
Cloud AI is convenient, but it adds up. A local workstation runs models offline, keeps your prompts and datasets private, and lets you experiment as much as you like without watching a meter. It also doubles as a serious content-creation machine for video editing, 3D and rendering. The catch is that AI is unlike gaming: instead of raw frame rates, what you need is memory on the GPU. A model has to fit inside your graphics card’s VRAM to run quickly, so a card with more VRAM can load bigger, smarter models. That is why we start with the GPU and build everything else around it.
Step 1: The GPU and VRAM (Start Here)
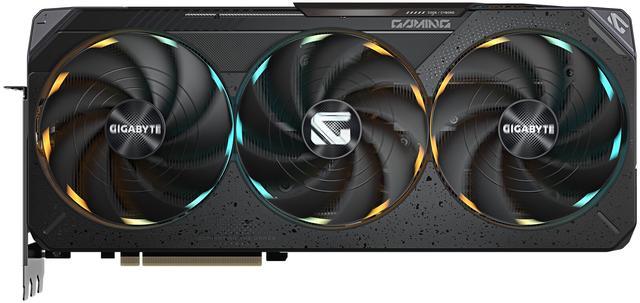
The graphics card is the heart of an AI workstation, and VRAM is the spec that decides which models you can run. The GIGABYTE GeForce RTX 5090 32GB at $4,699.99 is the top of the consumer stack, and its 32GB of VRAM is the reason it belongs in this build. That headroom lets you run larger local LLMs, generate high-resolution images in Stable Diffusion without running out of memory, and keep NVIDIA’s mature CUDA software ecosystem on your side. If the 5090 is beyond your budget, the principle still holds: buy the most VRAM you can afford before anything else. You can compare every current option in Newegg’s graphics card listings.
Step 2: The CPU
For AI, the CPU feeds the GPU rather than doing the heavy lifting, but a strong one keeps data flowing and handles the rest of your creative workload. The AMD Ryzen 9 9950X at $549.00 gives you 16 cores and 32 threads, which is plenty for data preprocessing, video encoding and 3D work while the GPU crunches models. You do not need a Threadripper for a single-GPU AI box; a top mainstream chip like this is the smarter, cheaper choice for most first builds.
Step 3: The Motherboard
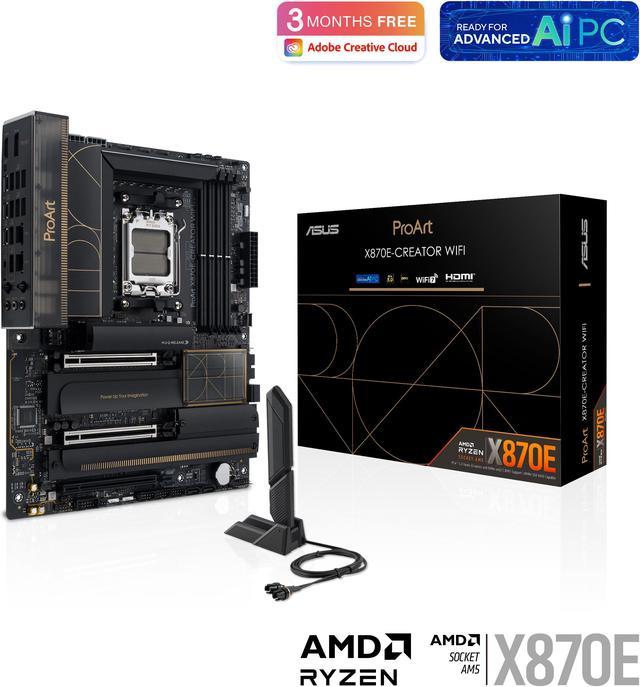
Your motherboard determines how much you can expand later. The ASUS ProArt X870E-CREATOR WIFI at $509.99 is built for exactly this kind of machine, with robust power delivery for the Ryzen 9, PCIe 5.0 support for the GPU and SSD, fast networking and generous rear connectivity. The X870E chipset gives you room to add drives and cards as your projects grow.
Step 4: Memory
System RAM is separate from GPU VRAM, and both matter. While VRAM holds the model, plenty of system memory keeps datasets, browser tabs and creative apps running smoothly alongside it. The Corsair Vengeance RGB 64GB (2×32) DDR5 kit at $879.99 is the right target for AI work; 64GB is comfortable for large datasets and multitasking, where 32GB can feel tight. Running two sticks keeps you in dual-channel mode for full bandwidth.
Step 5: Storage
AI models and datasets are large, and loading them from a fast drive saves real time. The Samsung 9100 PRO 2TB PCIe 5.0 SSD at $399.99 delivers cutting-edge sequential speeds that shorten model load times and give you 2TB to hold several multi-gigabyte models at once. It slots straight into the ProArt board’s PCIe 5.0 M.2 socket.
Step 6: Cooling
A hard-working CPU needs to stay cool under sustained load. The Corsair Nautilus 360 RS LCD 360mm liquid cooler at $177.49 keeps the Ryzen 9 9950X in check during long training and rendering sessions, and its large radiator handles the heat that comes with hours of continuous work. The LCD screen is a nice touch for monitoring temperatures at a glance.
Step 7: Power Supply
The GPU is power-hungry, so do not cut corners here. The MSI MAG A1000GLS 1000W ATX 3.1 at $129.99 delivers 1000 watts and, crucially, the modern ATX 3.1 standard with a native 12V-2×6 connector for the RTX 5090. That means clean, stable power for the whole system with headroom to spare, and no adapter cable clutter.
Step 8: The Case
Finally, a case that fits everything and breathes well. The Corsair 3500X RS-R ARGB at $79.99 is a superb value, with room for the 360mm radiator, clearance for a large GPU and strong airflow to keep temperatures down. Good airflow matters more in an AI box than in a typical gaming PC because the hardware runs hard for hours at a time.
Putting It Together
Assemble in a sensible order: mount the CPU, cooler and memory on the motherboard first, install the board and power supply in the case, then add storage, the GPU and cables. Here is the full parts list and what it costs today.
| Component | Product | Price |
|---|---|---|
| GPU | GIGABYTE GeForce RTX 5090 32GB | $4,699.99 |
| CPU | AMD Ryzen 9 9950X | $549.00 |
| Motherboard | ASUS ProArt X870E-CREATOR WIFI | $509.99 |
| Memory | Corsair Vengeance RGB 64GB DDR5 | $879.99 |
| Storage | Samsung 9100 PRO 2TB PCIe 5.0 | $399.99 |
| Cooling | Corsair Nautilus 360 RS LCD | $177.49 |
| Power Supply | MSI MAG A1000GLS 1000W | $129.99 |
| Case | Corsair 3500X RS-R ARGB | $79.99 |
| Total | $7,426.43 |
That comes to $7,426.43 for a machine that runs large local models today and has room to grow. The GPU is the biggest line item by far, which is exactly right for AI: spend on VRAM first, and let the rest of the build support it.
Read More
- NVIDIA GeForce RTX 5090 — Official specifications and CUDA details for the flagship AI and creator GPU.
- Puget Systems: AI and Machine Learning Workstations — Hardware recommendations and real-world benchmarks for AI-focused builds.
- AMD Ryzen Desktop Processors — Manufacturer overview of the Ryzen 9000 series used in this build.
- llama.cpp on GitHub — A popular open-source project for running large language models locally on your own GPU.
- Newegg: Graphics Cards — Browse and filter current GPUs by VRAM, chipset and price.