Your Browsing History
- Free 30-day Returns
$24.99
Ships from China.

Meet Your Seller


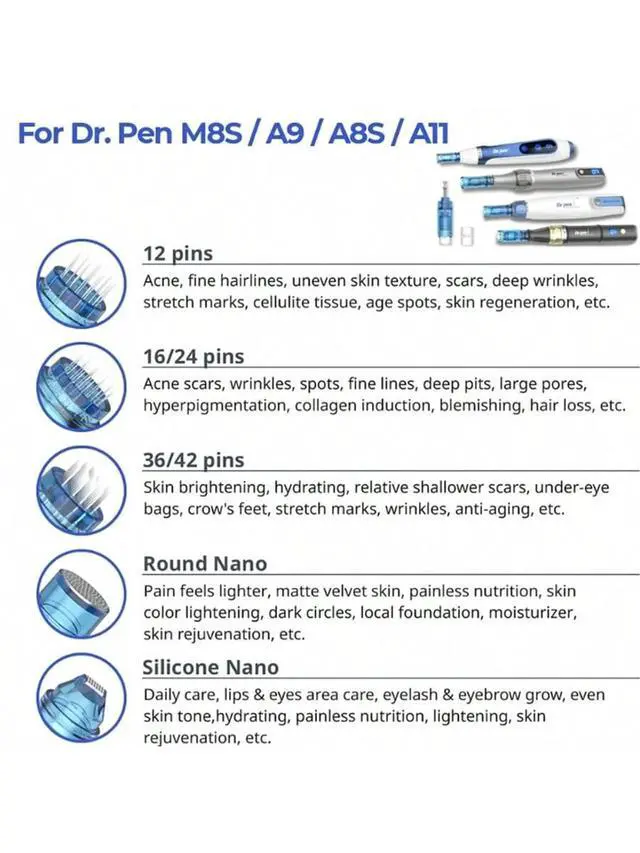


Dr.Pen M8S/A8S/A9/A11 Screw Needle Waved Cartridge Skin Pen Micro Needling Cartridges 10pcs Round Nano
- 100% AuthenticThese Dr.pen microneedling cartridges are all manufactured by authorized manufacturers of Dr.pen, designed specifically for use with the Dr.pen M8S/A8S/A9/A11, ensuring genuine quality and compatibility.
- Individually Packaged Each microneedling cartridges is individually packaged as a disposable sterile product, ensuring no cross-contamination and giving you peace of mind.
- Modelsuitable for Dr.pen M8S/Dr.pen A8S/Dr.pen A9/Dr.pen A11.
- Solve Various Skin Problemssuitable for improves acne, pores, scars, stretch marks, and cellulite tissue marks.
- Warm ReminderDr.pen M8S/Dr.pen A8S/Dr.pen A9/Dr.pen A11 replacement cartridges are for personal one-time use only, do not share with others or reuse. Do not use on open wounds or irritated skin.
- Upgraded features to suit the new Dr. Pen M8S/Dr.pen A8S/Dr.pen A9/Dr.pen A11 Microneedling Pen
+
+
Overview
Specs
Reviews
Any questions? Our AI beta will help you find out quickly.
Try me now
Newly adopted wavy contact edge to help with better skincare product absorption
Newly built three snap connectors to help with the performance and protection of the device machine
Easily paired with Dr. Pen M8S/Dr.pen A8S/Dr.pen A9/Dr.pen A11 Microneedling Pen
High-quality stainless steel for the gauge
Maximum depth of 2.5mm
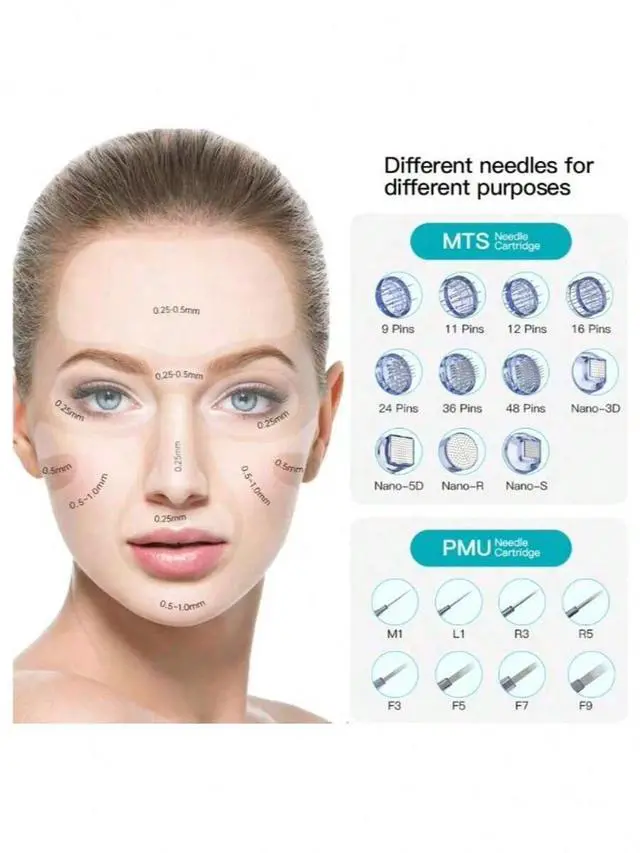
The main difference between Dr.pen M8S/Dr.pen A8S/Dr.pen A9/Dr.pen A11 cartridge models is the number and shape of the needles. Different needle types are suitable for different skin issues and treatment areas.
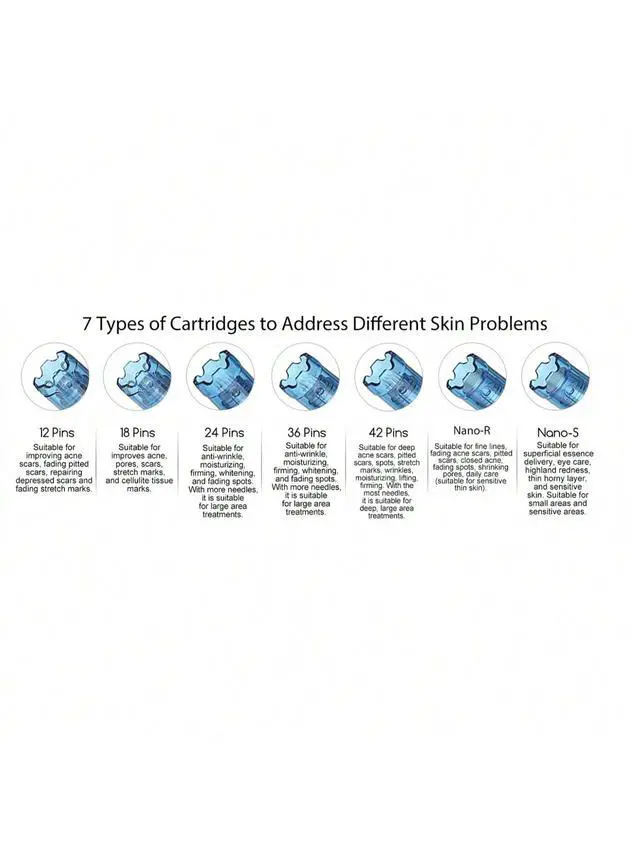
7 Available Types
12 Pins: Needles made of 304 stainless steel, suitable for improving acne scars, fading pitted scars, repairing depressed scars and fading stretch marks.
18 Pins: Needles made of 304 stainless steel, suitable for improves acne, pores, scars, stretch marks, and cellulite tissue marks.
24 Pins: Needles made of 304 stainless steel, suitable for anti-wrinkle, moisturizing, firming, whitening, and fading spots. With more needles, it is suitable for large area treatments.
36 Pins: Needles made of 304 stainless steel, suitable for anti-wrinkle, moisturizing, firming, whitening, and fading spots. With more needles, it is suitable for large area treatments.
42 Pins: Needles made of 304 stainless steel, suitable for deep acne scars, pitted scars, spots, stretch marks, wrinkles, moisturizing, lifting, firming. With the most needles, it is suitable for deep, large area treatments.
Nano-R: Skin contact area of 50mm², made of 304 stainless steel, suitable for fine lines, fading acne scars, pitted scars, closed acne, fading spots, shrinking pores, daily care (suitable for sensitive thin skin).
Nano-S: Skin contact area of 9mm², 7*7 contact points, single crystal silicon material, suitable for superficial essence delivery, eye care, highland redness, thin horny layer, and sensitive skin. Suitable for small areas and sensitive areas.
how to use M8S/Dr.pen A8S/Dr.pen A9/Dr.pen A11 Cartridges
Before You Start
1. Prepare your skin: Cleanse your face thoroughly and tie back any hair.
2. Get the right cartridge: Use a new, sterile disposable cartridge for each treatment to prevent cross-contamination.
3. Apply a serum: Apply a Hyaluronic Acid serum to the skin in small sections before needling to ensure the pen glides smoothly and to provide hydrati
Attaching the Cartridge
1. Match the prongs: Look for the three prongs on the cartridge and match them with the corresponding prongs on the pen.
2. Twist to secure: Twist the cartridge into place to secure it to the pen.
3. Set the depth: Rotate the dial on the pen to your desired needle depth, which will depend on the area being treated.
The Microneedling Process
1. Turn on the device: Power on the Dr. Pen M8S/A8S/Dr.pen A9/Dr.pen A11 pen.
2. Use a stamping technique: Work in small, 1-inch sections.
3. Move the pen: Use a combination of vertical, horizontal, and diagonal motions in each section, ensuring the entire area is covered.
4. Apply light pressure: Hold the skin taut with your free hand and let the pen do the work; do not press down with the pen.
5. Repeat: Work in a grid pattern to ensure you don't miss spots or go over the same area too many times.
After Treatment
1. Post-needling care: After microneedling, wash your face with tepid water and apply more Hyaluronic Acid serum.
2. Disposal: Safely dispose of the cartridge after each treatment.
3. Expect redness: It's normal to experience redness, swelling, and pinpoint bleeding after the treatment.
4. Avoid certain activities: Do not apply makeup, exercise, or sweat for 24 hours after treatment.
Warranty & Returns
Warranty, Returns, And Additional Information
Warranty
- Please contact the Seller directly for warranty information. Warranty information may also be found on the Manufacturer's website.
- CONTACT
Return Policies
- Return for refund within: 30 days
- Return for replacement within: non-replaceable
- This item is covered by Sooger Return Policy
Manufacturer Contact Info
- For a directory of all our manufacturers, please click below.
- Manufacturers Directory
LOADING...