


- Pre-Purchase Guide:
- Installation:Red ? ACC | Yellow ? BAT+ | Black ? Ground.
- Compatibility: Standard signal: A5B5. For A8B8 dash cams, use the included adapter cable.
- Features:
- Smart Parking Mode: Activates 3-5 min after engine off.
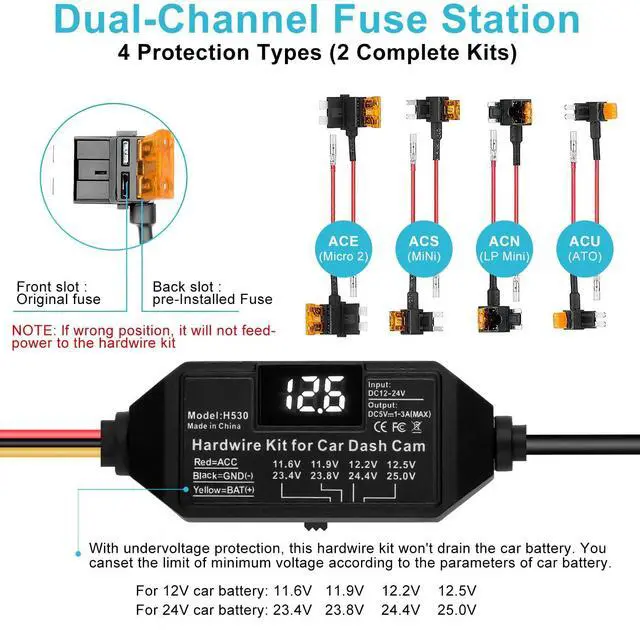
- Voltage Display: Accuracy: ±0.2V (Low) / ±0.3V (High).
- Low Voltage Protection:Automatically delays shutdown for 5 minutes after voltage drops below the set value (default: 11.6V).
- prevents your dash cam from powering off during auto start-stop cycles or temporary voltage dips, to ensure continuous recording
- and to help protect your car battery from excessive drain.
Upgraded Gen 3 USB-C Hardwire Kit: 11.6V Auto Cutoff (12-24V) & 24/7 Parking Mode


Key Features:
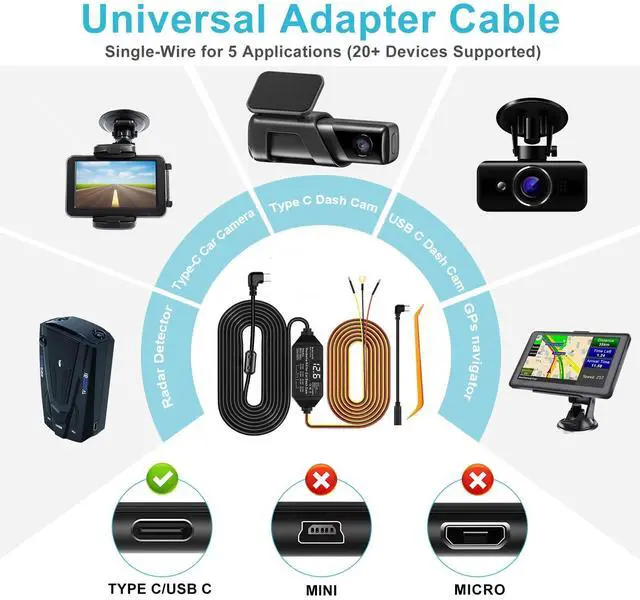
Compatible Devices:dash cam, car play ,mirror dashcam,car camera, GPS, radar detector and more
Power Supply:fuse taps
Additional Features:Voltage Display,Adjustable Battery Protection,24/7 Parking Monitoring,Acc mode,Anti-interference Magnetic Ring, Easy intallation
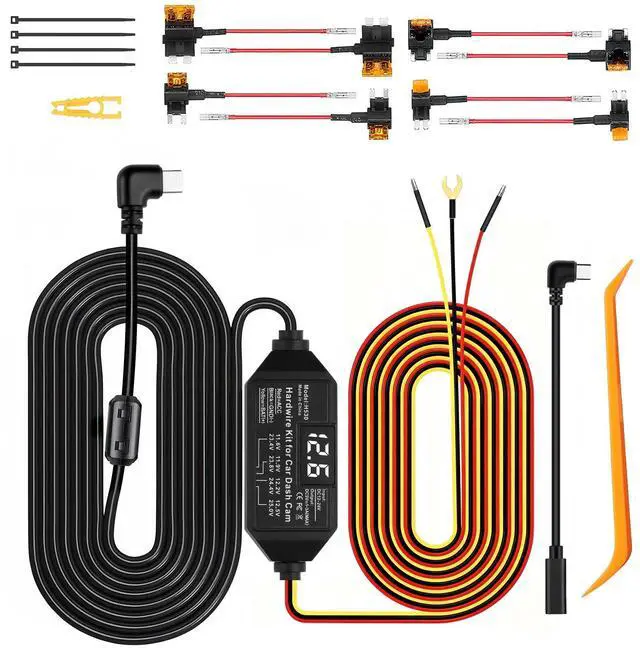
Package Contents:
3-lead hardwire dash cam kit,2x4 Fuse tap connectors,Short Type-C conversion cable (A/B5toA/B8),InstallationManual,installation tools,4pcsCable tie
Technical Specs:
- Connector: USB type C
- Output :DC5V/3A MAX Support 1-3A
- Operating Tem:-20?/-4?-+60?/140?
- Cable Length:11.5ft/3.5m
- Low Voltage Protection: 12V(11.8V);24V(23.6V)
- Conversion Efficiency:Maximum Value 96%
Dash Cam Connection Issues? Quick Troubleshooting Guide !!! Follow the steps below to quickly diagnose and resolve common problems.

Verify Wiring:
Red ? ACC (Ignition-Powered)
Yellow ? BAT+ (Constant Battery Power)
Black ? Ground (Metal Screw/Body) Voltage Check: Kit display should read 11.8V-12.8V (engine off). If blank or too low, reseat the fuse tap firmly.

Scenario A: Direct Compatibility (A5B5)
Compatible with A5B5 Dash Cams,
this hare wire kit is designed for dash cams using the A5B5 signal protocol. Parking mode activates automatically upon connection. Scenario B: Incompatibility
Incompatible? Likely a Signal Mismatch.
Symptoms like no parking mode, screen flickering, or no recording typically signal a protocol mismatch.

1. Quick Fix: Use Signal Adapter
Fix most compatibility issues with a universal signal adapter cable. Simply connect it between our kit and your dash cam.
2. Still Stuck?
If problems continue, message us with your dash cam and vehicle models for personalized support.
Step-by-Step Installation Guide

STEP 1: Comfirm installation location for the dash cam
- Reserve enough 11.5 ft (3.5 m) power cable enables easy installation in most vehicles.
- Ferrite Core Tip: Detach ferrite core while routing cables. Reinstall it afterward to minimize interference.

STEP 2: Locate and Open the Fuse Box
- Find the vehicle's fuse box, then use the included tool to remove the panel and access the fuse box. If you are unsure of its location on the vehicle, consult the vehicle's user manual or search the manufacturer's website

STEP 3: Find the correct fuse slot and ground point for installation
- Constant Power:Turn off the vehicle,then use an electric pen to find a fuse that still has power,that is the constant power port.
- ACC Power :With the vehicle off, find a fuse with no power. and then turn the key to ACC.Check the fuse again—if it has power now, it is ACC.

STEP 4:Install an Add-A-Fuse Tap
After locating the correct fuse slot:
- If a fuse is already in the slot: Remove it and place it into the empty slot on the Add-A-Fuse tap (as picture ashown).
- If the slot is empty: Insert the pre-installed Add-A-Fuse tap directly.

STEP 5:Correctly connect the wires
How to conect BAT and ACC ?
- Yellow conect to constant power(BAT)
- Red conect to ACC power
- Black conect to GND(metal grounding point)

STEP 6:Set the low voltage protection point
Four gears adjustable for low-voltage protection:
- For 12V Battery:11.6V 11.9V 12.2V 12.5V
- For 24V Battery:23.4V 23.8V 24.4V 25V
- Pre-Purchase Guide:
- Installation:Red ? ACC | Yellow ? BAT+ | Black ? Ground.
- Compatibility: Standard signal: A5B5. For A8B8 dash cams, use the included adapter cable.
- Features:
- Smart Parking Mode: Activates 3-5 min after engine off.
- Voltage Display: Accuracy: ±0.2V (Low) / ±0.3V (High).
- Low Voltage Protection:Automatically delays shutdown for 5 minutes after voltage drops below the set value (default: 11.6V).
- prevents your dash cam from powering off during auto start-stop cycles or temporary voltage dips, to ensure continuous recording
- and to help protect your car battery from excessive drain.
Upgraded Gen 3 USB-C Hardwire Kit: 11.6V Auto Cutoff (12-24V) & 24/7 Parking Mode
Key Features:
Compatible Devices:dash cam, car play ,mirror dashcam,car camera, GPS, radar detector and more
Power Supply:fuse taps
Additional Features:Voltage Display,Adjustable Battery Protection,24/7 Parking Monitoring,Acc mode,Anti-interference Magnetic Ring, Easy intallation
Package Contents:
3-lead hardwire dash cam kit,2x4 Fuse tap connectors,Short Type-C conversion cable (A/B5toA/B8),InstallationManual,installation tools,4pcsCable tie
Technical Specs:
- Connector: USB type C
- Output :DC5V/3A MAX Support 1-3A
- Operating Tem:-20?/-4?-+60?/140?
- Cable Length:11.5ft/3.5m
- Low Voltage Protection: 12V(11.8V);24V(23.6V)
- Conversion Efficiency:Maximum Value 96%
Dash Cam Connection Issues? Quick Troubleshooting Guide !!! Follow the steps below to quickly diagnose and resolve common problems.
Verify Wiring:
Red ? ACC (Ignition-Powered)
Yellow ? BAT+ (Constant Battery Power)
Black ? Ground (Metal Screw/Body) Voltage Check: Kit display should read 11.8V-12.8V (engine off). If blank or too low, reseat the fuse tap firmly.
Scenario A: Direct Compatibility (A5B5)
Compatible with A5B5 Dash Cams,
this hare wire kit is designed for dash cams using the A5B5 signal protocol. Parking mode activates automatically upon connection. Scenario B: Incompatibility
Incompatible? Likely a Signal Mismatch.
Symptoms like no parking mode, screen flickering, or no recording typically signal a protocol mismatch.
1. Quick Fix: Use Signal Adapter
Fix most compatibility issues with a universal signal adapter cable. Simply connect it between our kit and your dash cam.
2. Still Stuck?
If problems continue, message us with your dash cam and vehicle models for personalized support.
Step-by-Step Installation Guide
STEP 1: Comfirm installation location for the dash cam
- Reserve enough 11.5 ft (3.5 m) power cable enables easy installation in most vehicles.
- Ferrite Core Tip: Detach ferrite core while routing cables. Reinstall it afterward to minimize interference.
STEP 2: Locate and Open the Fuse Box
- Find the vehicle's fuse box, then use the included tool to remove the panel and access the fuse box. If you are unsure of its location on the vehicle, consult the vehicle's user manual or search the manufacturer's website
STEP 3: Find the correct fuse slot and ground point for installation
- Constant Power:Turn off the vehicle,then use an electric pen to find a fuse that still has power,that is the constant power port.
- ACC Power :With the vehicle off, find a fuse with no power. and then turn the key to ACC.Check the fuse again—if it has power now, it is ACC.
STEP 4:Install an Add-A-Fuse Tap
After locating the correct fuse slot:
- If a fuse is already in the slot: Remove it and place it into the empty slot on the Add-A-Fuse tap (as picture ashown).
- If the slot is empty: Insert the pre-installed Add-A-Fuse tap directly.
STEP 5:Correctly connect the wires
How to conect BAT and ACC ?
- Yellow conect to constant power(BAT)
- Red conect to ACC power
- Black conect to GND(metal grounding point)
STEP 6:Set the low voltage protection point
Four gears adjustable for low-voltage protection:
- For 12V Battery:11.6V 11.9V 12.2V 12.5V
- For 24V Battery:23.4V 23.8V 24.4V 25V