Your Browsing History

Meet Your Seller
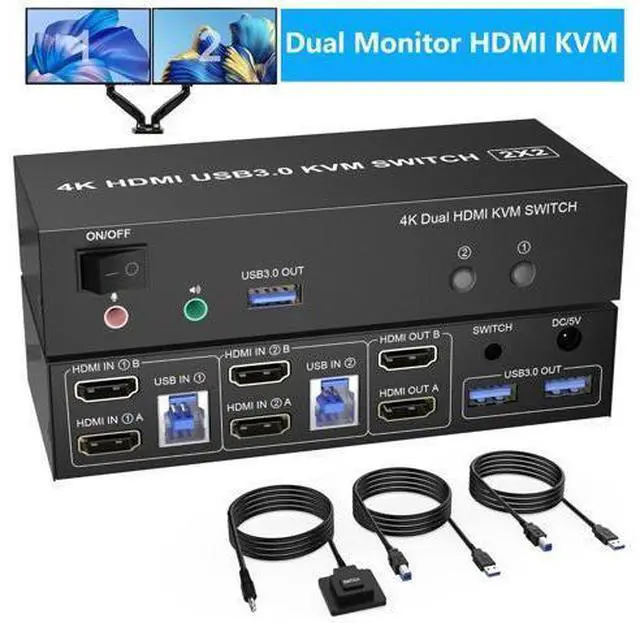


DIXSG 2 Port HDMI Dual Monitor USB 3.0 KVM Switch, 4K@60Hz Extended Display HDMI KVM Switch 2 Monitors 2 Computers with Audio Microphone Output and 3 USB 3.0 Ports, PC Monitor Keyboard Mouse Switcher
- Dual Monitor KVM Switch for 2 PC: This KVM Switch is for you to control them using one set of keyboard, mouse and single or dual monitors to make your work space tidy and efficient. Only when your computer supports dual display or multi display, you can u
+
+
Overview
Specs
Reviews
Any questions? Our AI beta will help you find out quickly.
Try me now
USB 3.0 Dual Monitor HDMI KVM Switch for 2 Computers 2 monitors
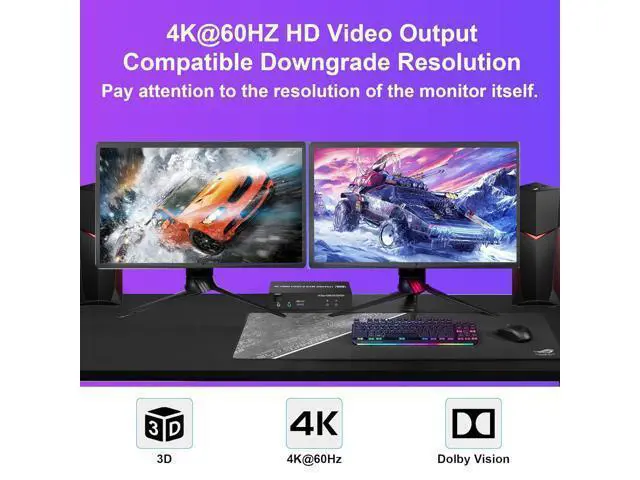
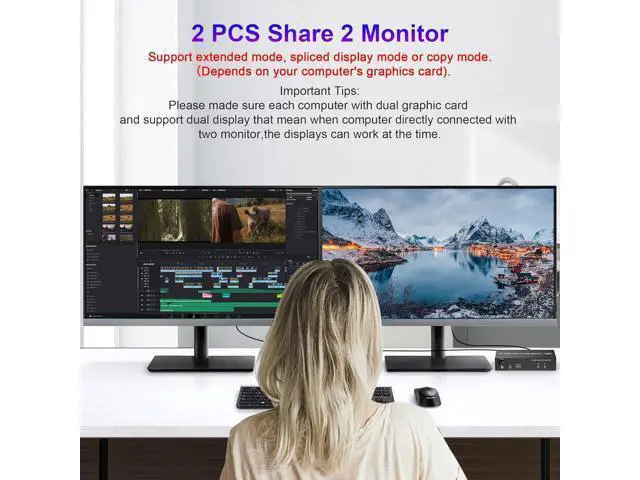
Advantages: Share one set of keyboard, mouse and dual monitors between 2 computers or laptops; Dual monitors output support up to 4K@60Hz for extended, mirrored or spliced display (Depends on your computer's graphics card. ); No complicated installation is required, and non-professionals can easily operate it; Cross support major operation systems including Windows, Linux, Mac and more;
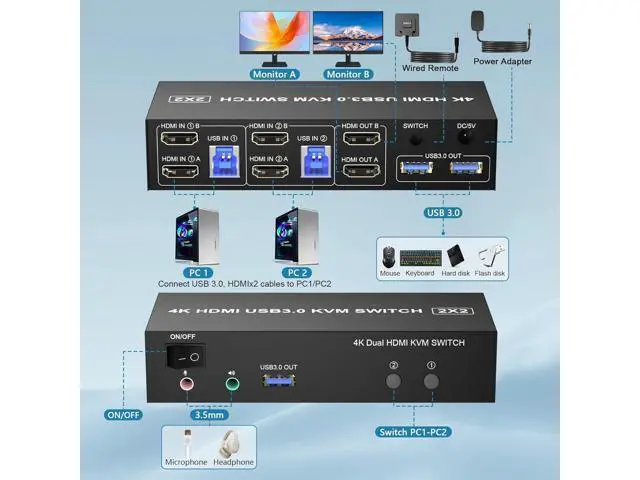
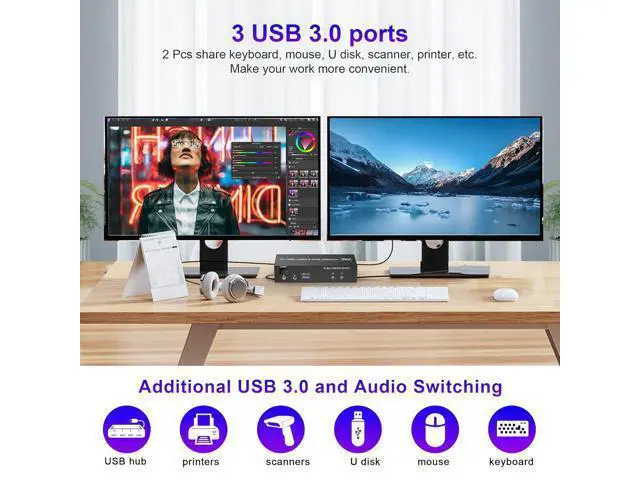
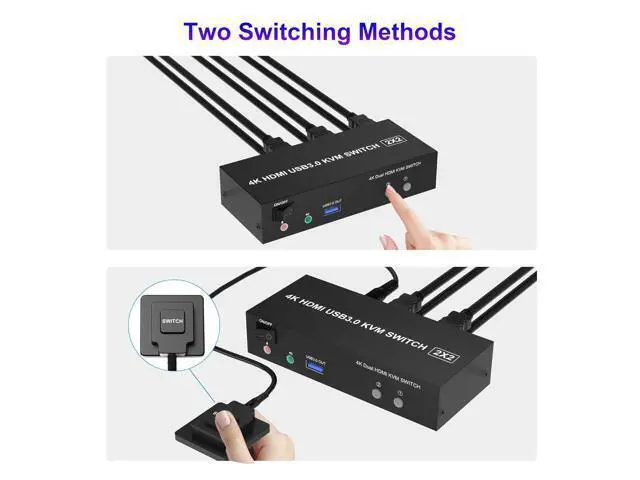
Switching modes: Buttons on the front panel and wired remote; The ports that need to plug in HDMI/USB cables are all hidden behind the KVM, so the desktop doesn't get cluttered; A USB hub can expand the USB 3.0 ports if multiple connections are required; Audio Microphone output.
installation steps:
1. Insert the adapter into the KVM;
2. Plug the HDMI cable into the KVM and monitor; (Output)
3. Plug the HDMI cable and USB 3.0 cable into the KVM and your computer/laptop (HDMI cables are not included) (Input) HD IN1 A + HD IN1 B + USB IN1=PC1 HD IN2 A + HD IN2 B + USB IN2=PC2
4. Insert the mouse and keyboard into the KVM switch
5. If needed, you can connect a microphone and audio port
Note:
1. Most of the reasons why only one video output works is because of incorrect connection. Please make sure each computer have 2 HDMI cables connect to the KVM.
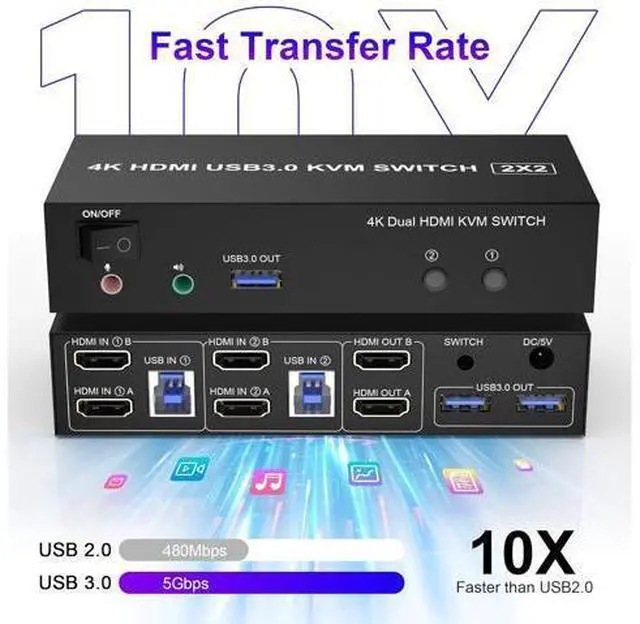
2. If the KVM switch does not work, you can turn off the switch on the panel and turn it on again after 2-3 seconds, and it will return to normal. KVM Switch With 3 USB 3.0 ports with 3 USB 3.0 ports, backward compatible with USB 2.0 and USB 1.1, share USB devices such as keyboard mouse scanner, printer, flash drive, etc. USB 3.0 Dual Monitor HDMI Switch for 2
Computers Advantages: Share one set of keyboard, mouse and dual monitors between 2 computers or laptops; Dual monitors output support up to 4K@60Hz for extended, mirrored or spliced display(Depends on your computer's graphics card. ); No complicated installation is required, and non-professionals can easily operate it; Cross support major operation systems including Windows, Linux, Mac and more;
Switching modes: Buttons on the front panel and wired remote; The ports that need to plug in HDMI/USB cables are all hidden behind the KVM, so the desktop doesn't get cluttered; A USB hub can expand the USB 3.0 ports if multiple connections are required; Audio Microphone output.
installation steps:
1. Insert the adapter into the KVM;
2. Plug the HDMI cable into the KVM and monitor; (Output)
3. Plug the HDMI cable and USB 3.0 cable into the KVM and your computer/laptop (HDMI cables are not included) (Input) HD IN1 A + HD IN1 B + USB IN1=PC1 HD IN2 A + HD IN2 B + USB IN2=PC2
4. Insert the mouse and keyboard into the KVM switch
5. If needed, you can connect a microphone and audio port
Note:
1. Most of the reasons why only onevideo output works is because of incorrect connection. Please make sure eachcomputer have 2 HDMI cables connect to the KVM.
2. If the KVM switch does not work, you can turn off the switch on the panel and turn it on again after 2-3 seconds, and it will return to normal.
Advantages: Share one set of keyboard, mouse and dual monitors between 2 computers or laptops; Dual monitors output support up to 4K@60Hz for extended, mirrored or spliced display (Depends on your computer's graphics card. ); No complicated installation is required, and non-professionals can easily operate it; Cross support major operation systems including Windows, Linux, Mac and more;
Switching modes: Buttons on the front panel and wired remote; The ports that need to plug in HDMI/USB cables are all hidden behind the KVM, so the desktop doesn't get cluttered; A USB hub can expand the USB 3.0 ports if multiple connections are required; Audio Microphone output.
installation steps:
1. Insert the adapter into the KVM;
2. Plug the HDMI cable into the KVM and monitor; (Output)
3. Plug the HDMI cable and USB 3.0 cable into the KVM and your computer/laptop (HDMI cables are not included) (Input) HD IN1 A + HD IN1 B + USB IN1=PC1 HD IN2 A + HD IN2 B + USB IN2=PC2
4. Insert the mouse and keyboard into the KVM switch
5. If needed, you can connect a microphone and audio port
Note:
1. Most of the reasons why only one video output works is because of incorrect connection. Please make sure each computer have 2 HDMI cables connect to the KVM.
2. If the KVM switch does not work, you can turn off the switch on the panel and turn it on again after 2-3 seconds, and it will return to normal. KVM Switch With 3 USB 3.0 ports with 3 USB 3.0 ports, backward compatible with USB 2.0 and USB 1.1, share USB devices such as keyboard mouse scanner, printer, flash drive, etc. USB 3.0 Dual Monitor HDMI Switch for 2
Computers Advantages: Share one set of keyboard, mouse and dual monitors between 2 computers or laptops; Dual monitors output support up to 4K@60Hz for extended, mirrored or spliced display(Depends on your computer's graphics card. ); No complicated installation is required, and non-professionals can easily operate it; Cross support major operation systems including Windows, Linux, Mac and more;
Switching modes: Buttons on the front panel and wired remote; The ports that need to plug in HDMI/USB cables are all hidden behind the KVM, so the desktop doesn't get cluttered; A USB hub can expand the USB 3.0 ports if multiple connections are required; Audio Microphone output.
installation steps:
1. Insert the adapter into the KVM;
2. Plug the HDMI cable into the KVM and monitor; (Output)
3. Plug the HDMI cable and USB 3.0 cable into the KVM and your computer/laptop (HDMI cables are not included) (Input) HD IN1 A + HD IN1 B + USB IN1=PC1 HD IN2 A + HD IN2 B + USB IN2=PC2
4. Insert the mouse and keyboard into the KVM switch
5. If needed, you can connect a microphone and audio port
Note:
1. Most of the reasons why only onevideo output works is because of incorrect connection. Please make sure eachcomputer have 2 HDMI cables connect to the KVM.
2. If the KVM switch does not work, you can turn off the switch on the panel and turn it on again after 2-3 seconds, and it will return to normal.
Warranty & Returns
Warranty, Returns, And Additional Information
Warranty
- Please contact the Seller directly for warranty information. Warranty information may also be found on the Manufacturer's website.
- CONTACT
Return Policies
- Return for refund within: 30 days
- Return for replacement within: non-replaceable
- This item is covered by TechMax Depot Return Policy
Manufacturer Contact Info
- For a directory of all our manufacturers, please click below.
- Manufacturers Directory
LOADING...