


Vantec Storage Devices
Founded in 1994, and headquartered in Fremont, CA, Vantec is a leading brand of computer accessories that provides a complete line of Storage, Thermal, and Mobile solutions. We are devoted to every computer user from mainstream to enthusiast. Our goal is to provide a complete and affordable line of products for all computing needs.
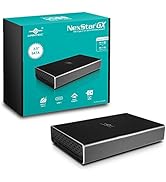
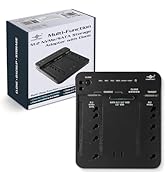
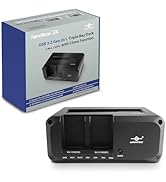
Storage Dock, Triple Devices

Vantec Storage Products
Vantec Storage Devices
M.2 NVMe Enclosures

M.2 NVMe Storage Enclosure


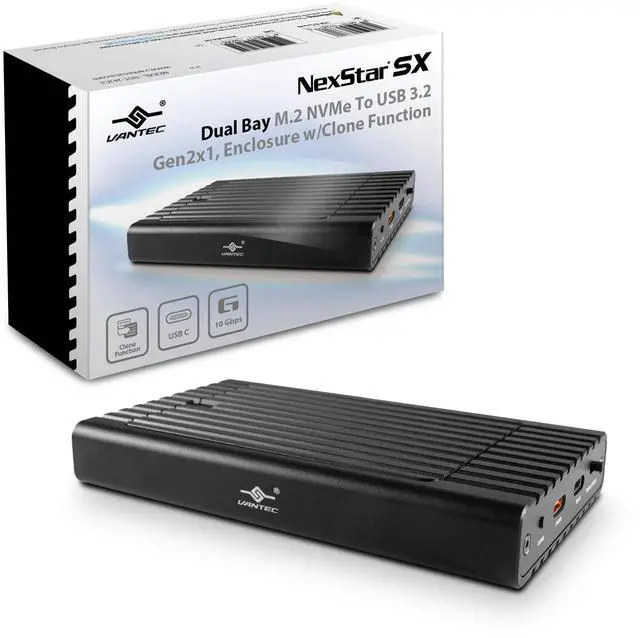
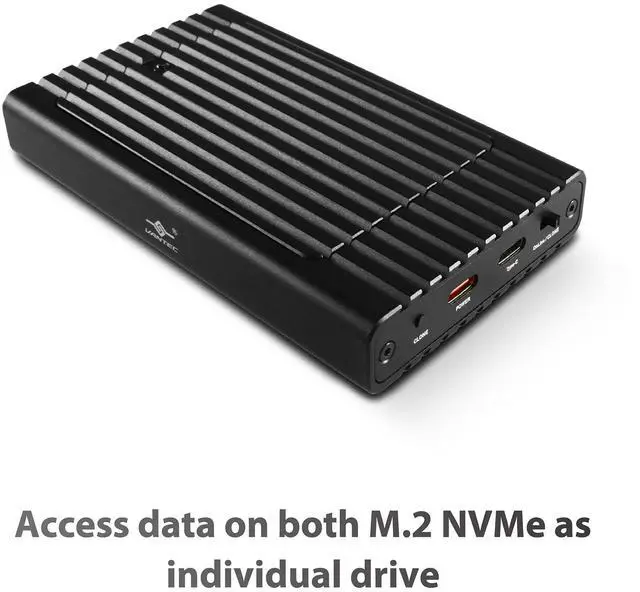
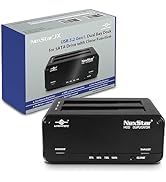
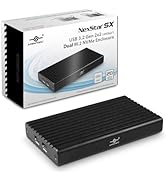
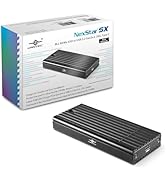
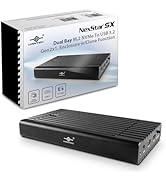
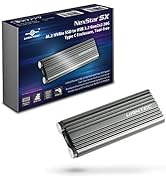
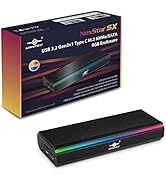
NexStar SX, Dual Bay M.2 NVMe To USB 3.2 Gen2x1, Enclosure w/Clone Function

USE AS STORAGE OR USE AS STORAGE WITH CLONED BACKUP
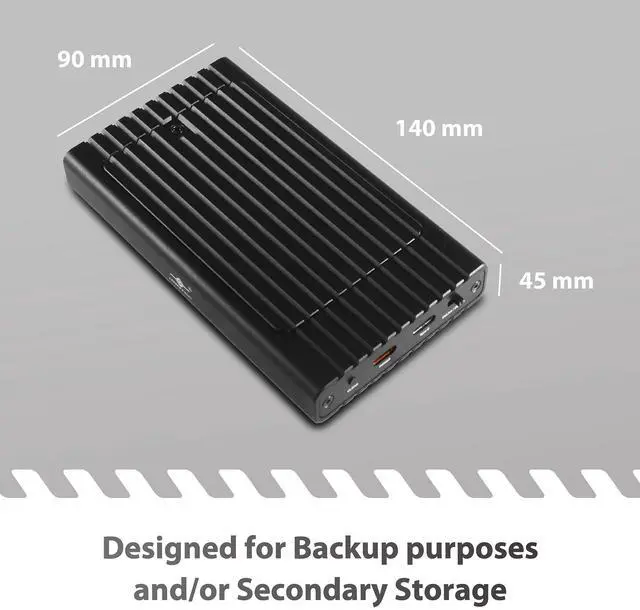
This Enclosure is designed for Two M.2 NVMe Modules with a Total Capacity of 32TB (16TB per bay max, as of this writing, maybe more later). It works as two individual drives each with its storage. It can be used as a clone enclosure to clone from Source to Target while online. Designed to be fast using native USB C with USB 3.2 Gen2x1, 10Gbps speed. Two marked USB C ports for Power/Data and Power Only to supplement your NVMe power requirement. The whole enclosure is designed to be the heatsink for both of the M.2 NVMe in the Enclosure, no drivers are required, Plugged and Ready, and supports all current OS available on the marketplace.
- Access data on both M.2 NVMe as individual drive
- Online Cloning NVMe to NVMe
- Designed for Backup purposes and/or Secondary Storage
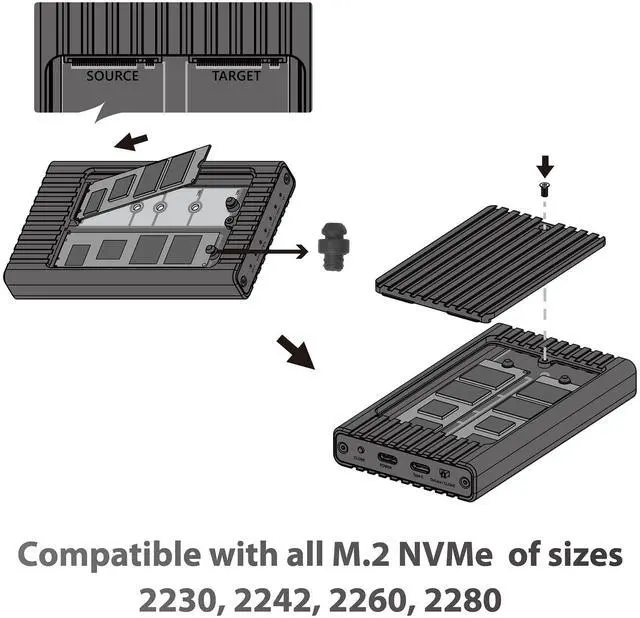
- Compatible with all M.2 NVMe of sizes 2230, 2242, 2260, 2280
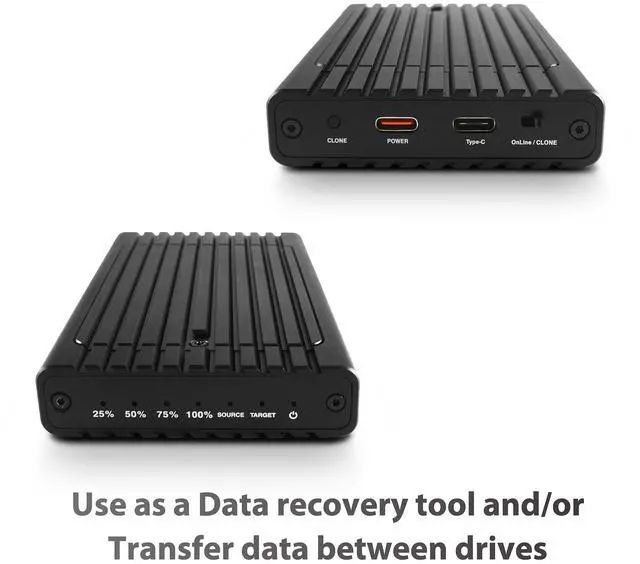
- Use as a Data recovery tool and/or Transfer data between drives
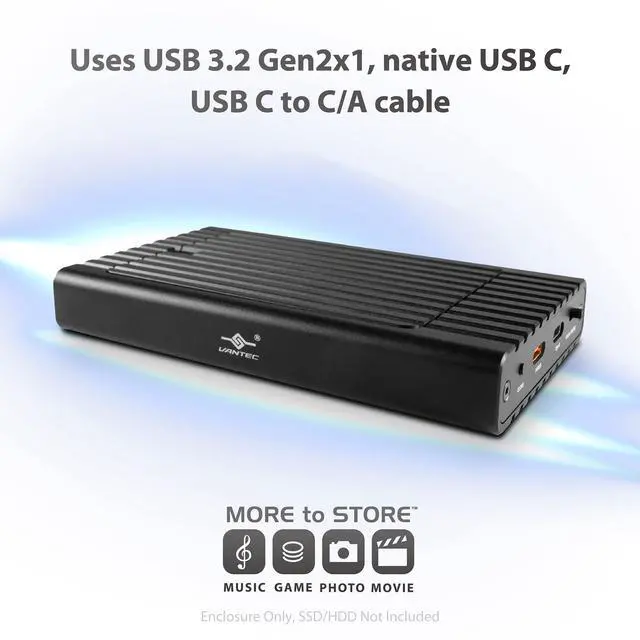
- Uses USB 3.2 Gen2x1, native USB C, USB C to C/A cable
- USB power port for additional power if needed
- No driver needed, plugged & ready
- Compatible with All OS with USB support, UASP, BOT, TRIM


FAQ:
IMPORTANT:
Why is there an orange color USB C port on the enclosure?
The orange color USB C port is for providing additional power to the enclosure. Here is the important information on power requirements that users need to be aware of.
Power is important to any Bus-powered USB device.
This information applies to ANY BUS-POWERED USB DEVICES because your storage relies on your USB port to provide power. If your USB port cannot provide enough power, you will see errors.
If the power requirement of your TWO NVMe + the enclosure is more than what your USB port can put out or is marginal, you can experience a drop connection or some errors.
The label on your NVMe module will tell you how much power is needed for the module to function, add the wattage of two of your M.2 NVMe plus that of this JX enclosure required, and the total wattage must be less than of the USB port you are going to connect.
Example:
On the label of your module, the M.2 NVMe will state how much power is needed for this module to function correctly. As an example, take a 2TB Samsung 990 Pro PCIe 4.0 M.2 NVMe module, it states “Rated DC 3.3V 2.2A” This means the module requires 3.3 * 2.2 = 7.26 watts to function correctly. Our enclosure used very little, it is 5V at 0.1A, which is 5 * 0.1 =0.5 watts.
The total of this whole unit (2 NVMe plus enclosure) is 7.26 + 7.26 + 0.5 = 15.02 watts. This means that your USB port MUST be able to provide 15.02 watts or more for the whole unit to function smoothly.
On this JX enclosure, there are two USB C ports, One orange color (Power only) and another regular black color (Power and Data).
Using the example above the total power required is 15.02 watts, if your regular USB C port can provide enough power meaning 15.02 watts or more to this unit, your unit will function correctly.
If that is not enough, you can use another USB C port to provide more power to your unit via the orange USB C port so that the total power to the unit is 15.02 watts or more for the unit to function correctly. NOTE: This is USB power to the port, NOT PD (Power Delivery), they are two separate power terms and functions.
1. What is the capacity for both of the M.2 Modules and can I use only ONE M.2 module?
If you are using the Cloning Function, the SOURCE must be Smaller or Equal in sectors to the TARGET.
If you do not plan to do any cloning, both M.2 NVMe slots can be of any size up to 16TB M.2 NVMe module each.
Yes, you can use only ONE M.2 module, you will not be able to do any cloning, but you can use it for storage use, you can put it in any of the two slots.
2. How do I clone a drive?
- Mount SOURCE M.2 NVMe on the slot label SOURCE. IMPORTANT NOTE: When you Clone a drive, MAKE SURE there is nothing IMPORTANT on your TARGET drive because it will be written over and not possible to recover once it is done.
- Mount TARGET M.2 NVMe on the slot label TARGET.
- Set the switch to Clone Mode.
- Connection power to the enclosure either via the orange USB C (power Only) port and to your 5VDC AC adapter OR USB-C port to your computer for power.
- Once the power comes ON with the power indicator light and the two SSD indicator lights stay on, press and hold the clone button. When all four clone indicator lights are on, release the button and press it again briefly. The cloning process will start.
- If the cloning process is started successfully, the two SSD indicator lights will flash, and the four cloning progress lights will light up in sequence at 25%, 50%, 75%, and 100% until all four lights are on, indicating that the cloning is complete.
- The Cloning is done, you can now unplug the power to the enclosure to remove the cloned M.2 if you need to.
3. How do I use the M.2(s) mounted in the enclosure just for access data storage?
- If you are planning just to use it to hold data as a storage device, you can mount one or two M.2 NMVe in the enclosure.
- If the mounted M.2 is new, you will need to prep it only ONCE (just like any new storage, initialize, partition, and format the drive) and it will be ready to use.
- The two M.2 will have their drive letter like you normally use for USB storage see drive letter like E: or F: etc.
- For prepping the drive, If you are using Windows OS, use Disk Management. For OS X, use Disk Utility. For Linux, follow your version of Linux like mksf command or Gparted.
4. Can I do both Clone and also use it online?
- Yes, you can, here is how. IMPORTANT NOTE: When you Clone a drive, MAKE SURE there is nothing IMPORTANT on your TARGET drive because it will be written over and not possible to recover once it is done.
- Since for cloning, your SOURCE must be smaller or Equal in sectors to the TARGET, this rule still applies as mentioned in the above cloning steps.
- After the clone, you can switch to online mode and your system will see both drives but will not be readily available here is why. When an OS see two drive that was cloned and is completely identical, the OS will complain and prevent access to one of them. After the Clone process, the two drives will have the exact identical drive ID, the OS will not know which is which, it will normally put one online and assign a drive letter to it, while it takes the other drive offline. You can see it in Disk Management showing the second drive is offline. This is a normal step for your OS to take.
- If you want to put the other offline drive back online, you can easily use Disk Management to do so. Once you put the other offline drive back online, the OS will assign a new drive ID and drive letter to this drive.
NexStar SX, Dual Bay M.2 NVMe To USB 3.2 Gen2x1, Enclosure w/Clone Function
USE AS STORAGE OR USE AS STORAGE WITH CLONED BACKUP
This Enclosure is designed for Two M.2 NVMe Modules with a Total Capacity of 32TB (16TB per bay max, as of this writing, maybe more later). It works as two individual drives each with its storage. It can be used as a clone enclosure to clone from Source to Target while online. Designed to be fast using native USB C with USB 3.2 Gen2x1, 10Gbps speed. Two marked USB C ports for Power/Data and Power Only to supplement your NVMe power requirement. The whole enclosure is designed to be the heatsink for both of the M.2 NVMe in the Enclosure, no drivers are required, Plugged and Ready, and supports all current OS available on the marketplace.
- Access data on both M.2 NVMe as individual drive
- Online Cloning NVMe to NVMe
- Designed for Backup purposes and/or Secondary Storage
- Compatible with all M.2 NVMe of sizes 2230, 2242, 2260, 2280
- Use as a Data recovery tool and/or Transfer data between drives
- Uses USB 3.2 Gen2x1, native USB C, USB C to C/A cable
- USB power port for additional power if needed
- No driver needed, plugged & ready
- Compatible with All OS with USB support, UASP, BOT, TRIM
FAQ:
IMPORTANT:
Why is there an orange color USB C port on the enclosure?
The orange color USB C port is for providing additional power to the enclosure. Here is the important information on power requirements that users need to be aware of.
Power is important to any Bus-powered USB device.
This information applies to ANY BUS-POWERED USB DEVICES because your storage relies on your USB port to provide power. If your USB port cannot provide enough power, you will see errors.
If the power requirement of your TWO NVMe + the enclosure is more than what your USB port can put out or is marginal, you can experience a drop connection or some errors.
The label on your NVMe module will tell you how much power is needed for the module to function, add the wattage of two of your M.2 NVMe plus that of this JX enclosure required, and the total wattage must be less than of the USB port you are going to connect.
Example:
On the label of your module, the M.2 NVMe will state how much power is needed for this module to function correctly. As an example, take a 2TB Samsung 990 Pro PCIe 4.0 M.2 NVMe module, it states “Rated DC 3.3V 2.2A” This means the module requires 3.3 * 2.2 = 7.26 watts to function correctly. Our enclosure used very little, it is 5V at 0.1A, which is 5 * 0.1 =0.5 watts.
The total of this whole unit (2 NVMe plus enclosure) is 7.26 + 7.26 + 0.5 = 15.02 watts. This means that your USB port MUST be able to provide 15.02 watts or more for the whole unit to function smoothly.
On this JX enclosure, there are two USB C ports, One orange color (Power only) and another regular black color (Power and Data).
Using the example above the total power required is 15.02 watts, if your regular USB C port can provide enough power meaning 15.02 watts or more to this unit, your unit will function correctly.
If that is not enough, you can use another USB C port to provide more power to your unit via the orange USB C port so that the total power to the unit is 15.02 watts or more for the unit to function correctly. NOTE: This is USB power to the port, NOT PD (Power Delivery), they are two separate power terms and functions.
1. What is the capacity for both of the M.2 Modules and can I use only ONE M.2 module?
If you are using the Cloning Function, the SOURCE must be Smaller or Equal in sectors to the TARGET.
If you do not plan to do any cloning, both M.2 NVMe slots can be of any size up to 16TB M.2 NVMe module each.
Yes, you can use only ONE M.2 module, you will not be able to do any cloning, but you can use it for storage use, you can put it in any of the two slots.
2. How do I clone a drive?
- Mount SOURCE M.2 NVMe on the slot label SOURCE. IMPORTANT NOTE: When you Clone a drive, MAKE SURE there is nothing IMPORTANT on your TARGET drive because it will be written over and not possible to recover once it is done.
- Mount TARGET M.2 NVMe on the slot label TARGET.
- Set the switch to Clone Mode.
- Connection power to the enclosure either via the orange USB C (power Only) port and to your 5VDC AC adapter OR USB-C port to your computer for power.
- Once the power comes ON with the power indicator light and the two SSD indicator lights stay on, press and hold the clone button. When all four clone indicator lights are on, release the button and press it again briefly. The cloning process will start.
- If the cloning process is started successfully, the two SSD indicator lights will flash, and the four cloning progress lights will light up in sequence at 25%, 50%, 75%, and 100% until all four lights are on, indicating that the cloning is complete.
- The Cloning is done, you can now unplug the power to the enclosure to remove the cloned M.2 if you need to.
3. How do I use the M.2(s) mounted in the enclosure just for access data storage?
- If you are planning just to use it to hold data as a storage device, you can mount one or two M.2 NMVe in the enclosure.
- If the mounted M.2 is new, you will need to prep it only ONCE (just like any new storage, initialize, partition, and format the drive) and it will be ready to use.
- The two M.2 will have their drive letter like you normally use for USB storage see drive letter like E: or F: etc.
- For prepping the drive, If you are using Windows OS, use Disk Management. For OS X, use Disk Utility. For Linux, follow your version of Linux like mksf command or Gparted.
4. Can I do both Clone and also use it online?
- Yes, you can, here is how. IMPORTANT NOTE: When you Clone a drive, MAKE SURE there is nothing IMPORTANT on your TARGET drive because it will be written over and not possible to recover once it is done.
- Since for cloning, your SOURCE must be smaller or Equal in sectors to the TARGET, this rule still applies as mentioned in the above cloning steps.
- After the clone, you can switch to online mode and your system will see both drives but will not be readily available here is why. When an OS see two drive that was cloned and is completely identical, the OS will complain and prevent access to one of them. After the Clone process, the two drives will have the exact identical drive ID, the OS will not know which is which, it will normally put one online and assign a drive letter to it, while it takes the other drive offline. You can see it in Disk Management showing the second drive is offline. This is a normal step for your OS to take.
- If you want to put the other offline drive back online, you can easily use Disk Management to do so. Once you put the other offline drive back online, the OS will assign a new drive ID and drive letter to this drive.
Vantec Storage Devices
Founded in 1994, and headquartered in Fremont, CA, Vantec is a leading brand of computer accessories that provides a complete line of Storage, Thermal, and Mobile solutions. We are devoted to every computer user from mainstream to enthusiast. Our goal is to provide a complete and affordable line of products for all computing needs.
Storage Dock, Triple Devices
Vantec Storage Products
Vantec Storage Devices
M.2 NVMe Enclosures
M.2 NVMe Storage Enclosure