Your Browsing History
 WDS200T4X0E")

Meet Your Seller
 TM8FFE004T0C129")
 T253TZ002T0C101")
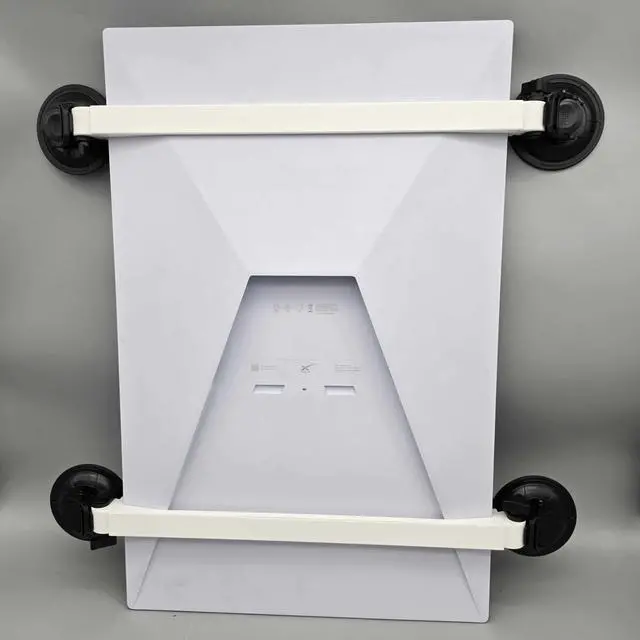
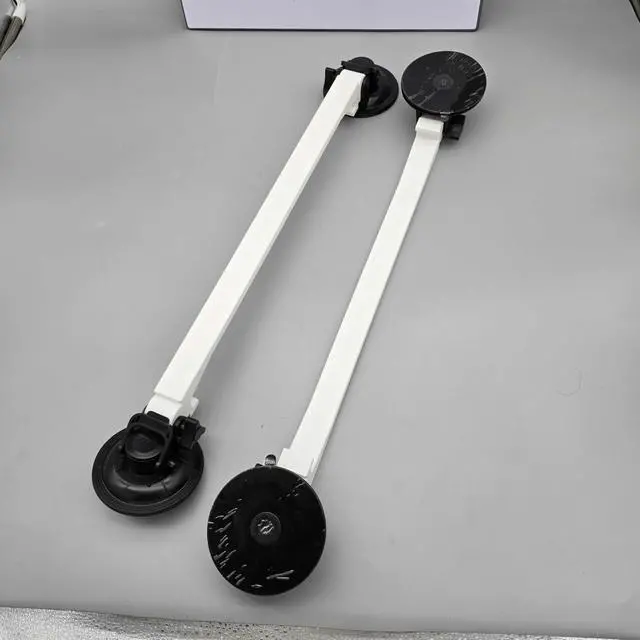


Suction Cup Mount for Starlink Standard Gen 3 V3 Antenaa^^ Car Sunroof and Rear Window Mount for Starlink Gen3 ^^ Road Trip Tested Starlink Sunroof/Moonroof Holder for Inside Rv/Vehicle Use
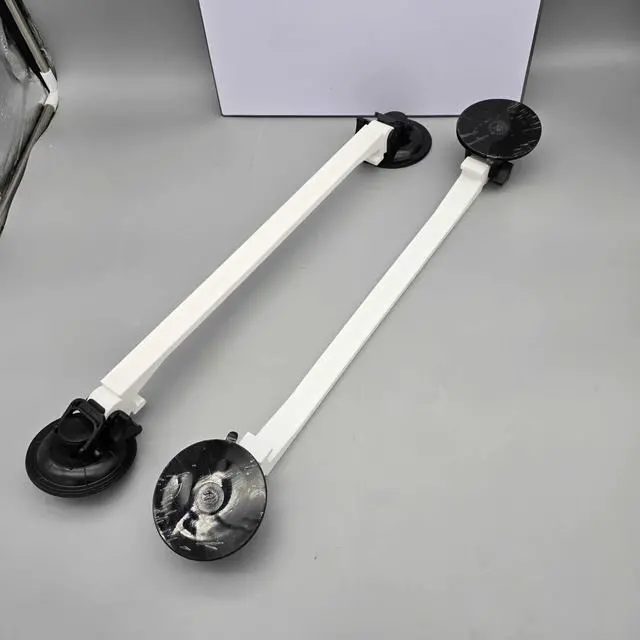
- High-Strength Suction Cups: Each suction cup holds up to 180 lbs when pulled straight and 230 lbs when pulled downward, providing impressive stability on the road.
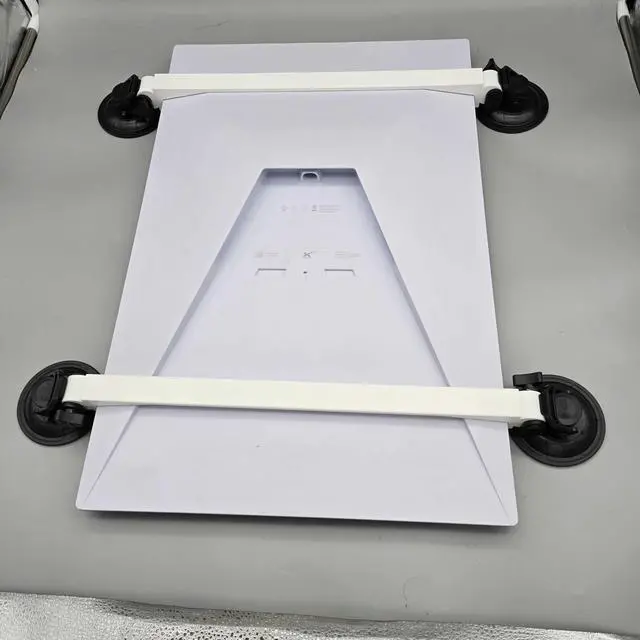
- Tool-Free, Slide-On Design: Our mount uses two identical brackets that slide onto each end of the Starlink Standard antenna. Please do not force the brackets over the antenna as they are not a snap-on designsimply slide them on for a secure fit, with no screws or hardware required.
- Road-Tested Durability: Built with heat- and UV-resistant materials, this mount is designed to endure harsh conditions, inspired by real-world road testing.
- Reliable Connectivity on the Go: Maintain stable internet speeds of up to 175+ Mbps, even in remote locations or on the road.
- Versatile Compatibility: Suitable for most sunroofs, rear windows, and smooth surfaces, this mount is a fit for vehicles, RVs, and even home windows.
- This product is made by a US Small Business! Proudly Made In Texas! Please reach out to us if you have an
 WDS400T4X0E")
+
+
Overview
Specs
Reviews
Any questions? Our AI beta will help you find out quickly.
Try me now
Optimize Your Starlink Standard (Gen 3) Setup with Our High-Strength Suction Cup Mount! Bring your Starlink Standard (Gen 3 or V3) on the road with our specially designed suction cup mount. Ideal for attaching your dish to sunroofs, rear windows, or smooth surfaces, this mount is perfect for mobile setups, keeping you connected wherever you go.
Product Highlights: High-Strength
Suction Cups: Each suction cup holds up to 180 lbs when pulled straight and 230 lbs when pulled downward, providing impressive stability on the road.
Tool-Free,
Slide-On Design: Our mount uses two identical brackets that slide onto each end of the Starlink Standard antenna. Please do not force the brackets over the antenna as they are not a snap-on designsimply slide them on for a secure fit, with no screws or hardware required.
Road-Tested Durability: Built with heat- and UV-resistant materials, this mount is designed to endure harsh conditions, inspired by real-world road testing. Reliable Connectivity on the
Go: Maintain stable internet speeds of up to 175+ Mbps, even in remote locations or on the road.
Versatile Compatibility: Suitable for most sunroofs, rear windows, and smooth surfaces, this mount is a fit for vehicles, RVs, and even home windows.
Safety and Liability StatementsIMPORTANT: This product is intended for temporary, monitored use only. While the suction cups provide a strong hold, do not use this mount where people, pets, or valuables may be directly underneath it in case of detachment. The user assumes full responsibility for installation, and the seller is not liable for any injury, damage, or accidents if the mount detaches. Always double-check that all suction cups are securely attached before driving and avoid leaving the dish unmonitored.
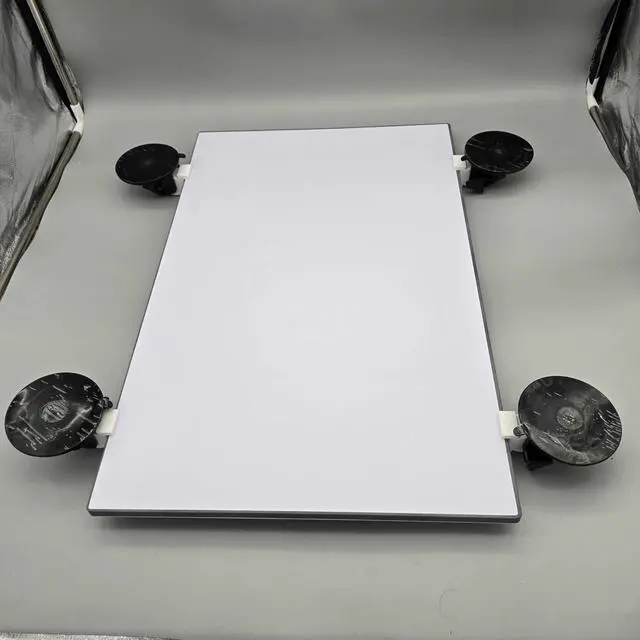
Whats Included: 2 x Mounting Brackets (slide onto each end of the antenna) 4 x High-Strength Suction Cups (180 lbs straight pull / 230 lbs downward pull strength)Note: Starlink Standard Antenna is not included. Images are for demonstration purposes only. Installation Guide for Starlink Standard Suction Cup MountWhat Youll Need: Starlink Standard Suction Cup Mount (Parts A and B) Starlink Standard Dish Clean cloth or paper towel Rubbing alcohol or
glass cleaner Optional: Water or a dab of
Vaseline for enhanced suctionStep 1: Prepare the Surface Choose Your
Mounting Area: Select a sunroof, rear window, or another smooth surface.
Clean Thoroughly: Make sure both the mounting surface and suction cups are free of dirt or grease.
Step 2: Assemble the Mount Slide
Part A: Carefully slide one bracket onto one end of the antenna.
Slide Part B: Slide the second bracket onto the opposite end. Avoid forcing the bracketsthey are not a snap-fit design.
Step 3: Secure the Suction Cups Attach and
Lock: Press each suction cup onto the cleaned surface, locking them down securely.
Step 4: Test
Stability Shake-Test: Gently shake the mount to ensure all suction cups are firmly adhered before driving.
Usage Tips: Check Suction Periodically on long trips, particularly in extreme temperatures. Reapply if Needed if any suction cups show signs of loosening.
Troubleshooting: Suction Fails to
Stick: Clean surfaces thoroughly or add a small dab of water or Vaseline to improve suction.
Mount Feels Loose: Ensure all suction cups are pressed firmly down and fully locked.
Worn Suction Cups: Replace as needed for optimal grip. For any questions or concerns, feel free to reach outwere here to ensure your Starlink setup is ready to go!
Product Highlights: High-Strength
Suction Cups: Each suction cup holds up to 180 lbs when pulled straight and 230 lbs when pulled downward, providing impressive stability on the road.
Tool-Free,
Slide-On Design: Our mount uses two identical brackets that slide onto each end of the Starlink Standard antenna. Please do not force the brackets over the antenna as they are not a snap-on designsimply slide them on for a secure fit, with no screws or hardware required.
Road-Tested Durability: Built with heat- and UV-resistant materials, this mount is designed to endure harsh conditions, inspired by real-world road testing. Reliable Connectivity on the
Go: Maintain stable internet speeds of up to 175+ Mbps, even in remote locations or on the road.
Versatile Compatibility: Suitable for most sunroofs, rear windows, and smooth surfaces, this mount is a fit for vehicles, RVs, and even home windows.
Safety and Liability StatementsIMPORTANT: This product is intended for temporary, monitored use only. While the suction cups provide a strong hold, do not use this mount where people, pets, or valuables may be directly underneath it in case of detachment. The user assumes full responsibility for installation, and the seller is not liable for any injury, damage, or accidents if the mount detaches. Always double-check that all suction cups are securely attached before driving and avoid leaving the dish unmonitored.
Whats Included: 2 x Mounting Brackets (slide onto each end of the antenna) 4 x High-Strength Suction Cups (180 lbs straight pull / 230 lbs downward pull strength)Note: Starlink Standard Antenna is not included. Images are for demonstration purposes only. Installation Guide for Starlink Standard Suction Cup MountWhat Youll Need: Starlink Standard Suction Cup Mount (Parts A and B) Starlink Standard Dish Clean cloth or paper towel Rubbing alcohol or
glass cleaner Optional: Water or a dab of
Vaseline for enhanced suctionStep 1: Prepare the Surface Choose Your
Mounting Area: Select a sunroof, rear window, or another smooth surface.
Clean Thoroughly: Make sure both the mounting surface and suction cups are free of dirt or grease.
Step 2: Assemble the Mount Slide
Part A: Carefully slide one bracket onto one end of the antenna.
Slide Part B: Slide the second bracket onto the opposite end. Avoid forcing the bracketsthey are not a snap-fit design.
Step 3: Secure the Suction Cups Attach and
Lock: Press each suction cup onto the cleaned surface, locking them down securely.
Step 4: Test
Stability Shake-Test: Gently shake the mount to ensure all suction cups are firmly adhered before driving.
Usage Tips: Check Suction Periodically on long trips, particularly in extreme temperatures. Reapply if Needed if any suction cups show signs of loosening.
Troubleshooting: Suction Fails to
Stick: Clean surfaces thoroughly or add a small dab of water or Vaseline to improve suction.
Mount Feels Loose: Ensure all suction cups are pressed firmly down and fully locked.
Worn Suction Cups: Replace as needed for optimal grip. For any questions or concerns, feel free to reach outwere here to ensure your Starlink setup is ready to go!
Warranty & Returns
Warranty, Returns, And Additional Information
Warranty
- Please contact the Seller directly for warranty information. Warranty information may also be found on the Manufacturer's website.
- CONTACT
Return Policies
- Return for refund within: 30 days
- Return for replacement within: non-replaceable
- This item is covered by VersaCom Return Policy
Manufacturer Contact Info
- For a directory of all our manufacturers, please click below.
- Manufacturers Directory
LOADING...