You’ve just connected a new 240Hz gaming monitor. You launch a game, open a browser, move your cursor — and something feels off. The motion isn’t as smooth as you expected. The most likely culprit: your refresh rate is still set to 60Hz. Windows doesn’t always automatically switch to the maximum rate when you connect a new monitor, and neither does your GPU control panel.
This guide walks you through exactly how to adjust refresh rate settings in Windows and GPU control panels in 2026, covering every method and common troubleshoot scenario.
Why Refresh Rate Doesn’t Set Itself
When you connect a new gaming monitor, Windows reads the monitor’s EDID (Extended Display Identification Data) — a standardized block of information the monitor sends over the cable that lists its supported resolutions and refresh rates. Windows then applies what it considers the “safe” default, which is often 60Hz rather than the monitor’s maximum.
This behavior protects compatibility but doesn’t serve gaming performance. Setting your refresh rate manually is always recommended after connecting a new display.
Method 1: Windows Display Settings (Quickest Route)
This is the most accessible path — no third-party software needed.
Steps:
- Right-click on your desktop → select Display Settings
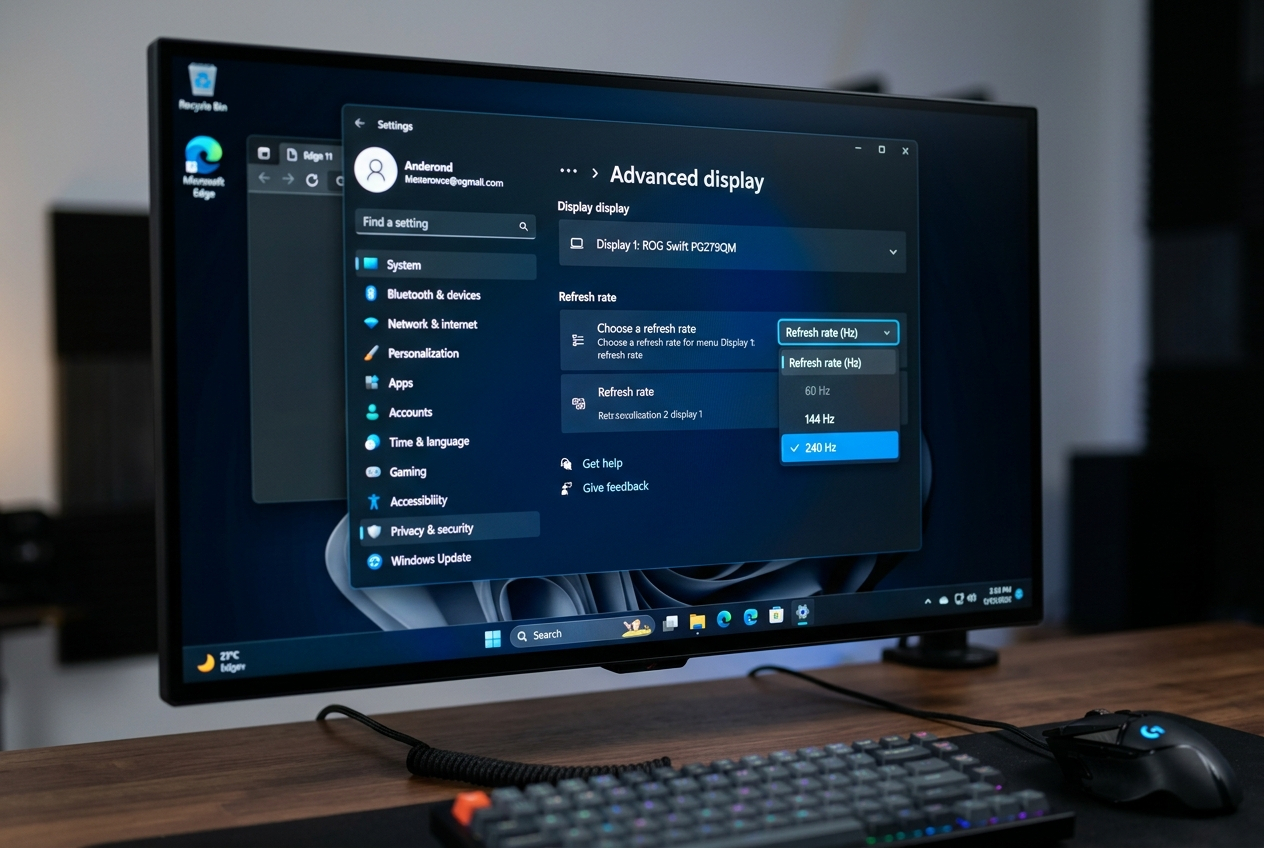
- Scroll down to Advanced display (Windows 11) or Advanced display settings (Windows 10)
- Click on Display adapter properties for Display X
- Select the Monitor tab
- Under Screen refresh rate, click the dropdown menu
- Select your target refresh rate (e.g., 144Hz, 240Hz, 360Hz)
- Click Apply, then Keep changes
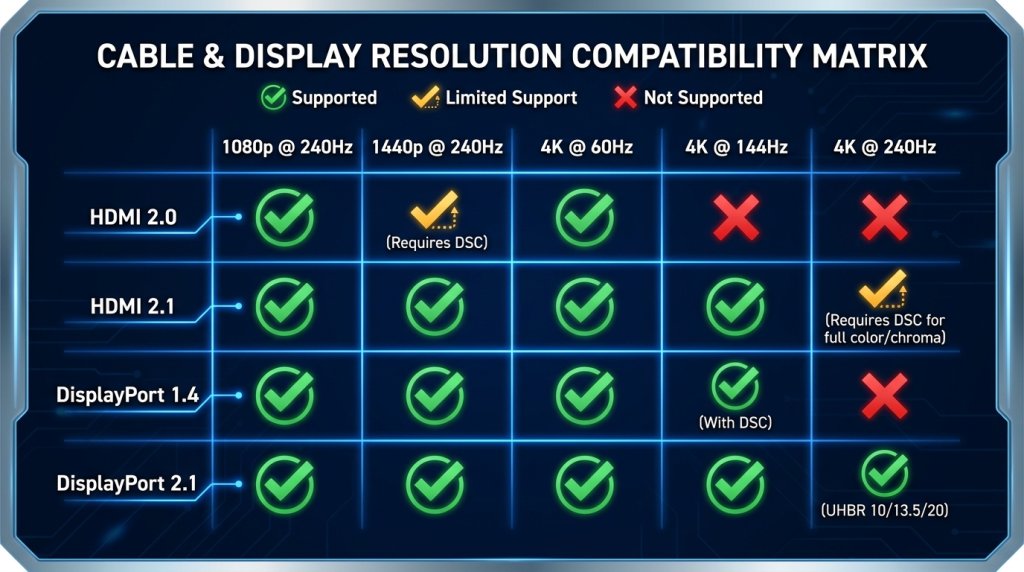
Important: If your target refresh rate doesn’t appear in the dropdown, it may indicate a cable bandwidth issue. A 4K gaming monitor connected via HDMI 2.0 at 4K resolution will not show 144Hz as an option — that cable can only carry 4K @ 60Hz. Switch to HDMI 2.1 or DisplayPort 1.4 to unlock higher refresh rates at 4K.
Windows 11 shortcut (2026): In Windows 11, you can also navigate directly to Settings → System → Display → Advanced display → Choose a refresh rate. This is the same setting through a faster path.
Method 2: NVIDIA Control Panel
For NVIDIA GPU users, the NVIDIA Control Panel offers more granular control and additional options beyond what Windows exposes.
Steps:
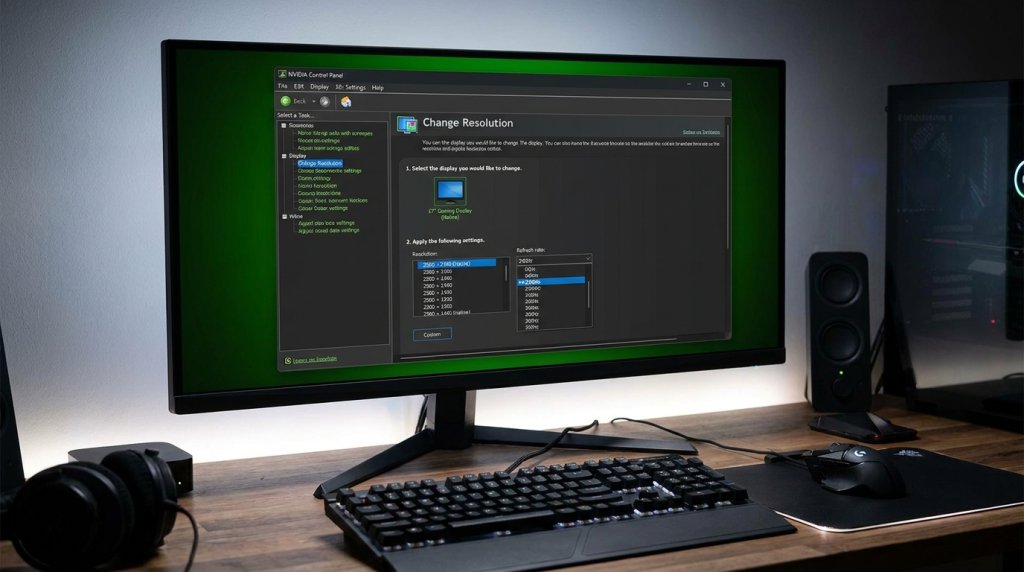
- Right-click desktop → NVIDIA Control Panel (or find it in the system tray)
- Navigate to Display → Change resolution
- Select the correct monitor from the display list at the top
- Under Resolution, ensure your target resolution is selected
- Under Refresh rate, select the highest available option (e.g., 240Hz)
- Click Apply
Additional NVIDIA option — Custom Resolution: If your monitor supports a refresh rate that doesn’t appear in the standard dropdown, you can create a custom resolution:
- In Change Resolution, click Customize
- Click Create Custom Resolution
- Enter your target refresh rate and click Test
This is useful for monitors that support intermediate refresh rates (e.g., 165Hz) that Windows doesn’t always populate automatically.
NVIDIA App (2026 update): NVIDIA has been transitioning from the traditional Control Panel to the new NVIDIA App — a redesigned interface that consolidates display settings, driver management, and overlay features. Refresh rate settings are accessible under Display settings in the NVIDIA App with the same functionality.
Method 3: AMD Software: Adrenalin Edition
For AMD GPU users, AMD Software: Adrenalin Edition handles refresh rate settings alongside driver management and VRR configuration.
Steps:
- Open AMD Software: Adrenalin Edition (system tray or Start menu)
- Navigate to Display tab
- Find your monitor under the connected displays list
- Under Custom Resolutions or display properties, select the refresh rate dropdown
- Choose your target refresh rate and click Apply
AMD Adrenalin also provides a Custom Resolution creation tool under the Display tab if your target refresh rate isn’t listed automatically.
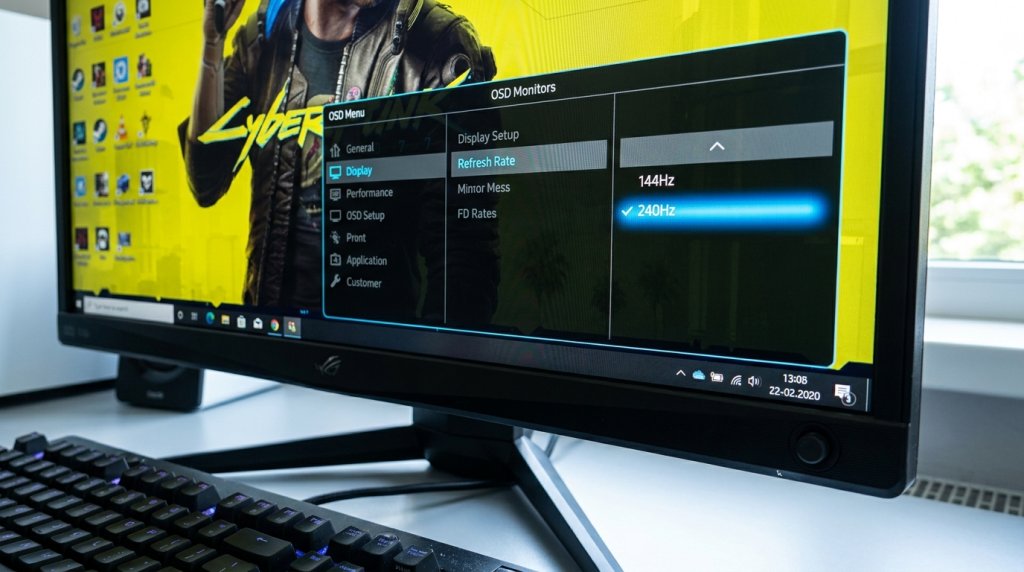
Method 4: Monitor OSD (On-Screen Display)
Some gaming monitors — particularly those with DisplayPort Adaptive-Sync or certain proprietary refresh rate implementations — require enabling higher refresh rates from the monitor’s own menu system, not just from Windows or the GPU panel.
Check your monitor’s OSD (accessed via the physical buttons or joystick on the monitor bezel) for:
- A Display Mode or Refresh Rate setting (some monitors have a 144Hz / 240Hz toggle in OSD)
- Overclock mode — some monitors support a factory-unlocked refresh rate boost (e.g., 165Hz from a base 144Hz panel) that must be enabled in OSD before Windows can see it
This step is especially relevant for curved ultrawide monitors and 33-inch and larger displays that have tiered refresh rate modes.
Verifying Your Refresh Rate Is Actually Active
Setting a refresh rate in software doesn’t always confirm it’s being applied. Here’s how to verify:
Windows built-in: Settings → System → Display → Advanced display → shows “Refresh rate: Xhz (effective)”
NVIDIA Control Panel: The selected rate appears in the Resolution page under Refresh rate
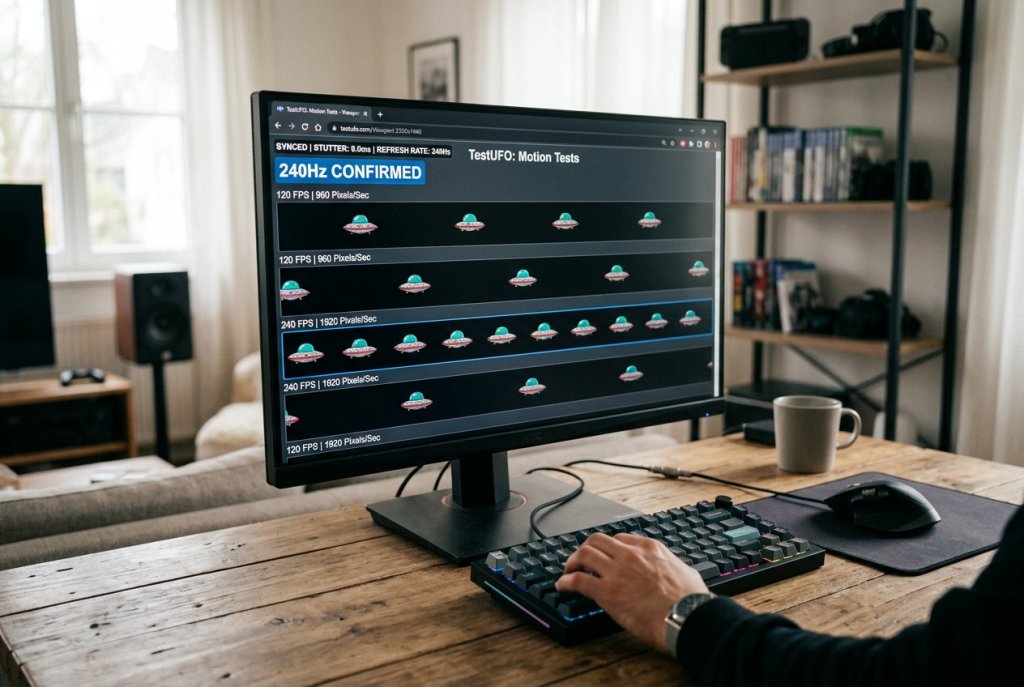
Third-party tools: Free utilities like HWiNFO and GPU-Z display the active refresh rate in real time. UFO Test (testufo.com) is a browser-based motion test that visually confirms your actual refresh rate through a frame-counting test.
Refresh Rate by Scenario: Quick Reference
| Monitor Type | Target Refresh Rate | Minimum Cable Required | Where to Set |
|---|---|---|---|
| 1080p 144Hz | 144Hz | HDMI 2.0 or DP 1.2 | Windows Display Settings |
| 1080p 240Hz | 240Hz | HDMI 2.0 or DP 1.4 | Windows or NVIDIA/AMD panel |
| 1440p 144Hz | 144Hz | HDMI 2.0 or DP 1.2 | Windows Display Settings |
| 1440p 240Hz | 240Hz | DP 1.4 recommended | Windows or GPU panel |
| 4K 60Hz | 60Hz | HDMI 2.0 or DP 1.4 | Windows Display Settings |
| 4K 144Hz+ | 144Hz+ | HDMI 2.1 or DP 2.1 | GPU panel (may need custom) |
| OLED/QLED | 240–480Hz | DP 2.1 for highest tiers | OSD + GPU panel |
Common Issues and Quick Fixes
Refresh rate option missing from dropdown: → Check cable bandwidth — swap to a higher-spec cable (DP 1.4 / HDMI 2.1) → Check monitor OSD for refresh rate mode unlock
Monitor shows at 60Hz despite 144Hz setting: → Confirm Windows applied the change (check effective rate in Advanced display) → Try a different cable or port on your GPU
HDR drops the refresh rate: → HDR 10-bit mode uses more bandwidth; you may need to lower resolution slightly or upgrade to HDMI 2.1 / DP 2.1
The Bottom Line
Adjusting your refresh rate correctly is a five-minute task that transforms your gaming monitor experience. Whether you’re using Windows Display Settings, the NVIDIA Control Panel, AMD Adrenalin Edition, or your monitor’s OSD, the key steps are: select the right refresh rate, verify it’s applied, and confirm your cable supports the bandwidth. Do all three and your monitor will perform exactly as rated.
Related Posts
- Response Time and Gaming Performance: Choosing the Right Speed for Your Play Style in 2026
- How to choose the best computer monitor
- Wi-Fi 7 Routers in 2026: What to Know and Which to Buy
- Best Gaming Laptops in 2026: RTX 50-Series Showdown Across Every Budget
- DDR5 Memory Buying Guide 2026: Speed, Capacity, and EXPO/XMP Explained