Your Browsing History
 WDS400T4X0E")

Meet Your Seller
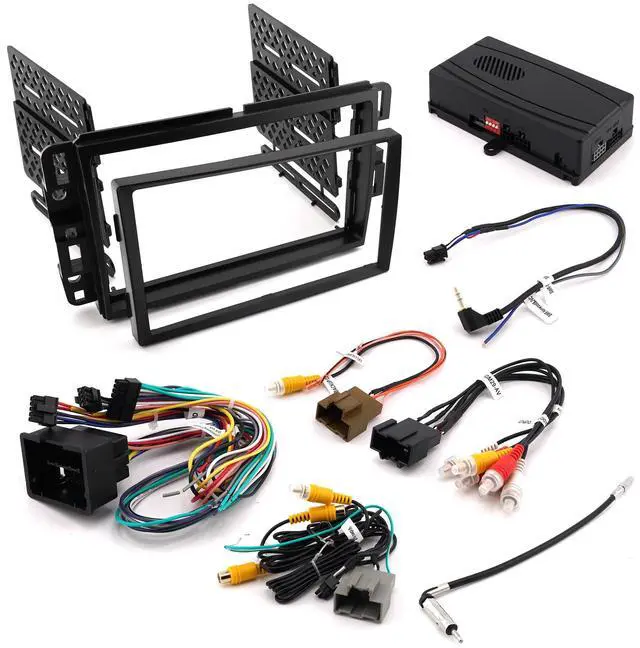


CRUX DKGM-16W OnStar Radio Replacement Interface w/SWC Retention, Video Switcher & Double Din Dash Kit for Select GM LAN-29 Bit SUVs & Trucks w/Nav Radios & w/Bose Amplified & Non-Amplified Systems
- Retains factory features in select GM LAN 29 Bit vehicles while functioning with an aftermarket radio. Retains Steering Wheel Controls via built-in, pre-programmed interface. Retains Factory OnStar, factory rear view camera, & factory warning chimes
- Adds Forced Rear view and Front view camera while in motion using the factory side mirror controls. Works with Non-Bose, BOSE, & Y-91 amplified systems.
- Retains Rear Seat Entertainment, Audio/Video. Requires Cable #CRUX2333A (sold separately). Easy Plug-and-Ready Connections. EIA color coded wiring for easy installation. Includes Double DIN Dash Kit
- "NOTE: 1). The Front and Rear fading are not retained on Y-91 Bose System. 2). Chime includes: seat belt, check engine, key in ignition, low fuel, low oil and lights on."
 WDS200T4X0E")
+
+
Overview
Specs
Reviews
Any questions? Our AI beta will help you find out quickly.
Try me now
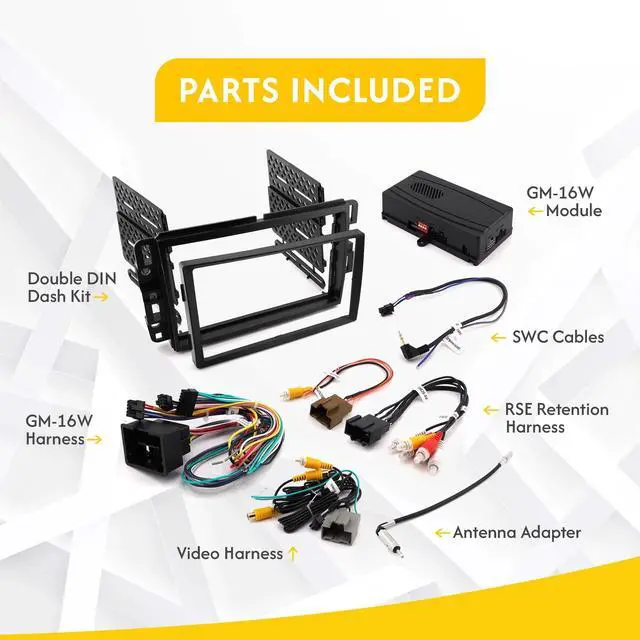
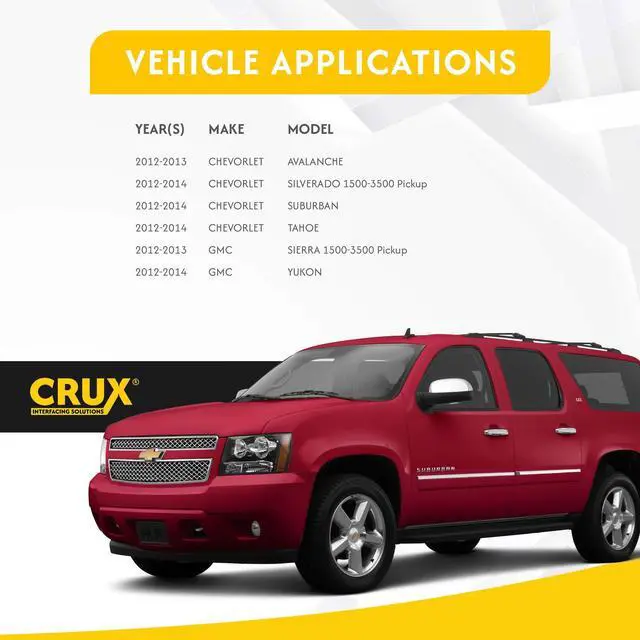
"The CRUX DKGM-16W is an OnStar Replacement interface for select General Motors 2012-2014 Trucks & SUV's LAN 29-Bit Vehicles. It facilitates the integration of an after-market radio to fully retain factory features in GM LAN 29-Bit vehicles with Bose Amplified and Non-Amplified Systems. This interface has a 44 pin connector for select GM LAN29-Bit vehicles that have factory navigation. It also includes a double-din dash kit replacement. This enhanced interface is also pre-programmed for the retention of steering wheel controls and adds camera switching capability for forced front-view & rear-view cameras.
CHIME VOLUME ADJUSTMENT: The DKGM-16W - has a potentometer to adjust the chime volume. It is set at half way by default. To adjust the volume, simply use a suitable screw driver and turn the potentometer clockwise to increase the volume and counter-clockwise to decrease the volumeONSTAR
VOLUME ADJUSTMENT: To adjust the OnStar volume, turn on OnStar and adjust the volume using the Steering Wheel Control volume adjustment. Once it is set, the DKGM-16W will memorize this level.
REAR SEAT ENTERTAINMENT (RSE): Part# CJA2333A can be special ordered to retain the Rear Seat Entertainment (RSE). 1. Connect the rear seat entertainment 16-pin connector to the vehicles 16-pin factory connector. 2. Connect the RCAs to the a aftermarket radio audio and video inputs. 3. Test the audio and video before installing the radio into the dashboard.
BACK UP CAMERA CONNECTION: The DKGM-16W includes a video harness that allows a front and rear view camera to be plugged in and viewed on the afterermarket radio screen. The video harness includes a 20-pin brown connector that plugs into the OEM rear view camera harness to retain the use of the OEM rear view camera (if equipped). The two female video RCAs are used to connect an aftermarket front and rear view camera (if vehicle is not equipped with an OEM rear view camera).
REVERSE WIRE CONNECTION: For vehicles with a factory reverse camera installed, the factory camera module must be powered up to enable the forced view feature of the DKGM-16W. Connect the Reverse Gear Wire (RED/WHITE) on the DKGM-16W harness to the reverse camera power wire located on the reverse camera module or BCM. The factory reverse camera module or BCM can be found in different locations in the vehicle depending on the year and model. The chart below will aid in locatng the reverse camera module or BCM. Use a 1N4001 diode to isolate the factory reverse camera power wire.
FORCED CAMERA FEATURE: The DKGM-16W - can force the aftermarket radio to show the front1 or rear video camera on selectGM trucks and SUVs with power mirror controls at any time while driving. To force the front or rear camera while driving do the following1. Set the power mirror selection to off (both LED lights must be off on the power mirror switch). You can turn off the LED by pressing the button on the same side that the LED is currently lit.
Note: Turning off the mirror selection will prevent the mirrors from being adjusted while forcing the front/rear camera mode2. To force the Front camera mode, press and hold the Up arrow on the 4-way joystick until the video shows on the aftermarket radio. 3. To force the Rear camera mode, press and hold the Down arrow on the 4-way joystick until the video shows on the aftermarket radio. (If the vehicle is not equipped with a factory backup camera, an aftermarket backup camera can be installed and plugged into the DKGM-16W backup camera video harness)4. To turn Off forced camera mode, press and hold the 4-way joysTck Up arrow if in front camera mode or Down arrow if in rear camera mode. Wait until the video turns off on the afterermarket radio then release the 4-way joystick. 5. The reverse camera has priority over the front camera when driving the vehicle in reverse. ENABLING THE RSE
IR SYSTEM: To retain the use of the IR headphones with the factory overhead entertainment system you will need to connect a +12 volt switched accessory powe
Warranty & Returns
Warranty, Returns, And Additional Information
Warranty
- Please contact the Seller directly for warranty information. Warranty information may also be found on the Manufacturer's website.
- CONTACT
Return Policies
- Return for refund within: 30 days
- Return for replacement within: 30 days
- This item is covered by ApexDash Return Policy
Manufacturer Contact Info
- For a directory of all our manufacturers, please click below.
- Manufacturers Directory
LOADING...