
Bias lighting is the use of a peripheral backlight to enhance your monitor. A bias lighting setup typically takes the form of LED lighting strips or other lamps placed behind your desktop setup. These lighting peripherals come in specific color temperatures and ratings to help reduce the negative aspects of blue light from your monitor.
Setting up bias lighting is important because there’s a lot more to the visual experience than merely picking out the right monitor. If you haven’t considered the lighting around and behind your peripherals, then you haven’t truly optimized your viewing yet. (Yes, that’s true even if you have a top-of-the-line monitor!)
Bias lighting tricks the eyes into an easier, more pleasant viewing experience by manipulating the color temperature and other lighting variables. The truth is, every desktop setup benefits from a bias lighting setup that complements what you see on-screen by reducing bleed, enhancing contrast, and eliminating unnecessary glow.
Backlighting always looks cool, but with your display it can be a an eye-saver
The result is a better viewing experience that reduces eye strain and even enhances your monitor’s built-in backlight (and extends its lifespan).
It’s as simple as picking up a lighting kit or a few LED strips with the right color rating and installing them in the right spots around your gaming desktop rig.
We have the perfect Gaming Desk and Gaming Chair for you
What Are the Benefits of Well-Placed Bias Lighting?
Much of your viewing experience depends on the lighting around your desktop. Your monitor’s backlight doesn’t exist in a vacuum. It can only accomplish so much when the ambient lighting in the room is working against it.
#1: Bias Lighting Reduces Eye Strain
You can’t escape headaches, dry eyes, and eye fatigue by buying a fancier monitor. No matter how good your monitor is, you’re susceptible to eye strain when you use it for extended periods of gaming (or any use).
It’s well-known that direct blue light contributes to eye strain even more when the backdrop is dark or non-neutral, so working or playing in a dim room (or any room without neutral lighting behind the monitor) leads to eye strain symptoms.
Bias lighting reduces eye strain by dampening or neutralizing the brightness of direct blue light that comes from your monitor. The presence of a warm-temperature lighting strip behind your monitor provides a neutral backdrop for the cool light of the monitor, which alleviates stress on your eyes.
Bias or bust
#2: Bias Lighting Provides a Better Viewing Experience
Bias lighting literally changes the way you perceive the visuals on your screen, even if you think your monitor can’t get any better.
The presence of a neutral color reference point behind your desktop affects the way you perceive glow, light bleed, and contrast.
Bias lighting reduces bleed, negates glow, and improves contrast. The result is a picture that looks crisper, cleaner, and more color-accurate compared to the same monitor viewed in a dark room without a neutralizing source of light.
#3: Bias Lighting Extends Backlight Lifespan and Reduces Energy Expenditure
Bias lighting can help improve the lifespan of your monitor’s built-in backlight by reducing use at full power. The better your bias lighting setup, the less you’re likely to run your monitor at high brightness because it simply won’t be necessary to do so.
Fewer hours of high brightness leads to a longer lifespan for your monitor setup.
That aside, another perk of running your monitor at low brightness is reduced energy usage. Bias lighting is typically low-energy LED, so you won’t have to worry about the bias setup cutting into your energy savings. A lower bill and a lower carbon footprint await you when you set up the perfect bias lighting rig.
Smart Lights illuminate intelligently
How to Choose the Right Bias Lighting Setup
To pick the perfect bias lighting peripherals, you’ll need to have a basic understanding of the Kelvin color temperature range and the color rendering index score, both of which are used in these background lighting setups.
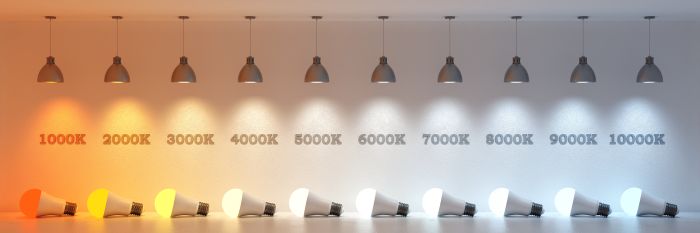
Kelvin Color Temperature for Bias Lighting
The Kelvin color temperature index is a way to describe the color and appearance of light. It starts at 1,000 Kelvin and goes all the way up to 10,000 Kelvin.
Amber is the color of her bias lighting
At the lower end of the scale, light appears warm red and transitions to warm yellow, warm white, neutral white, cool white, and finally cool blue at the high end of the scale.
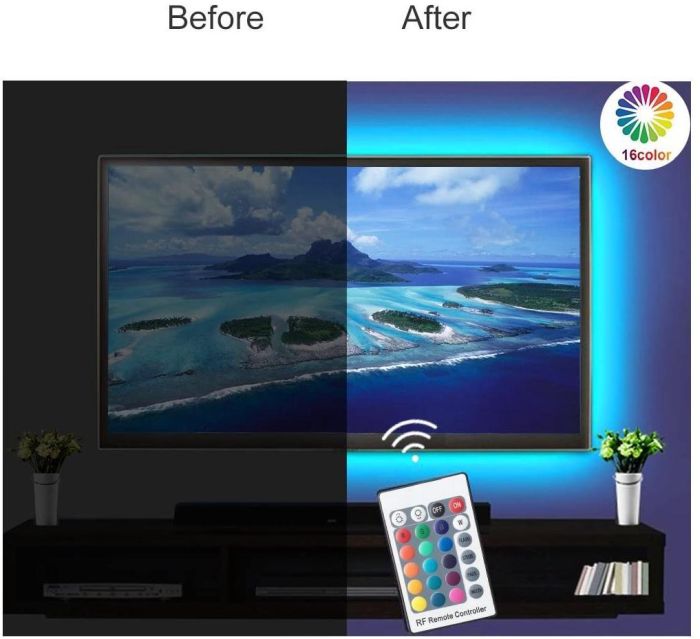
Your monitor primarily gives off light with a high Kelvin temperature—that is, cool white to blue light. This light is tough on your eyes, and when it’s not neutralized, it’s not ideal for media viewing and gaming. Looking at cool lighting in the dark leads to excessive perceived glow and poor contrast.
Bias lighting aims to bring the color temperature back to a neutral place by providing backlight at the other end of the spectrum. Bias lighting is typically a lower Kelvin temperature for warm red to yellow light.
When the warmth from your bias light collides with the coolness from your monitor backlight, you’ll end up with a light temperature somewhere in between. That means light that’s crisp, invigorating, and welcoming without being overbearing or causing excessive eye strain.
Color Rendering Index for Bias Lighting
The color rendering index (CRI) is a color quality metric that compares the actual color of an object with the way it looks under artificial (usually LED) lighting.
This metric is often used to score LED lamps and other lighting peripherals used for bias lighting.
The CRI is an objective way to measure how close a light source comes to reflecting natural color at 100%.
When shopping for bias lighting, aim for a CRI score of 90 or higher for lighting that has a quality close to natural light. Lights with a CRI score over 90 are considered high CRI lights.
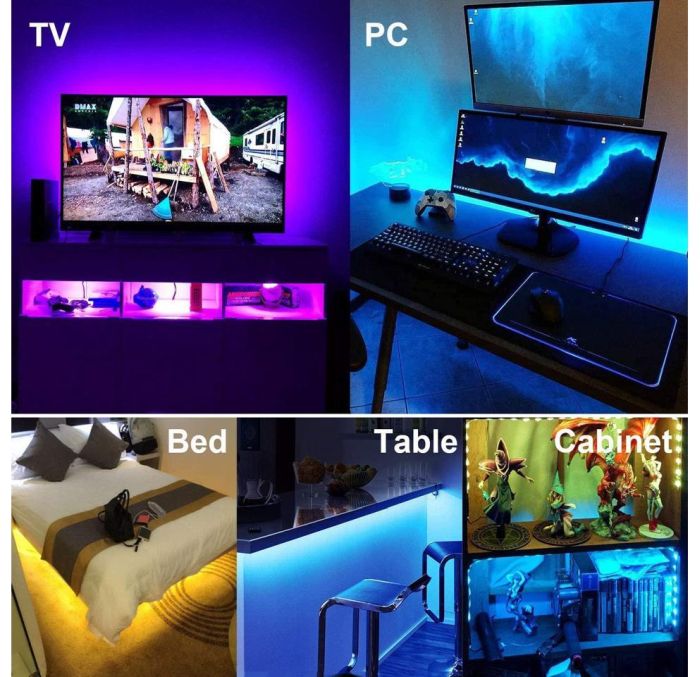
Examples of Bias Lighting for DIY
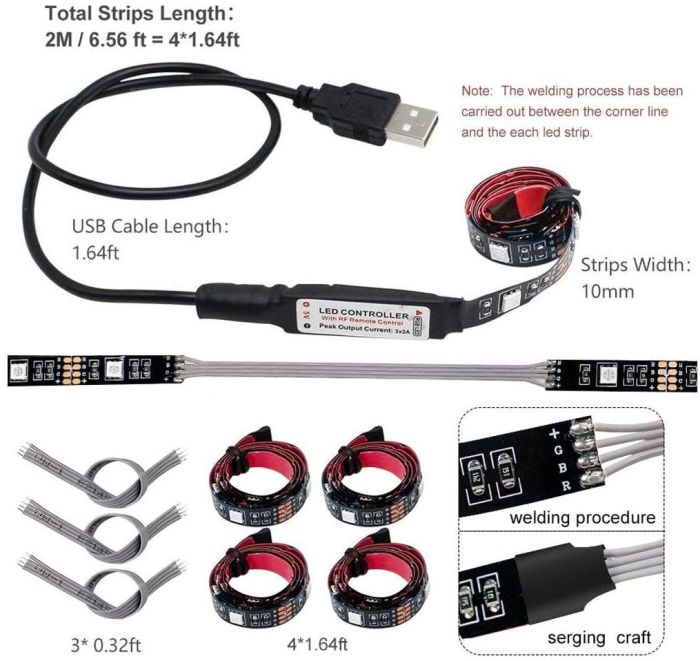
Many bias lighting setups come in the form of a ready-to-install kit. These have the benefit of requiring essentially no thought or pre-planning to get started. All you do is choose your bias lighting kit and follow the directions that come with it to install the included lighting hardware.
However, you don’t have to go with a kit if you’re a DIY type. At its heart, bias lighting can come from any source of light that’s the right color temperature and CRI score to offset your monitor.
You can DIY your own bias lighting setup by purchasing the peripherals in the right color wavelength and installing them behind your monitor.
Almost as smart as Night Rider’s car
Search Furniture for your gaming room or office needs
Where to Install Bias Lighting
The location where you install bias lighting matters almost as much as the Kelvin temperature and CRI score of the light!
If you buy a kit, the instructions will guide you on where to install it.
If you’re installing your own light peripherals, you should install lighting directly behind the monitor about 2 inches inward from the edge of the display, spanning the perimeter of the monitor if you’re using trimmable LED strips.
If you’re using a clamp lamp or anything that can’t attach directly to the back of the monitor, then install it close to the center of the monitor, directly behind it.
Popular on Newegg
- Corn Electronics 14.3 Ft. LED Strip Lights
- LightingWill LED TV Backlights
- View all Bias Lighting Kits
Final Considerations for Your Bias Lighting Setup
One thing’s for certain: bias lighting is a critical part of getting the most out of your computer monitor. Whether you’re a casual or pro gamer, you want to: a) protect your eyes from strain, and b) get the best possible viewing experience. No matter what monitor you have or how much time you spend in front of it, make bias lighting your next upgrade and you won’t regret it.
Find everything you need for gaming and more at Newegg